

A pfSense site to site VPN connects two offices (or your home lab and a server somewhere) so devices on both LANs can reach each other as if they were on one network. On pfSense the standard way is IPsec: a Phase 1 entry on each firewall to build the tunnel, a Phase 2 entry for the subnets, and one firewall rule on the IPsec tab. You set up the same few entries on both firewalls.
The Short Version
- Make sure the two LANs use different subnets (for example 192.168.1.0/24 and 192.168.2.0/24).
- On both firewalls: VPN, IPsec, Add P1. Remote Gateway is the other side’s WAN IP, same pre-shared key on both.
- Add a Phase 2 with your LAN as Local Network and the other LAN as Remote Network.
- Firewall, Rules, IPsec: allow traffic from the remote subnet.
- Check Status, IPsec and ping a host on the other side.
👀 This Tutorial has some related Articles!
👉 The Complete pfSense Fundamentals Bootcamp
👉 Install pfSense from USB – The Complete Guide
👉 Install pfSense on VirtualBox
👉 The Complete pfSense OpenVPN Guide
👉 The Complete pfSense DMZ Guide
👉 Generate SSL Certificates for HTTPS with pfSense
👉 The Complete pfSense Squid Proxy Guide (with ClamAV!)
👉 pfSense Site-to-Site VPN Guide
👉 pfSense Domain Overrides Made Easy
👉 pfSense Strict NAT (PS4,PS5,Xbox,PC) Solution
👉 The Best pfSense Hardware
👉 Traffic Shaping VOIP with pfSense
👉 pfSense OpenVPN on Linux – Setup Guide
👉 pfSense Firewall Rule Aliases Explained
👉 Email Notifications with pfSense
👉 pfSense DNS Server Guide
The Scenario: pfSense Site to Site VPN
I try to keep this example scenario as simple as possible, therefore I created an easy-to-understand, self-explaining diagram.
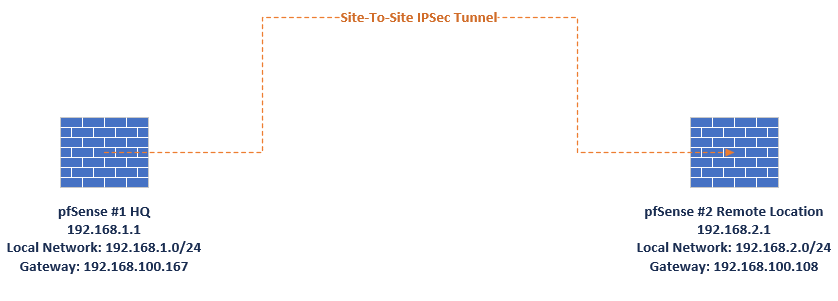
This should give you a pretty good understanding of what we want to achieve. We simply want to establish a pfSense site-to-site VPN connection between pfSense #1 HQ and pfSense #2 Remote Location. To do this, we need to create IPSec tunnels and firewall rules on both sides. I kept the subnets simple so you don’t get confused by too many different IPs. The Gateway in your case would be your WAN IP Address.
Settings Both Sides Must Agree On
Most broken tunnels come down to one side using a different value than the other. Pick these before you touch either firewall and use them on both. They follow Netgate’s current recommendations:
| Setting | Phase 1 | Phase 2 |
|---|---|---|
| Key Exchange version | IKEv2 | |
| Authentication | Mutual PSK (same key on both sides) | |
| Encryption | AES, 256 bits | AES256-GCM, or AES 256 |
| Hash | SHA256 | None with GCM, otherwise SHA256 |
| DH / PFS group | 14 (2048 bit) | 14 (2048 bit) |
| Lifetime | 28800 seconds | 3600 seconds |
The steps below use PFS group 15 instead of 14. That works too. What matters is that both firewalls use the same group.
The screenshots are from an older pfSense release. The field names haven’t changed, but current pfSense CE and pfSense Plus add a few options, like Child SA Start Action and Child SA Close Action. Leave them on default for a basic tunnel. If you want one side to only answer and never start the tunnel, set Child SA Start Action to “None (Responder Only)” on that side.
Step 1 – Creating IPSec Phase 1 on pfSense #1 HQ
To create a pfSense site-to-site VPN, you need to log in to your pfSense #1 HQ and navigate to VPN / IPsec and click on + Add P1. Set the address of the Remote Gateway and a Description.
- IP of your WAN Interface on your pfSense #2 Remote Location
- Enter a Description

Scroll down to Phase 1 Proposal (Authentication). Now head to any page you like, or this one, to create a Pre-Shared Key.
You can also use the tool pwgen on Linux with the following command to create a key:
pwgen -sy 25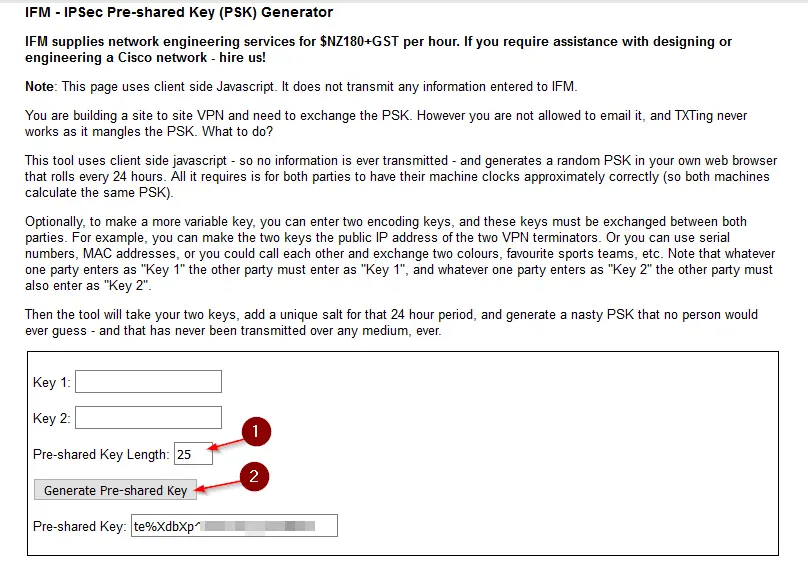
Copy this key and paste it into the Pre-Shared Key field.
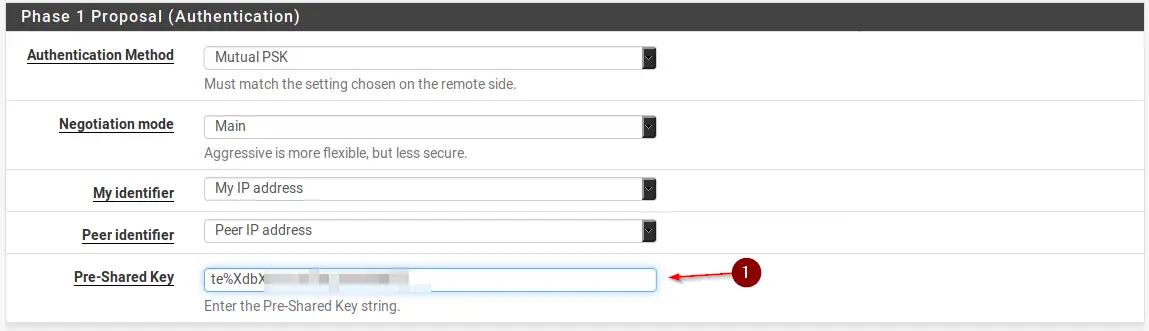
Before you save, check the Phase 1 Proposal section against the table above: IKEv2, AES 256 bits, SHA256, DH group 14. Then scroll down, click Save, and click Apply Changes.
Step 2 – Creating IPSec Phase 2 on pfSense #1 HQ
Time to create the second Phase. Click on + Show Phase 2 Entries and click on + Add P2.
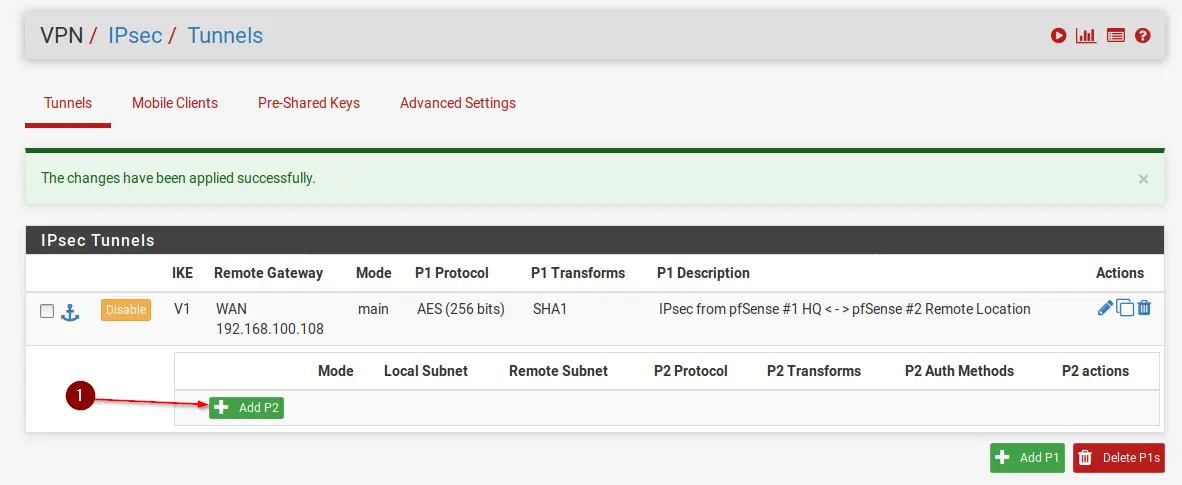
Now enter values like in the following example:
- On Local network choose Network
- Enter the Subnet of your Local Network (192.168.1.0/24 for pfSense #1 HQ)
- On Remote Network choose Network
- Enter the Subnet of your Remote Network (192.168.2.0/24 for pfSense #2 Remote Location)
Enter a description if you want.
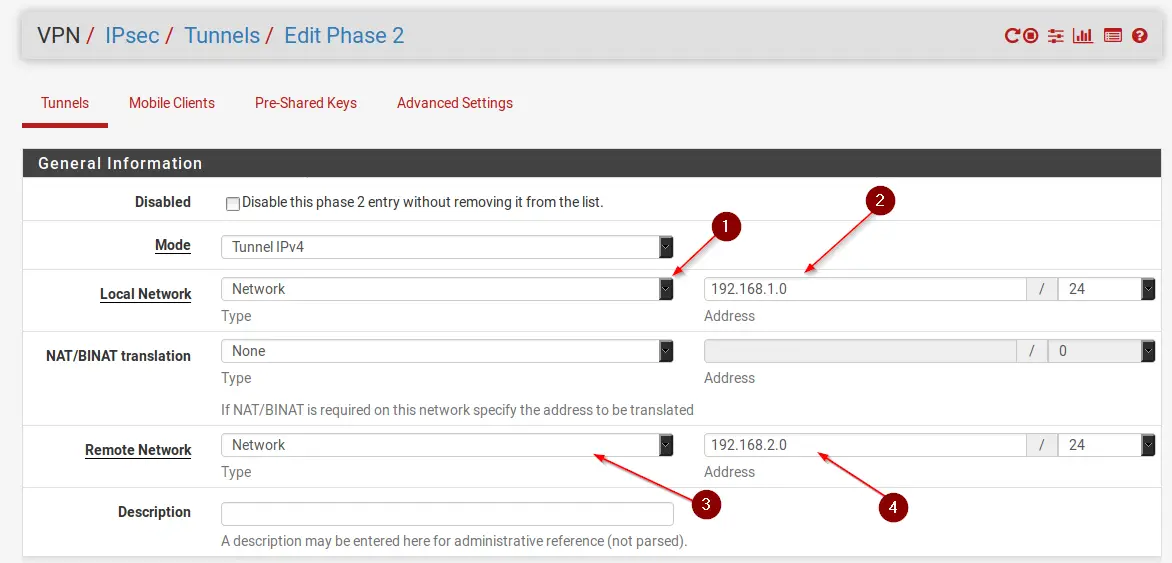
Scroll down to Phase 2 Proposal (SA/Key Exchange). Enter values like in the following example:
- Change AES Encryption to 256 bits
- Change PFS key group to 15 (3072 bit)
- Enter the pfSense #2 Remote Location’s IP Address to be pinged automatically (this ensures that the tunnel stays active at all times)
- Smash that Save button (Sorry, watched too many YouTube videos)
- Hit Apply Changes
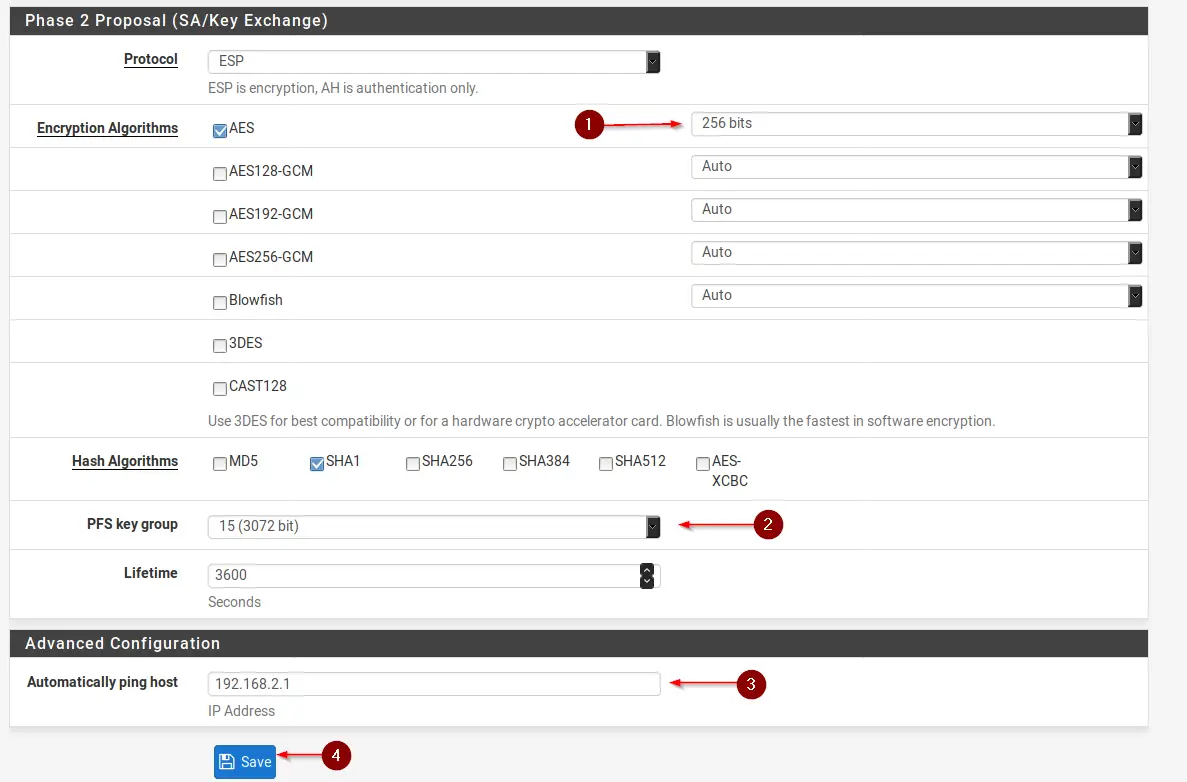
Almost done with pfSense #1, now we just need to create a Firewall Rule for the IPsec interface.
Step 3 – Creating a Firewall Rule on pfSense #1 HQ
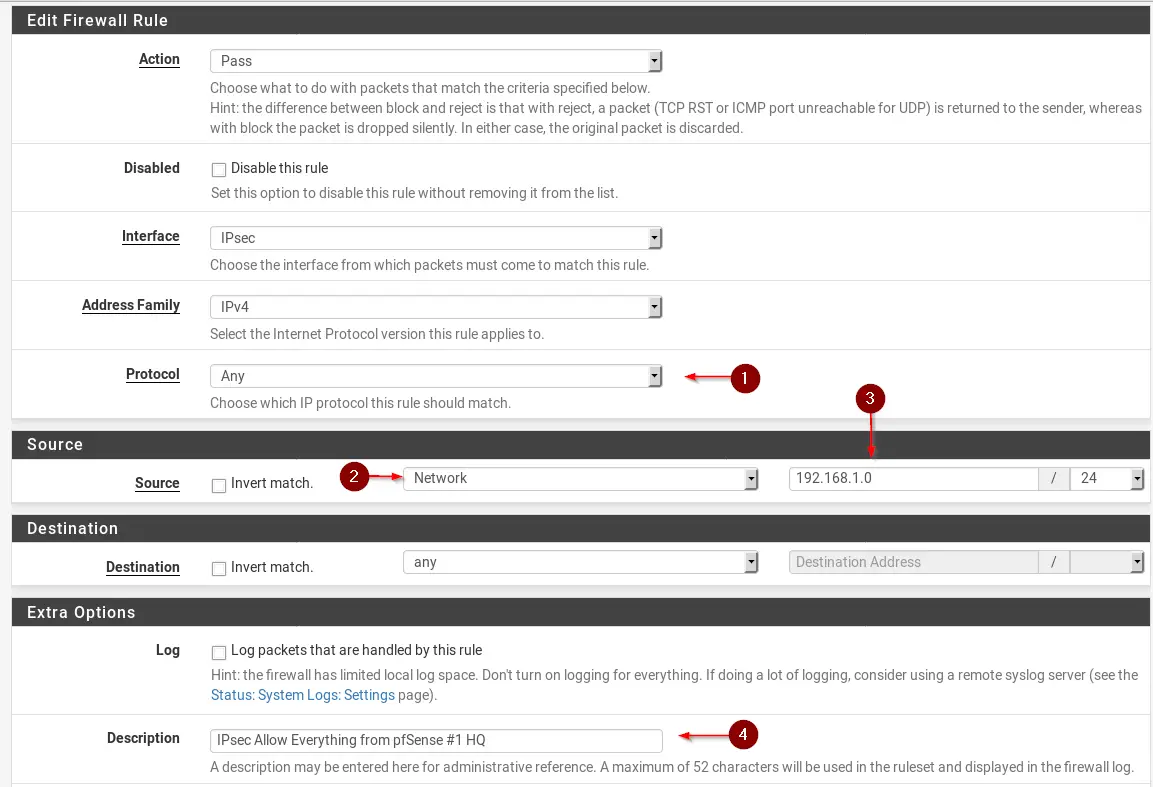
Navigate to Firewall / Rules / IPsec. Click on Add. Enter values as the following:
- Change Protocol to Any
- For Source select Network
- Enter the Subnet of pfSense #2 Remote Location (192.168.2.0/24)
- Enter a Description
- Hit Save & Apply Changes
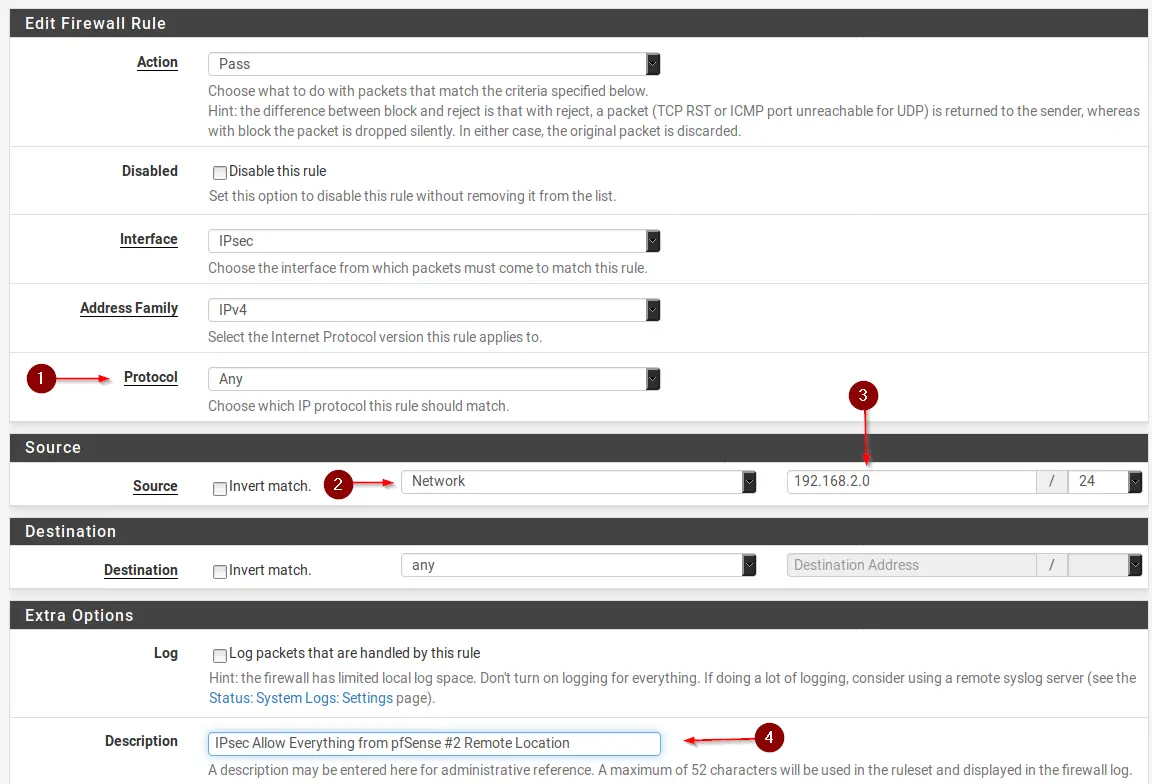
That’s it. We are done with pfSense #1 HQ, let’s head over to pfSense #2 Remote Location to create our pfSense site-to-site VPN.
Step 4 – Creating IPSec Phase 1 on pfSense #2 Remote Location
Now we basically need to repeat those exact steps again just with slightly changed values. I will guide you through every step anyway. Navigate to VPN / IPsec and click on + Add P1. Enter values as in the following:
- IP of your WAN Interface on your pfSense #1 HQ
- Enter a Description
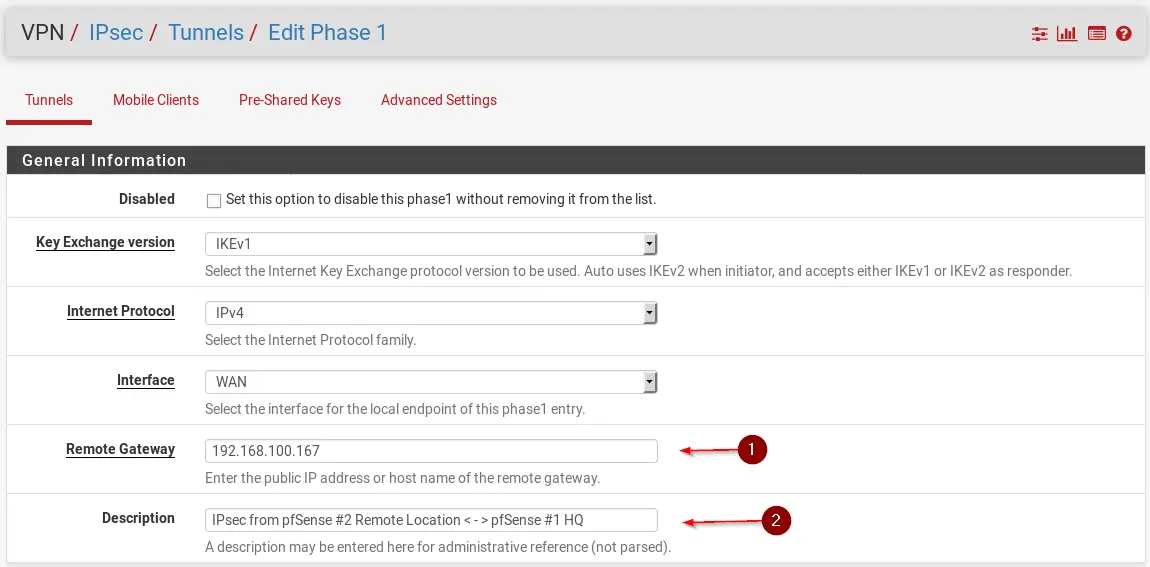
Scroll down to Phase 1 Proposal (Authentication). Enter the same Pre-Shared Key like in pfSense #1 HQ that we created in Step 1.
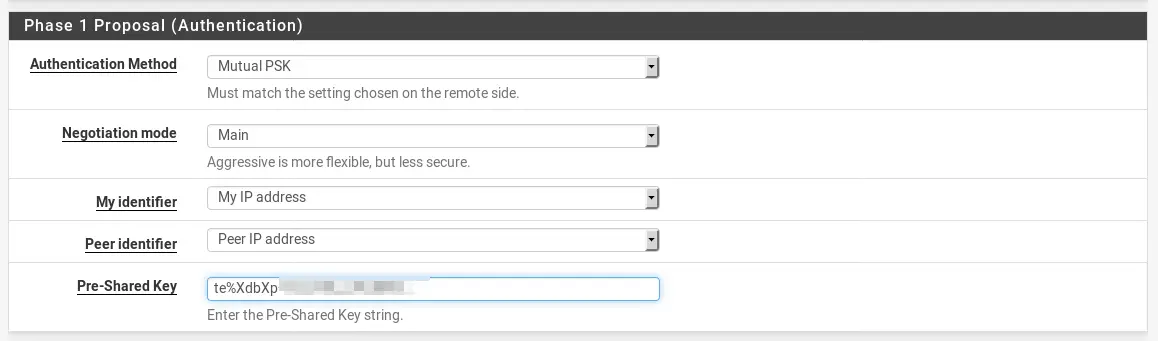
Scroll to the bottom and hit Save & Apply Changes.
⚠️ If you would like to learn more about pfSense, I highly recommend you check out my pfSense Fundamentals Bootcamp over at Udemy. This is the most up-to-date as well as the highest-rated pfSense course on Udemy.
Step 5 – Creating IPSec Phase 2 on pfSense #2 Remote Location
Once again, click on +Show Phase 2 Entries and click on + Add P2.
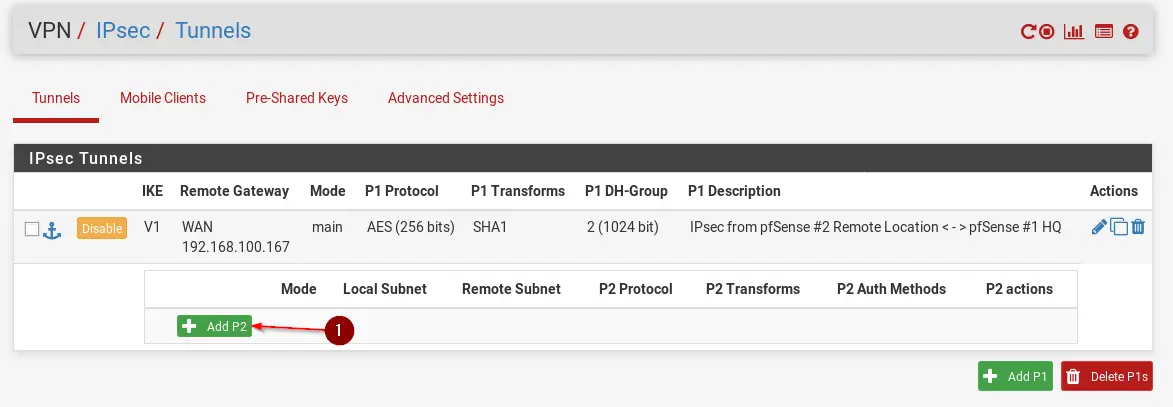
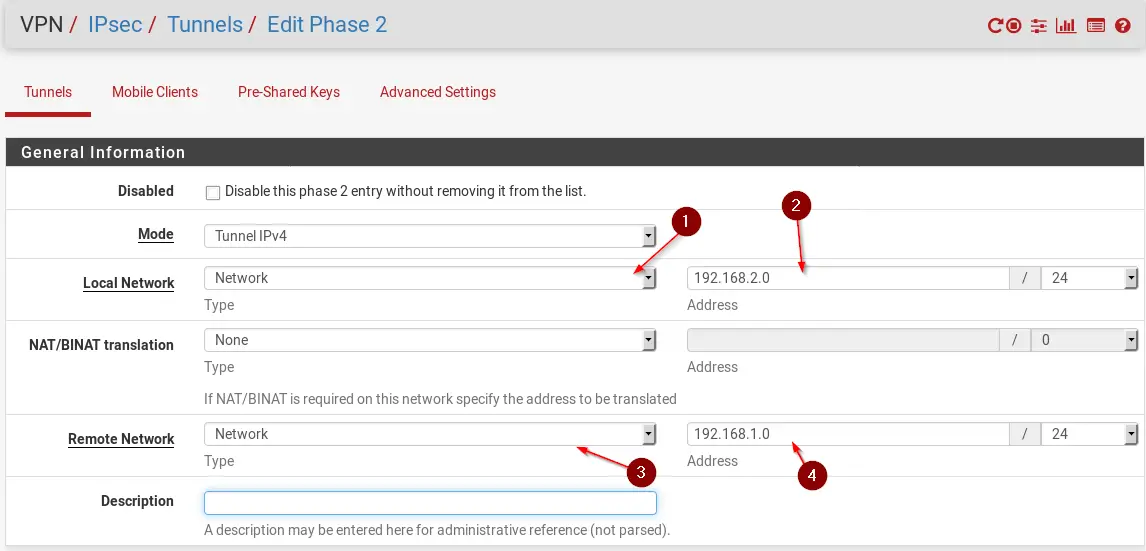
Now enter values like in the following example:
- On Local network choose Network
- Enter the Subnet of your Local Network (192.168.2.0/24 for pfSense #2 Remote Location)
- On Remote Network choose Network
- Enter the Subnet of your Remote Network (192.168.1.0/24 for pfSense #1 HQ)
Enter a description if you want.
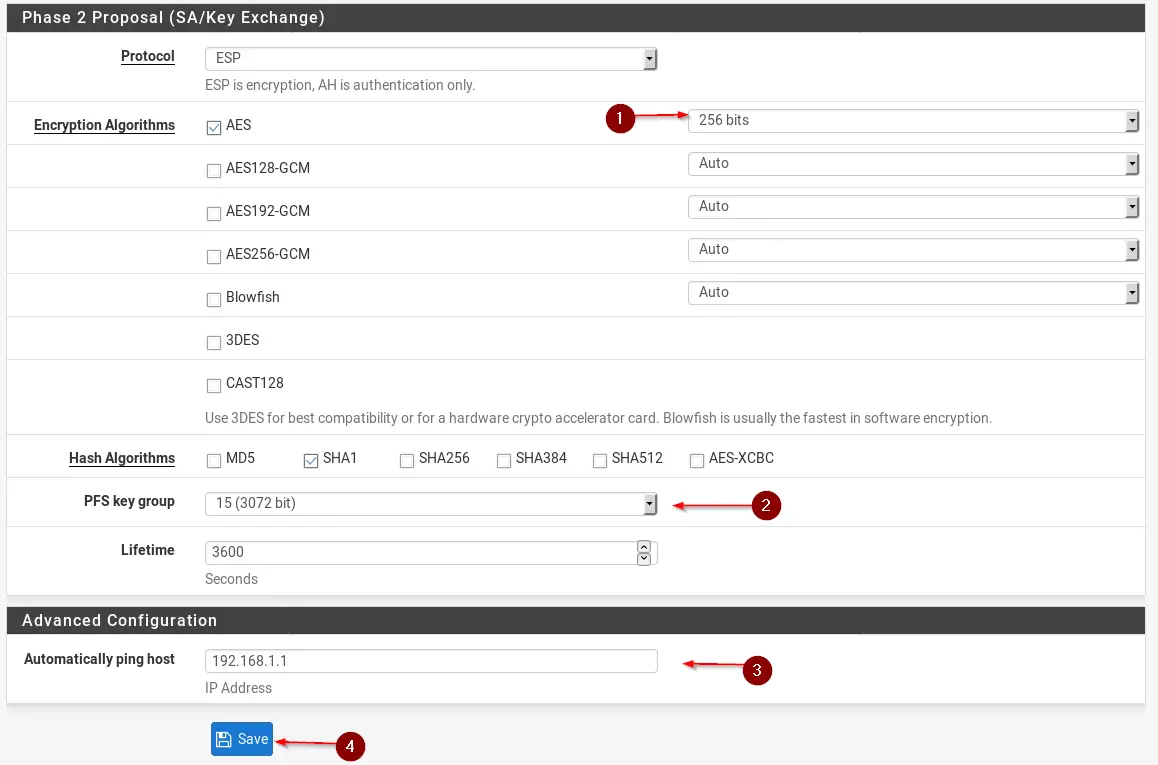
Scroll down to Phase 2 Proposal (SA/Key Exchange) and enter the values like below.
- Change AES Encryption to 256 bits
- Change PFS key group to 15 (3072 bit)
- Enter the pfSense #1 HQ’s IP Address to be pinged automatically (this ensures that the tunnel stays active at all times)
- Hit Save & Apply Changes.
Step 6 – Creating a Firewall Rule on pfSense #2 Remote Location
Navigate to Firewall / Rules / IPsec. Click on Add. Enter values as the following:
- Change Protocol to Any
- For Source select Network
- Enter the Subnet of pfSense #1 HQ (192.168.1.0/24)
- Enter a Description
- Hit Save & Apply Changes
Now, in theory, a tunnel should be established between the two.
Step 7 – Testing the Tunnel
Back on pfSense #1 HQ head to Status / IPsec. You should see, if everything went well, that a connection is established.
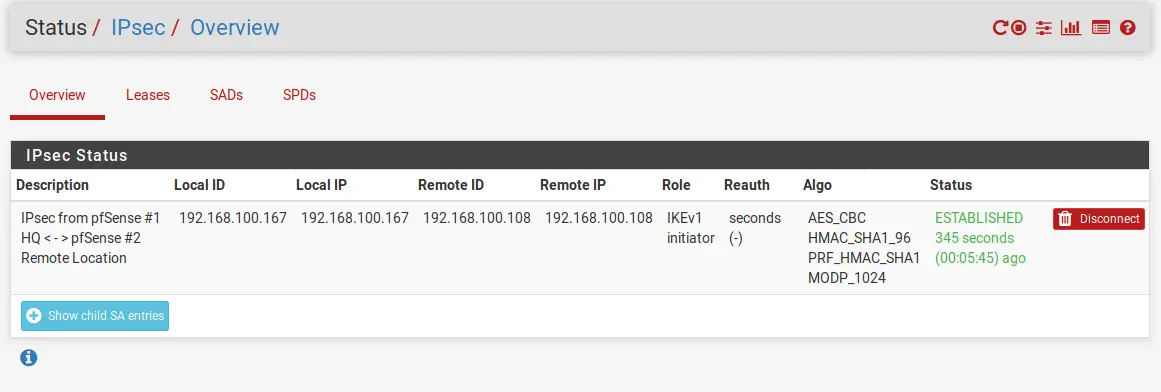
You will see a similar picture on pfSense #2 Remote Location. We can do two more things to also validate if the firewall rules are correct: Running a Ping from a Client on each Firewall’s Subnet.
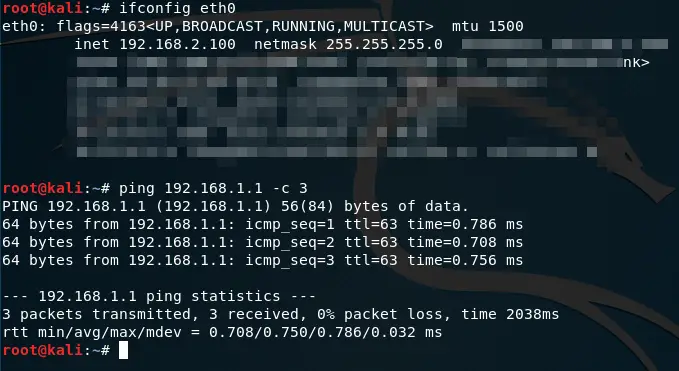
First I will try to Ping pfSense #1 HQ from a Client connected to pfSense #2 Remote Location.
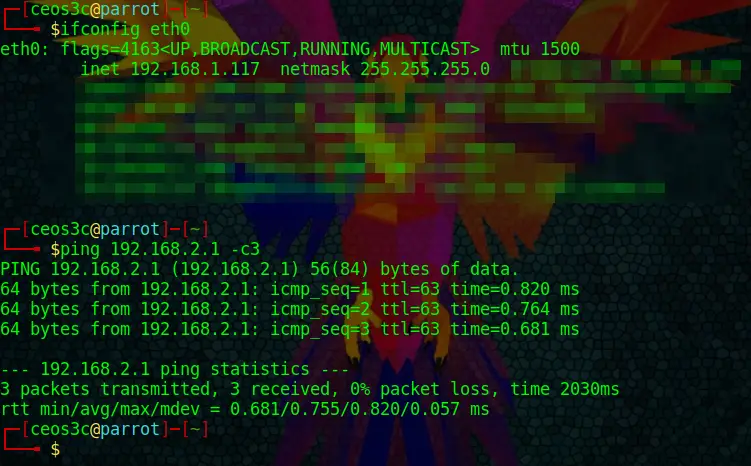
And now I run a Ping from a client connected to pfSense #1 HQ to pfSense #2 Remote Location.
Troubleshooting: pfSense Site to Site VPN Not Connecting
Your first stop is always Status, System Logs, IPsec on both firewalls. The log usually tells you which phase failed. Here’s what each symptom normally means:
| Symptom | Likely cause | Fix |
|---|---|---|
| Phase 1 never comes up | Different pre-shared key, IKE version or Phase 1 proposal | Compare both P1 entries field by field. Re-paste the key on both sides |
| Log shows “NO_PROPOSAL_CHOSEN” | Encryption, hash or DH group don’t match | Make both sides match the settings table |
| Phase 1 up, Phase 2 down | Local and Remote Network are not mirrored | Side A’s Local Network must be Side B’s Remote Network, and the other way round |
| Tunnel up, no traffic | No rule on the IPsec tab | Add the Firewall, Rules, IPsec rule on both sides |
| You can ping the firewall but not PCs behind it | The PC’s own firewall blocks other subnets | Allow the remote subnet on the host. Windows Firewall often blocks ping from other subnets by default |
| Nothing reaches the other side at all | UDP 500/4500 or ESP blocked upstream | Check ISP router port forwarding. Make sure “Disable all auto-added VPN rules” is off under System, Advanced, Firewall & NAT |
| Tunnel works, then drops every few hours | Lifetime or dead peer detection mismatch | Match lifetimes on both sides, or set the responder side about 10 percent higher |
One more that catches people: both LANs on 192.168.1.0/24. Two sites with the same subnet can’t route to each other over a plain tunnel. Change one LAN, it’s far less pain than NAT workarounds.
IPsec vs WireGuard vs OpenVPN for Site to Site
IPsec isn’t the only option on pfSense. Here’s how I’d choose:
| IPsec | WireGuard | OpenVPN | |
|---|---|---|---|
| Built in | Yes | Package (Package Manager) | Yes |
| Works with other vendors | Yes. Fortinet, Cisco, cloud VPN gateways | Only other WireGuard peers | Only other OpenVPN endpoints |
| Setup effort | Medium. Many matching fields | Low. Keys and peers | Medium. Certificates |
| Speed | Fast, especially with AES-NI | Fast | Slower |
| Pick it when | The other end isn’t pfSense, or you want the standard | Both ends run pfSense or Linux and you want simple | You need TCP or a restrictive network in between |
My default is still IPsec for site to site, because it talks to everything. If you’d rather go the OpenVPN route, I covered it in the pfSense OpenVPN guide.
FAQ
Do both sites need a static public IP?
It makes life easier. If one side has a dynamic IP, use a dynamic DNS hostname as the Remote Gateway on the other side, and consider making the dynamic side the one that starts the tunnel.
Can pfSense be behind another router for an IPsec tunnel?
Yes. pfSense uses NAT traversal automatically. Forward UDP 500 and UDP 4500 from the upstream router to pfSense’s WAN.
Can I connect more than two sites?
Yes. Add one Phase 1 per remote site on the main firewall, each with its own Phase 2 entries. For several WAN links on one box, see my pfSense multi-WAN guide.
Conclusion
Both pings go through, so the tunnel is up and the rules are right. That’s a working pfSense site to site VPN. Keep the settings table handy, because the next time a tunnel breaks, it’s almost always a mismatch between the two sides.
👀 This Tutorial has some related Articles!
👉 The Complete pfSense Fundamentals Bootcamp
👉 Install pfSense from USB – The Complete Guide
👉 Install pfSense on VirtualBox
👉 The Complete pfSense OpenVPN Guide
👉 The Complete pfSense DMZ Guide
👉 Generate SSL Certificates for HTTPS with pfSense
👉 The Complete pfSense Squid Proxy Guide (with ClamAV!)
👉 pfSense Site-to-Site VPN Guide
👉 pfSense Domain Overrides Made Easy
👉 pfSense Strict NAT (PS4,PS5,Xbox,PC) Solution
👉 The Best pfSense Hardware
👉 Traffic Shaping VOIP with pfSense
👉 pfSense OpenVPN on Linux – Setup Guide
👉 pfSense Firewall Rule Aliases Explained
👉 Email Notifications with pfSense
👉 pfSense DNS Server Guide
hey man, need your help
i have configured pfsense vpn/ipsec tunnel. ill explain my topology below and then tell you what i have done with pfsenses.
i have two networks
nat1->pfsense1->router1->mls1->pc1
nat2->pfsense2->router2->mls2->pc2
pfsense1-> wan=192.168.122.70 lan 192.1682.2
router e0/0 connected to pfsense1= 192.168.2.1 e0/1 connected to mls1 =192.168.10.1
mls1 e0/0 connected to router1 192.168.10.2 mls vlan 30 192.168.30.1
pc1 192.168.30.30 all /24
pfsense2 wan= 192.168.122.25 lan 192.168.3.3
router2 e0/0 connected to pfsense2 192.168.3.1 e0/1 connected to mls 2 192.168.20.1
mls2 e0/0 connected to router2 192.168.20.2 mls2 vlan 40 192.168.40.1
pc2 192.168.40.40 all /24
in my pfsense1-> vpn->ipsec->tunnel i have
remote gateway 192.168.122.25 and AES 256bits SHA256 DH Group 14 (2048) and lifetime 3600
and phase2
local network 192.168.30.0 /24, remote network 192.168.40.0 /24
firewall->rules->wan i have protocol any, source any, destination any
another protocol tcp, source any, destination any and destination port IPsec NAT-T (4500)
another protocol ESP, source any and destination any
and another protocol UDP, source any, destination this firewall (self) and the destination port ISAKMP(500)
firewall->rules->lan
protocol any, source network 192.168.2.0 /24, destination any
another protocol any, source network 192.168.30.0 /24 and destination any
another protocol any, source 192.168.10.0 /24 and destination any
firewall->rules->IPsec
protocol any, source network 192.168.30.0 /24 and source network 192.168.40.0 /24
another protocol any, source any, destination any
Pfsense2
in my pfsense2-> vpn->ipsec->tunnel i have
remote gateway 192.168.122.70 and AES 256bits SHA256 DH Group 14 (2048) and lifetime 3600
in phase2
local network 192.168.40.0 /24, remote network 192.168.30.0 /24
firewall->rules->wan i have protocol any, source any, destination any
another protocol tcp, source any, destination any and destination port IPsec NAT-T (4500)
another protocol ESP, source any and destination any
and another protocol UDP, source any, destination this firewall (self) and the destination port ISAKMP(500)
firewall->rules->lan
protocol any, source network 192.168.3.0 /24, destination any
another protocol any, source network 192.168.40.0 /24 and destination any
another protocol any, source network 192.168.20.0 /24 and destination any
firewall->rules->IPsec
protocol any, source network 192.168.40.0 /24 and source network 192.168.30.0 /24
another protocol any, source any, destination any
I want to know how to JOIN an IPsec Site to Site VPN with my PFsense, not create one. Where do I go to read about that?
I tried as you mention above but i am not able to connect with this method.
Same situation too :c I only see the gateway but i cant see my PC on the other site, can you resolve this?
Hi, greate guide. works nice but i got problem with routing, i can reach the gateway on both sites but nothing els behind.
Hi! I used to do this with “tunnel gre” protocol, and work so fine… I have 2 clients, with office (Miami-Caracas), but actually I dont know how tu applie QoS over tunnel gre…
You are awesome thank you for this guide ❤