
In this pfSense VirtualBox tutorial, I will show you how to install pfSense on VirtualBox. VirtualBox is a free virtual machine software that allows you to install pfSense as a virtual instance. We’ll guide you through each step.
For the latest pfSense tutorials, make sure to check out the pfSense Category!
Table of Contents
- Can you install pfSense on a Virtual Machine?
- What is VirtualBox?
- Install pfSense on VirtualBox
- Requirements
- Part 1: Downloading & Unzipping the pfSense ISO file
- Part 2: Creating a VM in VirtualBox
- Part 3: Install pfSense on VirtualBox
- Part 4: Initial Configuration
- FAQ
- Conclusion
Can you install pfSense on a Virtual Machine?
This is probably the first question you ask yourself when you first look into this topic. The answer is: Yes, you can install pfSense on a virtual machine. pfSense can be installed, to our knowledge, on the following hypervisors:
- Oracle VirtualBox
- VMWare Workstation & Player
- VMWare ESXi
- XenServer
The choice here is entirely yours. If this is your first time installing pfSense, VirtualBox is a great choice since it’s completely free and works really well.
Can pfSense be virtualized?
Yes. You can virtualize your pfSense firewall and run it entirely as a virtual machine. This can be achieved if you have multiple network interfaces available on your hypervisor or if you use VLANs and trunking.
What is VirtualBox?
For those of you new to this, just a quick overview of what VirtualBox actually is. VirtualBox is a powerful software tool that allows users to create virtual machines on their computers. These virtual machines allow you to run different operating systems or environments, such as Windows, Linux, or Android, in an isolated environment directly on your current operating system.
This allows you to easily test new software or try out different configurations without affecting your main system. Additionally, VirtualBox can be used for secure remote access to computers and servers when working with other systems remotely. Whether you are looking to try out new software or gain more control over your computing experience, VirtualBox offers the perfect solution.
Install pfSense on VirtualBox
To install pfSense on VirtualBox, make sure you first fulfill all the requirements below before starting with Part 1.
Requirements
So make sure you have the following prepared:
- VirtualBox – Download the latest version of VirtualBox and install it, leaving everything as default.
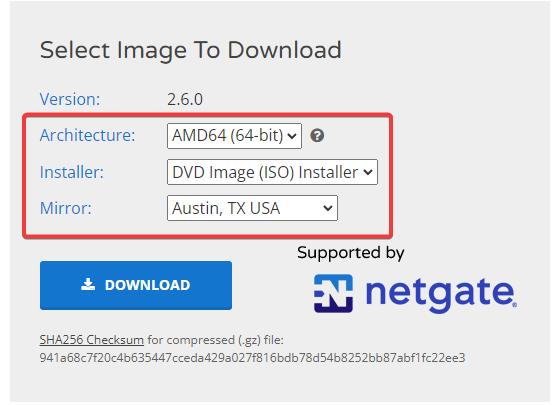
- pfSense ISO Image – Download the latest version of pfSense (Select AMD64 and ISO Image!).
- 7-Zip – To extract the pfSense ISO file.
⚠️ If you would like to learn more about pfSense, I highly recommend you check out my pfSense Fundamentals Bootcamp over at Udemy. This is the most up-to-date as well as the highest-rated pfSense course on Udemy.
Part 1: Downloading & Unzipping the pfSense ISO file
First off, download the pfSense ISO image file. Once downloaded, make sure you have 7-Zip installed. Head to your Downloads folder and right-click the pfSense-amd64.iso.gz file.
Now choose 7-Zip (if you are on Windows 11, you have to select Show More Options first!) and select Extract Here.
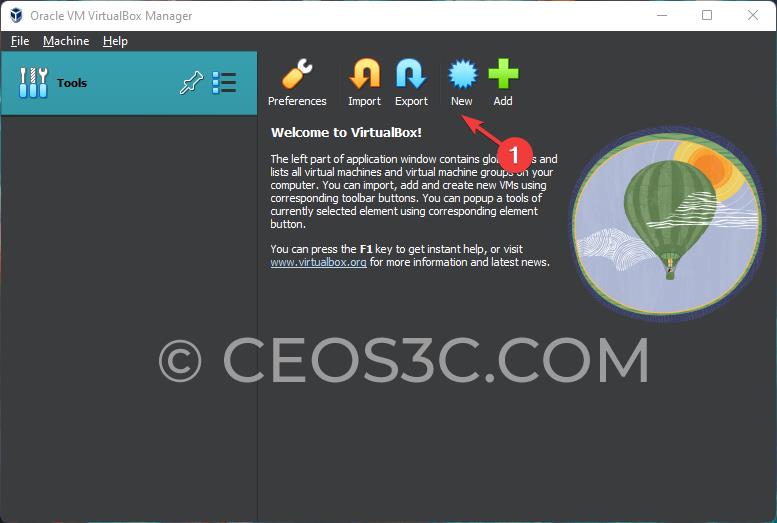
Part 2: Creating a VM in VirtualBox
Start up VirtualBox and click on New.
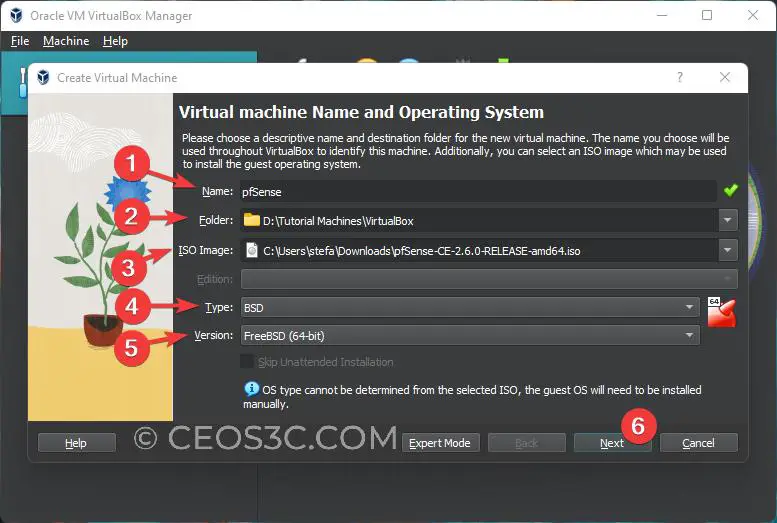
Setting Up Installation Parameters
Now we need to set up a few things:
- Choose a name for your VM (pfSense is good!).
- Choose a location on your physical hard disk where you want to store the VM.
- Select the unzipped pfSense.amd64.iso file from your Downloads folder.
- As Type, choose BSD (pfSense’s underlying Linux kernel).
- As Version, choose FreeBSD (64-bit).
- Click on Next to continue.
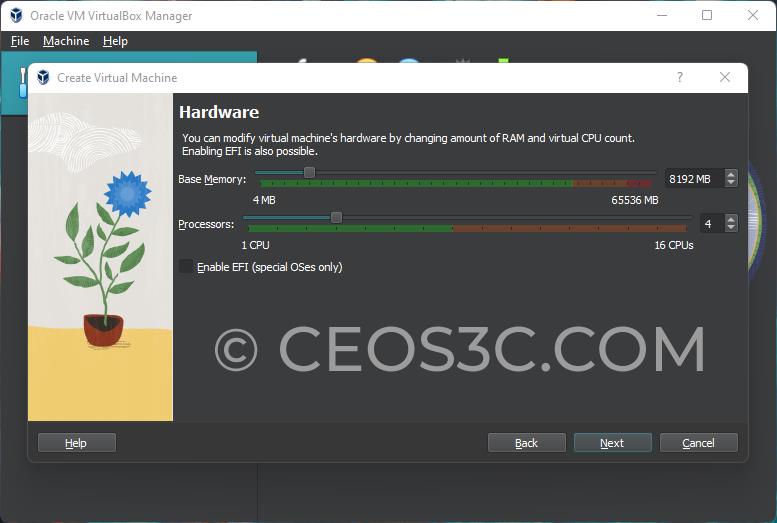
Hardware Settings
The hardware settings are your personal preference. Just make sure to adhere to pfSense’s minimum hardware requirements. You should assign at least 1024 MB of memory and 1 CPU. We will assign a little bit more:
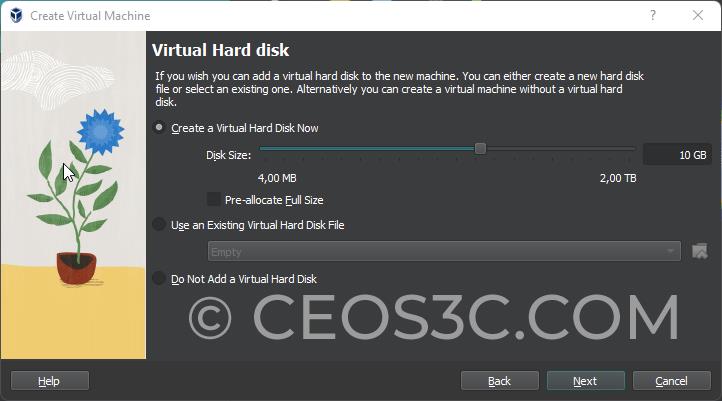
Next, we need to set up the Virtual Hard Disk. 10 GB is sufficient for pfSense. If you plan to install a lot of packages, choose more:
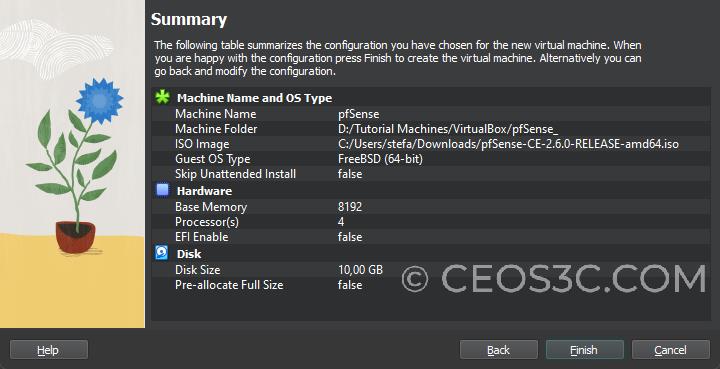
In the final screen, make sure everything is according to your preferences and click on Finish:
Network Interfaces
Since we want to install a firewall, it will come in handy to have multiple network interfaces to play around with. One of these interfaces will serve as our WAN interface, providing us with a working internet connection.
To set up network interfaces, make sure your pfSense VM is selected and click on Settings in VirtualBox. Once inside of the settings, click on the Network tab. Here, use the following settings:
- Adapter 1:
- ☑️ Enable Network Adapter
- Attached to: NAT
- Adapter 2:
- ☑️ Enable Network Adapter
- Attached to: Internal Network
- Name: intnet
- Adapter 3:
- ☑️ Enable Network Adapter
- Attached to: Internal Network
- Name: intnet
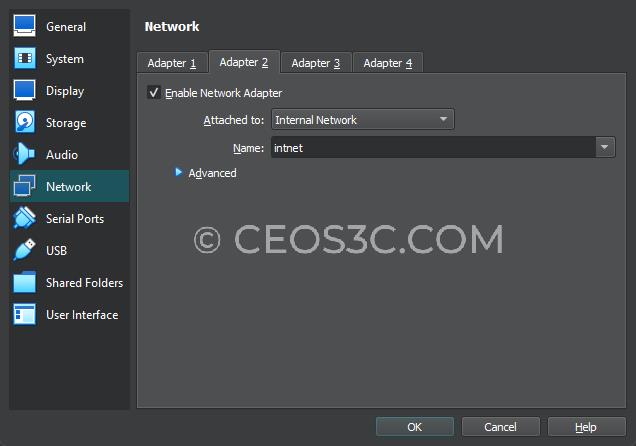

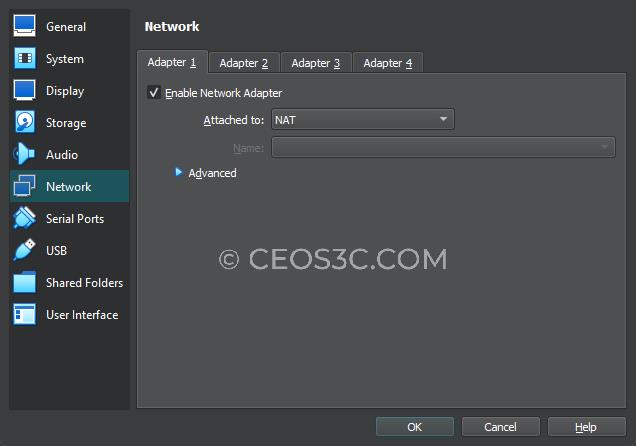
With this setup, Adapter 1 will be our WAN adapter, Adapter 2 will be our LAN adapter, and Adapter 3 will be our OPT adapter.
Click on OK to save and proceed.
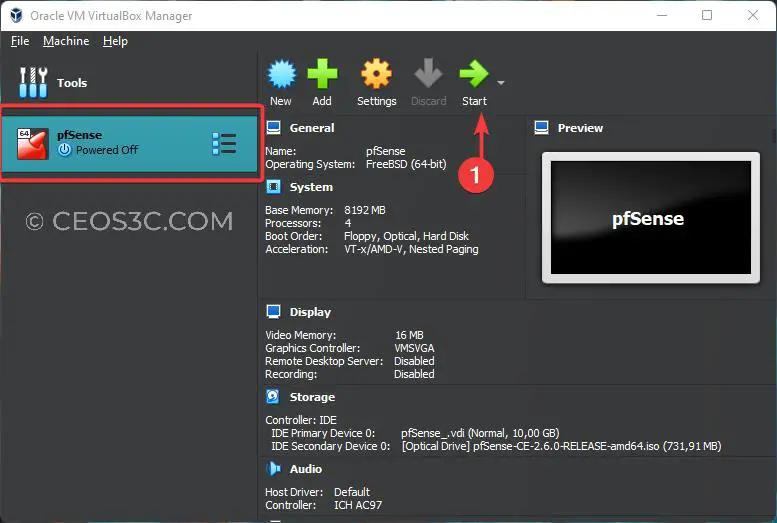
Part 3: Install pfSense on VirtualBox
Now we are ready to install pfSense on VirtualBox. To get started, click on Start while your pfSense VM is selected:
This will start the pfSense installer. You do not need to press anything on the first screen where the countdown timer is running down. Just wait for the installation to start.
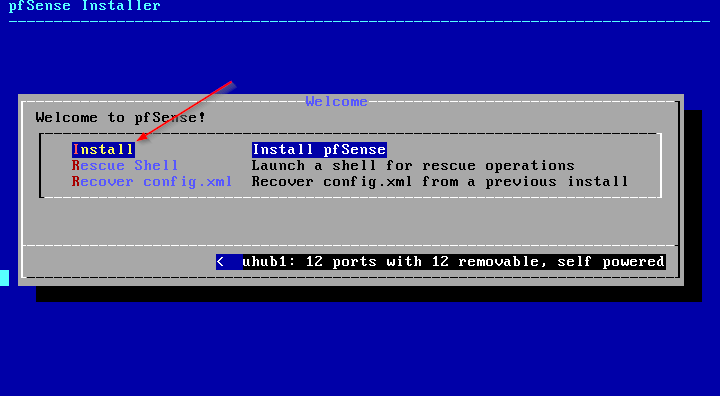
On the first screen, click on Accept to accept the copyright and distribution notice.
Note: If VirtualBox “Captures” your mouse, press your right control key to release it again.
After accepting, choose Install pfSense.
Now choose a Keymap of your flavor and hit Enter.
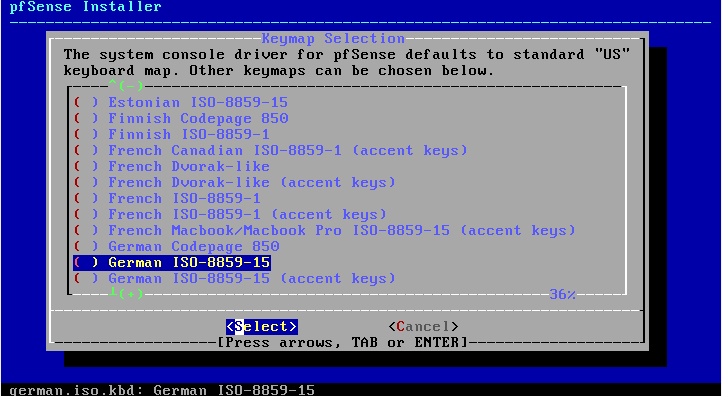
Select Continue with <YourKeyMap> and hit Enter again.
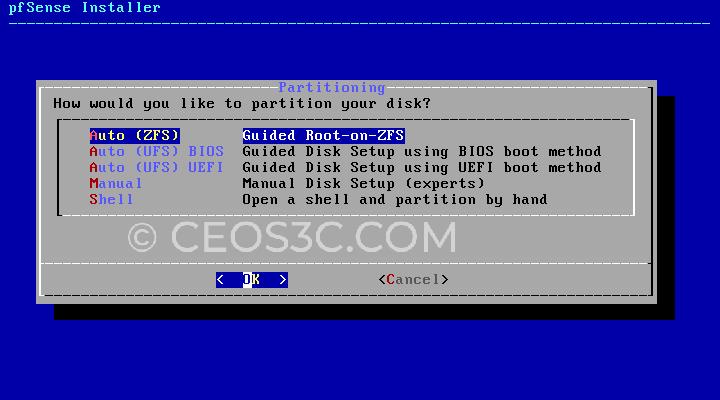
Choose Auto (ZFS) and continue with Enter. Don’t worry about file systems at this point. Auto (ZFS) is the default for pfSense, and it’s a good system:
After confirming with Enter, we leave everything on default and hit Enter again to start the installation:
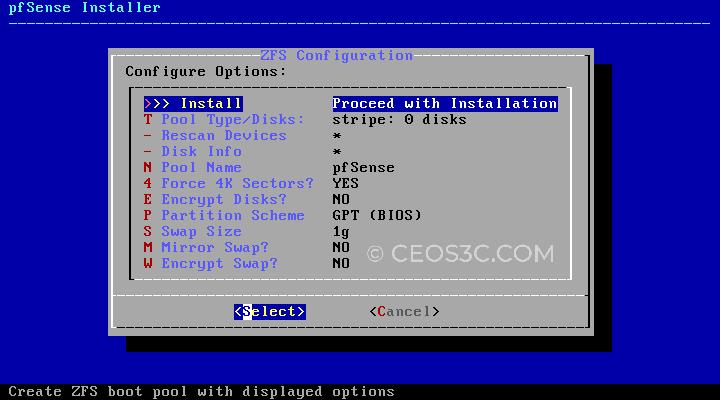
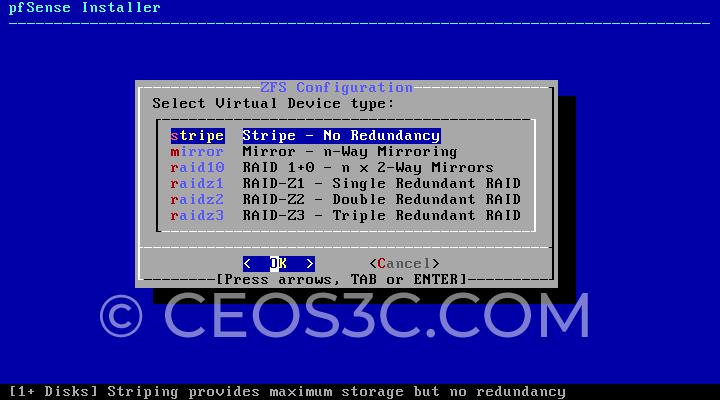
In the next step, we select stripe since we only install pfSense on a single disk.
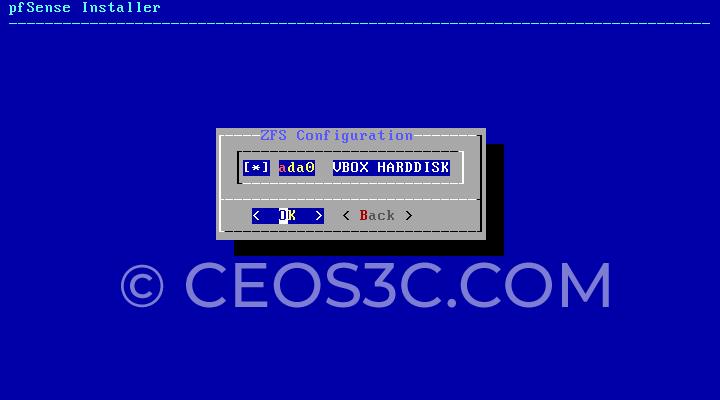
Next, press the Space Bar to select the VBOX HARDDISK and continue with Enter:
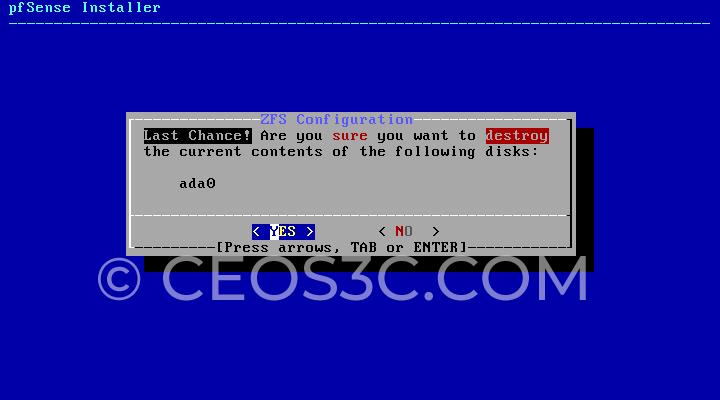
Make sure to choose Yes on the last dialogue to start with the pfSense installation:
The installation will now run. It usually takes a couple of minutes.
Finishing the Installation
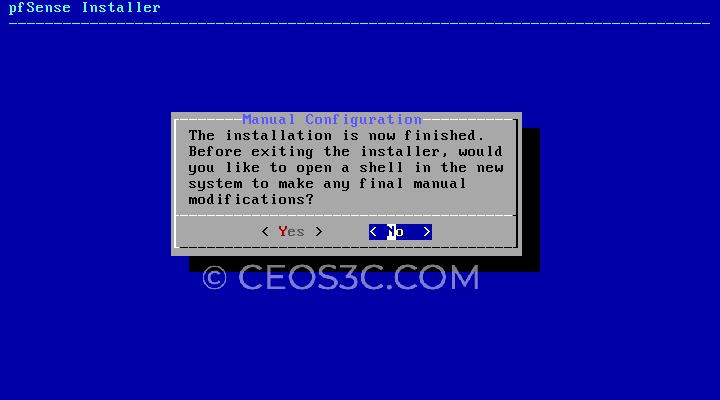
Once the installation has finished, select No when asked if you want to make additional changes:
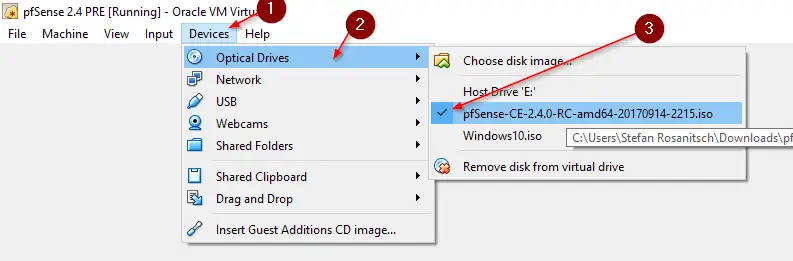
Now, we must remove the .ISO file from VirtualBox before rebooting. Otherwise, we end up at the beginning of the installation routine again. To do that, click on Devices on the Menu Bar where your pfSense VM is running and click on Optical Drives. Then click on the pfSense.amd64.iso file to unmount it. If another dialogue pops up if you want to unmount forcefully, select Yes.
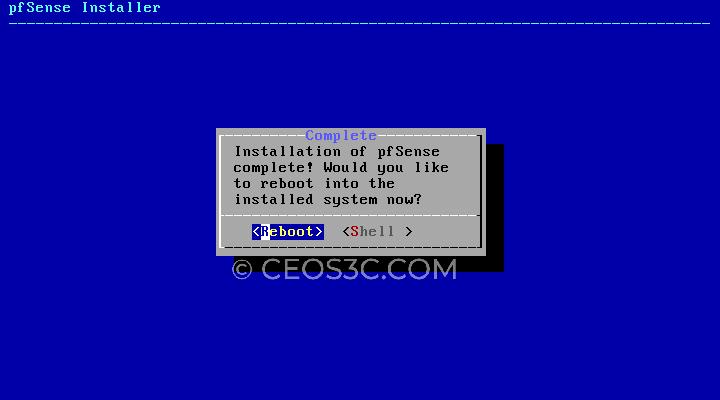
And finally, select Reboot to reboot the virtual machine:
Booting Up for the First Time
pfSense will now boot up for the first time. If you have followed through each of the steps so far, pfSense should automatically recognize the network adapter that we set up for NAT (Adapter 1) as the WAN interface and the other two adapters as the LAN and OPT interfaces, as you can see in the screenshot below:
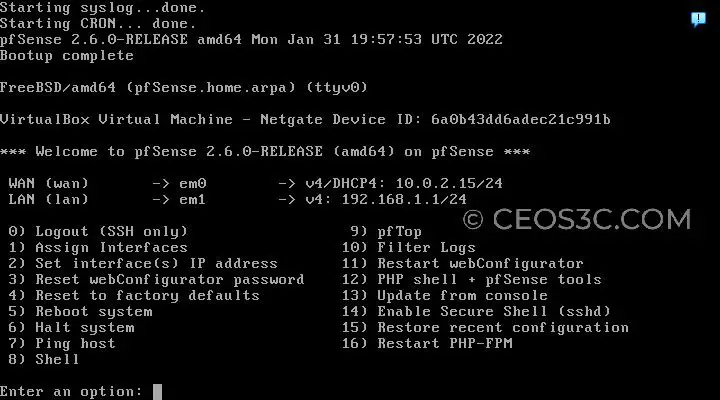
DHCP is enabled by default on the LAN interface. pfSense has 192.168.1.1 as its default IP Address.
Part 4: Initial Configuration
Now, with a VM or Computer residing on the same Subnet (you need to have another VM inside of the Internal Network (intnet) to be able to connect to pfSense. You can use Lubuntu for this as a lightweight system.
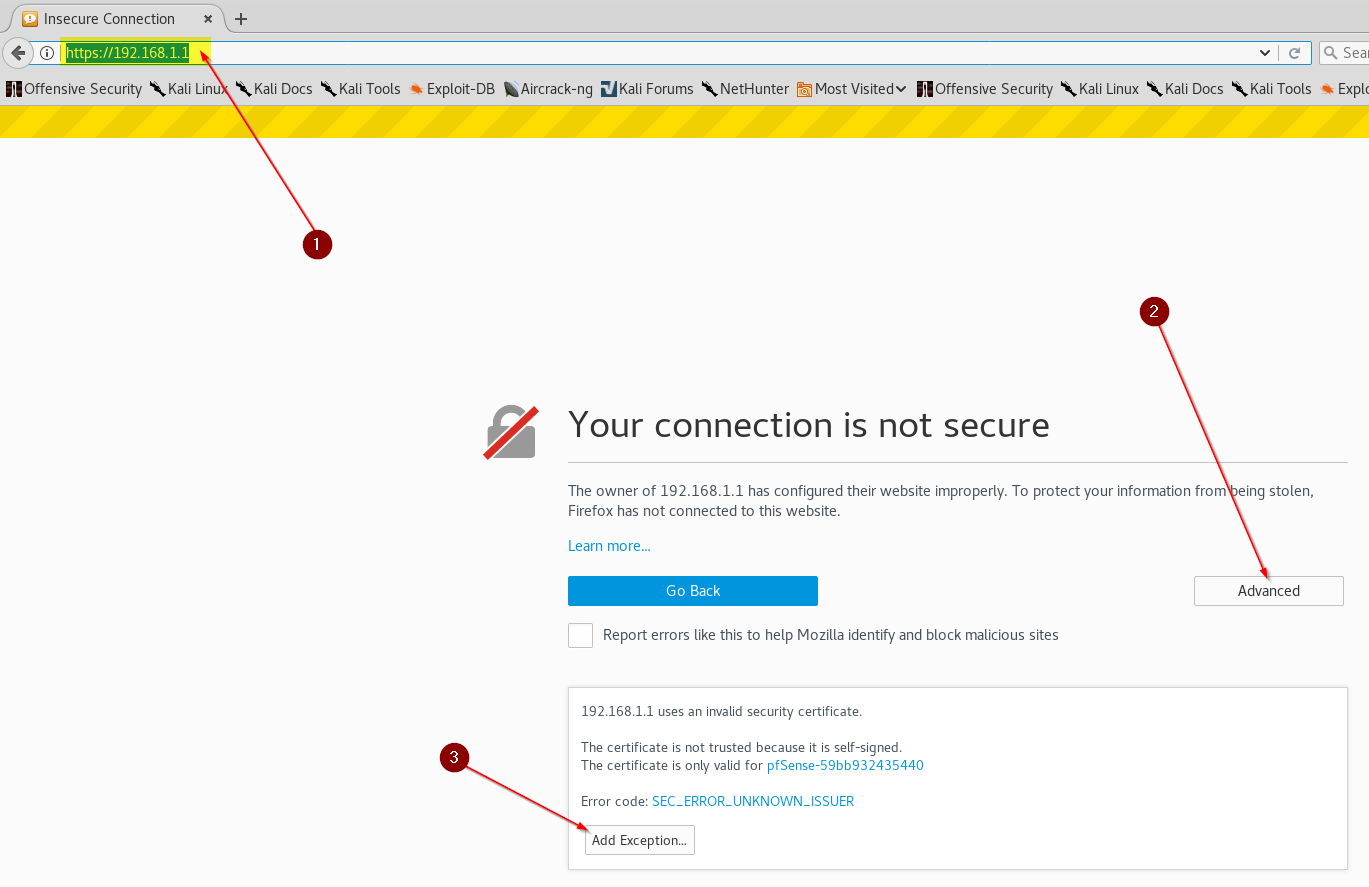
Open a Web Browser and enter the IP of your pfSense Firewall: 192.168.1.1
You can safely add an exception to your Browser and ignore the Security Warning. If you want to know how to get a Secure Connection to pfSense, read my Article on it!
Log in with the Default Credentials: admin//pfsense
Run through the Initial Configuration Wizard to finish the installation and configuration of pfSense. And that’s it for the installation part. Check out the pfSense Tutorial Section to continue from here.
FAQ
We get a lot of questions in terms of installing pfSense. We try to cover a few of them below.
Can you Install pfSense on a PC?
Yes, it is certainly possible to install pfSense on a PC. All you need is supported hardware and a network card with multiple network interfaces. If you have an old PC lying around, you can turn it into a budget firewall!
How many cores can pfSense use?
Pfsense is a powerful and versatile network management platform that can support multiple cores for running complex network operations. The exact number of cores that pfSense can support depends on the specific needs of your network, as well as other factors such as system memory, resource usage, and traffic patterns.
Ultimately, the core count will depend on the unique configuration of each individual network and how it is being used. However, in general, it is safe to say that pfSense has the potential to accommodate numerous cores for optimal performance regardless of your needs or scale. So whether you are managing a small home network or a large enterprise setup, pfSense has what it takes to meet your requirements and keep your network humming along smoothly.
What hardware can I run pfSense on?
There is a range of hardware options available for running pfSense, depending on your specific needs and budget. For example, if you are looking for a high-performance system with excellent processing power and plenty of memory, you might choose to go with a dedicated server or workstation with multiple cores and plenty of RAM.
Alternatively, if you are just looking to add basic firewall functionality to an existing network setup, you could opt for a small hardware appliance such as those offered by Netgate or SofaWare.
Alternatively, you could turn an old PC or Laptop into a pfSense Firewall!
Whatever your needs and budget may be, there is sure to be a suitable piece of hardware that is perfectly suited to running pfSense. So if you’re looking to add some powerful firewall capabilities to your network, why not check out the range of hardware options available today?
Conclusion
This is how easy it is to install pfSense on VirtualBox. It is also a great way to play around with the firewall before dedicating it to a physical device. Make sure to check out some of our other pfSense Tutorials!
👀 This Tutorial has some related Articles!
👉 The Complete pfSense Fundamentals Bootcamp
👉 Install pfSense from USB – The Complete Guide
👉 Install pfSense on VirtualBox
👉 The Complete pfSense OpenVPN Guide
👉 The Complete pfSense DMZ Guide
👉 Generate SSL Certificates for HTTPS with pfSense
👉 The Complete pfSense Squid Proxy Guide (with ClamAV!)
👉 pfSense Site-to-Site VPN Guide
👉 pfSense Domain Overrides Made Easy
👉 pfSense Strict NAT (PS4,PS5,Xbox,PC) Solution
👉 The Best pfSense Hardware
👉 Traffic Shaping VOIP with pfSense
👉 pfSense OpenVPN on Linux – Setup Guide
👉 pfSense Firewall Rule Aliases Explained
👉 Email Notifications with pfSense
👉 pfSense DNS Server Guide
telecharger l’iso de pfsence
hi Sir,
Im having a problem with the internet connection of the Kali Linux which can access pfSense but no the internet .The pfSense has been configured as NAT (tried also Bridge) and is connected to internet. How can I fix this ?
Is the DHCP Server enabled?
sir i’m unable to install it on VM. after rebooting, it again starts installation process.
secondly if i uncheck pfsense iso from devices it pops up with error.
kindly help me out.
thanking in advance.
You have to click on Devices -> Optical Drives -> Remove Disk from Virtual Drive.
I use the same configuration but I tried to open it from kali linux but I didn’t get access to pfsense interface on the web browser so please can you help me with it