
With this article, we intend to provide a complete and beginner-friendly guide on how to install pfSense from USB on a physical appliance. This is one of the most difficult things to do when it comes to installing pfSense, so we walk you through the whole process in a step-by-step fashion. Should you need a more complete, video-guided introduction to pfSense, we can highly recommend the Complete pfSense Fundamentals Bootcamp, where we cover all of the steps below and much more.
Summary: In this article, you will learn how to install pfSense from USB using a Serial Cable (Null Modem Cable).
Table of Contents
- Requirements
- What is pfSense?
- What Hardware do I need to Install pfSense?
- What are the Steps to Install and Configure pfSense?
- Step 1 – Downloading the pfSense Image
- Step 2 – Creating a bootable USB drive
- Step 3 – Setting up the connection to pfSense
- Step 4 – Connecting to pfSense using puTTY
- Step 5 – Booting pfSense from USB
- Step 6 – Install pfSense from USB
- Step 7 – Configuring pfSense via Web GUI
- Step 8 – Wrapping Up
- FAQ
- Can pfSense be installed on a Router?
- Is OpenWRT better than pfSense?
- How much RAM is needed for pfSense?
- Is pfSense still Free?
- Is pfSense a good Firewall?
- Which is better OPNsense or pfSense?
- Can you run pfSense on Raspberry Pi?
- Can you run pfSense in a VM?
- Does pfSense have a GUI?
- Does pfSense run on Linux?
- Does pfSense have antivirus?
- Has pfSense ever been hacked?
- Can pfSense block websites?
- Can pfSense block applications?
- Does pfSense have IPS?
- Conclusion
Requirements
- Download & Install puTTY
- Download & Install Win32DiskImager
- USB Drive with 2GB free space
What is pfSense?
PfSense is an open-source firewall and router platform that offers a wide range of powerful features and customization options. Designed to be easy to install, configure, and manage, regardless of your skill level, pfSense makes it simple to protect your network against security threats, reduce latency, and increase efficiency.
Whether you’re running a small home office or managing a large enterprise network, pfSense has the capabilities you need to keep your data safe and your network running smoothly. With its intuitive interface and robust feature set, pfSense is the perfect solution for any organization seeking enhanced security and greater control over its digital infrastructure.
While pfSense is heavily used in the corporate world, it also is a popular solution for small businesses or home networks. pfSense is a great first firewall to set up in your home network if you want to learn more about how to secure your data and how to manage your network since it’s so easy to use.
What Hardware do I need to Install pfSense?
To install pfSense, you will need certain hardware components and peripherals. For example, you will need a computer with at least 1 GB of RAM and a minimum of 8 GB of disk space for the operating system. In addition, you will need an Ethernet interface to connect your computer to your network.
Other essential components and peripherals include a firewall-capable router, network cables or a wireless adapter, and any required power supplies or adapters. Overall, the specific hardware requirements vary depending on your needs and preferred setup, but having the right tools is key to successfully installing pfSense on your network.
pfSense Minimum Hardware Requirements
The absolute minimum requirements to install pfSense are:
- A 64-bit amd64 (x86-64) compatible CPU.
- 1 GB of RAM.
- 8 GB of free Hard Disk Space.
- At least one compatible network interface (1 interface isn’t very practical).
- A bootable USB Drive with at least 1GB of space.
What are the Steps to Install and Configure pfSense?
To install pfSense on a physical appliance, we have to follow through quite a few steps. A quick summary of these steps is as follows:
- Downloading the pfSense image & creating a bootable USB drive.
- Setting up the connection to pfSense & connecting to pfSense with puTTy
- Booting pfSense from USB & installing pfSense on the device
- Configuring pfSense via Web GUI
Step 1 – Downloading the pfSense Image
We use a Serial Connection to connect to our pfSense Firewall. Be aware that if you have a VGA output on your pfSense firewall and you want to use a monitor to install it, you have to choose VGA on the console dropdown.
For everyone also using a Serial Connection, download the pfSense image with the following options checked here: pfsense.org/download/
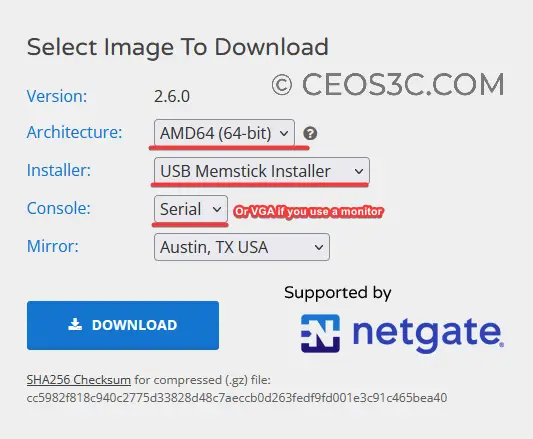
Make sure you select everything according to the image above. Choose a Mirror closest to your location.
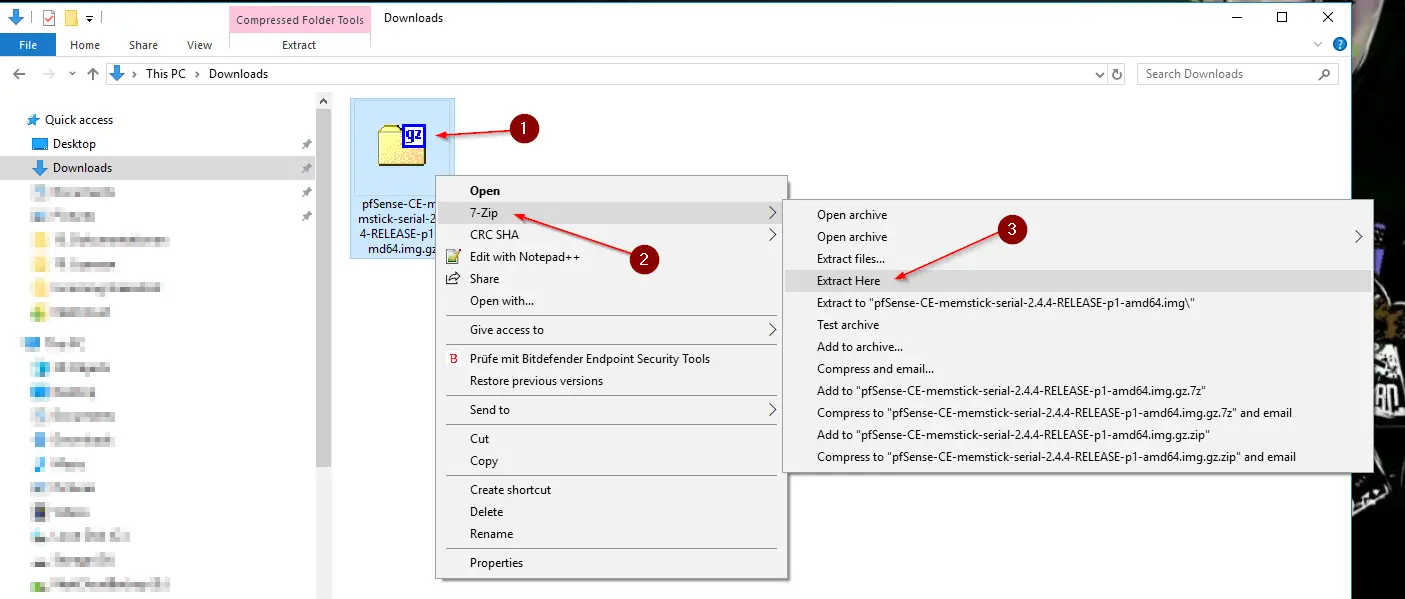
After downloading the image, navigate to your Downloads folder, right-click the file and use 7-zip to extract it.
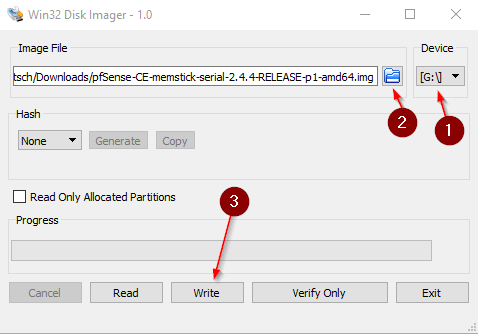
Step 2 – Creating a bootable USB drive
To be able to install pfSense from USB, we need to create a bootable USB drive. 2GB USB Drive is sufficient.
Next, start Win32DiskImager.
Make sure you have your USB Drive selected under Device, then choose the extracted pfSense.img file from your Downloads folder. Finally, hit Write. Be aware that everything on your USB drive will be deleted.
Step 3 – Setting up the connection to pfSense
We have a built-in serial converter in our appliance, so we can use a USB cable to connect our PC to our pfSense firewall. You most likely will only have a serial cable. Whatever you have, connect pfSense to your PC now with whatever type of serial cable you have.
Also, go ahead and plug the USB drive into the USB slot of your pfSense appliance.
Make sure your pfSense appliance is running now.
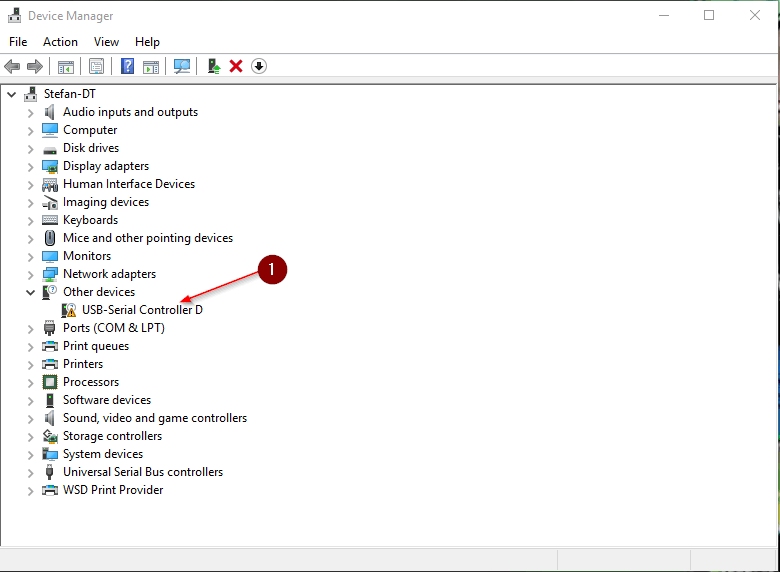
Next, hit the Windows Key and type “Device Manager” into the search field. Open the Device Manager.
Because this converter is built into our firewall, we have to install a driver for it. If you use any kind of USB to Serial cable with a built-in converter, you probably also have to install a driver. Gladly, it’s very simple:
Right-click the USB-Serial Controller in your Device Manager and select Update Driver.
Select “Search automatically for updated driver software”.
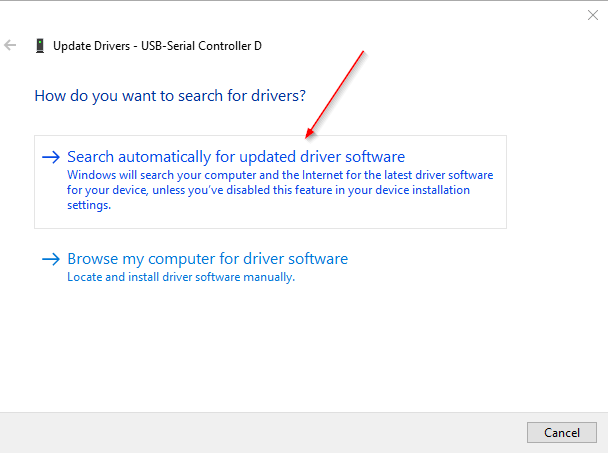
For our converter, that worked perfectly. It finds the driver and installs it. Your experience may vary. Look up which type of USB to Serial Converter is built into your cable and search for that specific driver on Google and install it manually if Windows Update doesn’t find it. We had a good experience using the “Prolific USB-to-Serial” type converters.
You will find the installed device under Ports (COM & LPT) now.
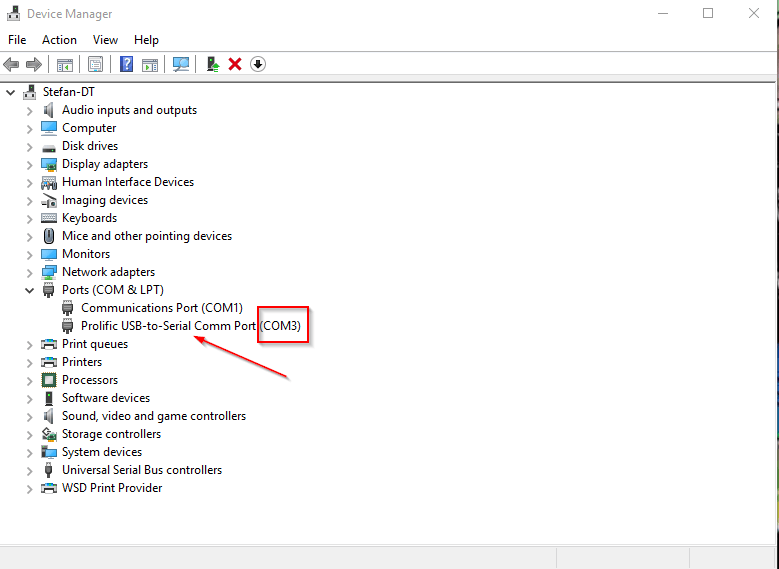
Now, this is very important. You have to remember the COM Port that your device got assigned. In our case, it’s COM3, as shown in the screenshot above.
If you use any other Serial Connection, make sure that you know which COM port it is using. That is important for the connection with puTTY. If you don’t know, simply go through all of your COM ports when trying to connect with puTTY, and one will be working.
Good, now that we got that figured out, we can try to connect with puTTY.
⚠️ If you would like to learn more about pfSense, I highly recommend you check out my pfSense Fundamentals Bootcamp over at Udemy. This is the most up-to-date as well as the highest-rated pfSense course on Udemy.
Step 4 – Connecting to pfSense using puTTY
Open PuTTY. Don’t get thrown off by how many options there are.
Set the Connection Type to Serial. For Serial Line, enter your COM port. For Speed, choose 115200. The speed might vary depending on your appliance. In case, look up your appliance documentation. The default values for be pfSense can be found here: https://docs.netgate.com/pfsense/en/latest/hardware/connecting-to-the-serial-console.html
Now type “pfSense” underneath of “Saved Sessions” and hit the Save button on the right. This way, you can reconnect to your pfSense firewall without typing everything again each time you want to connect.
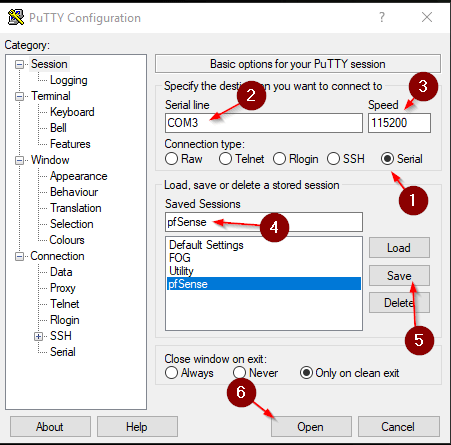
Finally, click on Open. Hit the Enter key once the window opens. You should now see something popping up, which leads us to our next step.
Step 5 – Booting pfSense from USB
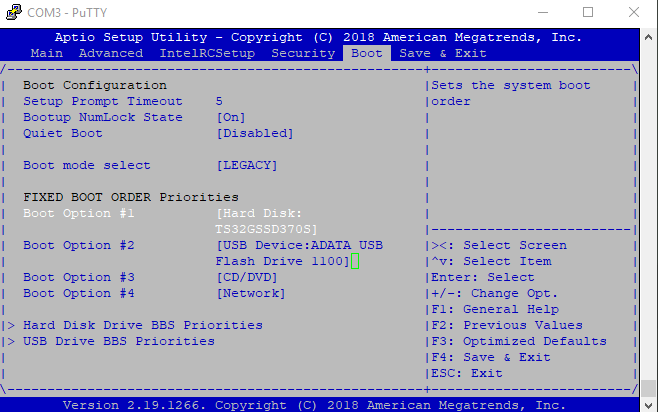
First, we need to make sure to be able to boot via a USB drive. Because you already placed your USB drive in your firewall, it’s possible that you are already in the pfSense installer menu. If that’s the case, you can skip the following BIOS step and wait until we get to the installation.
BIOS Setup
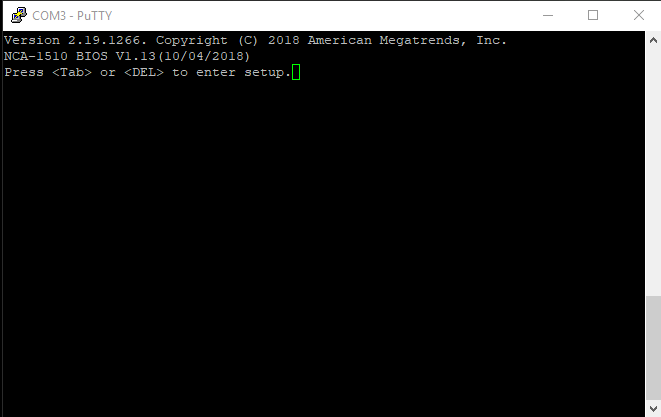
Restart your firewall and get into the BIOS. This probably varies from appliance to appliance. We have to press either TAB or DEL when it’s booting up. Look up your appliance’s documentation in case you can’t figure it out. Usually, it’s written there which button to press when you start it.
Leave your puTTY window open, and restart the appliance either by pressing a button or just pulling the power cable.
Once you are in the BIOS, navigate to Boot. Make sure Boot mode is on LEGACY. Make sure your USB Drive is on #1 as a Boot Option, and your Hard Drive is on #2.
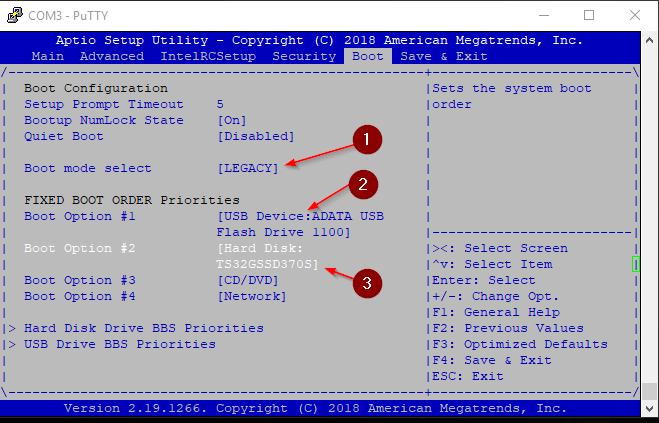
Navigate to Save & Exit and select Save Changes and Reset. Your firewall will reboot again.
Step 6 – Install pfSense from USB
Now, if you did everything correctly, your appliance should boot from the USB drive. We will guide you through the whole installation process now.
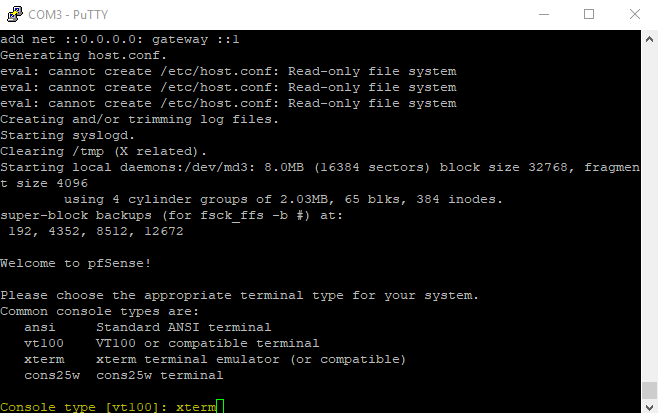
For Console Type, type xterm and hit enter:
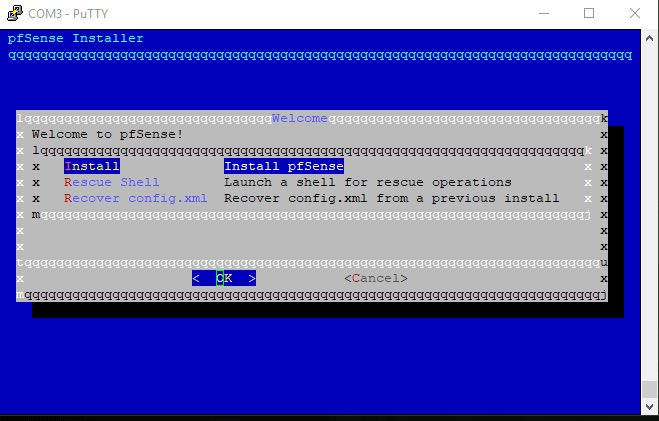
Accept the Copyright and distribution notice.
Select Install pfSense:
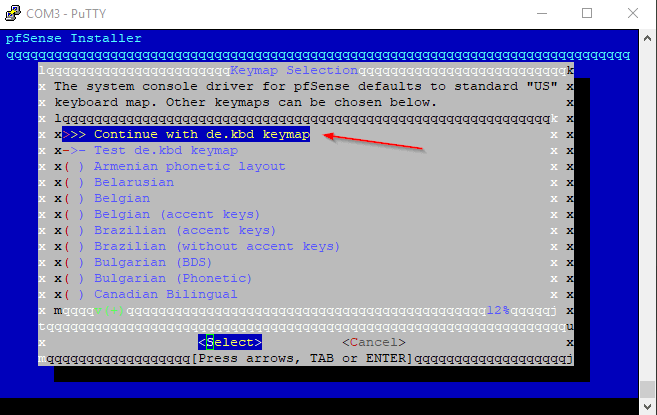
Choose your preferred keymap by scrolling down, selecting the one you want and pressing enter. Select “Continue with YourKeymap” on the top and hit enter. Repeat the same in the next step.
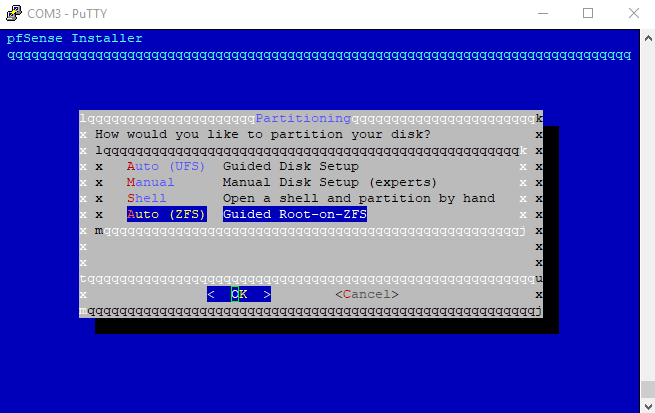
For partitioning, that’s up to your personal preference, but we will choose the new Auto (ZFS) Filesystem that was introduced with pfSense 2.4. If you don’t know what to choose, I recommend ZFS for you as well.
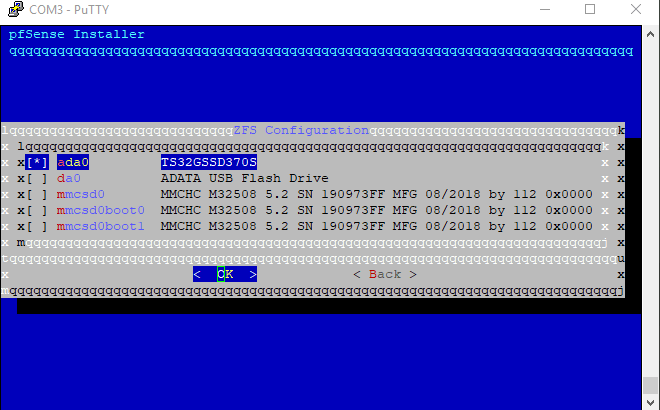
Select Pool Type/Disks and hit Enter. Choose Stripe – No Redundancy. Make sure you select your appliance’s hard drive in the next window by pressing Space Bar and hitting Enter.
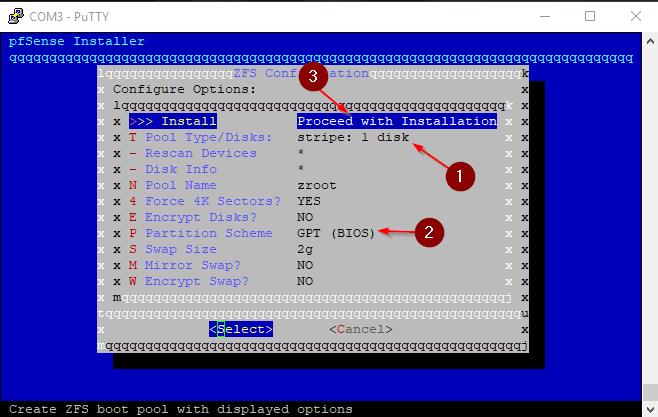
Make sure Partition Scheme is set to GPT (BIOS) and leave everything else as default. Finally, select Install on top of the screen and hit enter.
Agree and be aware that everything on your Hard Drive will get wiped.
For the question, if you want to do some manual configuration steps, choose no.
Now select Reboot and get ready to enter that BIOS Menu again while the appliance is rebooting. We need to change the boot order back to the correct order. Remove your USB drive from the appliance after it reboots.
Navigate to Save & Exit and select Save Changes and Reset.
If all went well, you would now end up in the pfSense Welcome Screen.
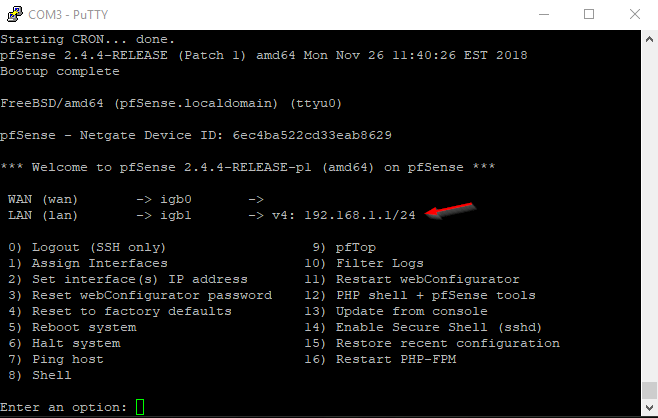
You can see that the interfaces were automatically assigned. Your first Interface got assigned as WAN, and your second interface got assigned as LAN.
DHCP is enabled by default, and your pfSense firewall has an IP of 192.168.1.1.
Step 7 – Configuring pfSense via Web GUI
Connect a LAN cable to the LAN port on your firewall. Usually, the first port is dedicated to WAN(igb0), and the second port is dedicated to LAN(igb1). Connect your Laptop / PC / Switch to the other end of the LAN port.
The WAN interface is the one where you want to plug your Modem / Internet Connection in. If you don’t know which modem to use, I highly recommend the DrayTek Vigor 130. Here’s a guide on how to configure a DrayTek Modem for use with pfSense. We run multiple of those, and they served us very well over the years.
Open a Web Browser and enter the IP of your pfSense 192.168.1.1. If you want to get rid of that warning message, we got you covered.
Log in with the default credentials:
- Username: admin
- Password: pfsense
Click Next on the first dialogue.
WebGUI Setup 1
Click Next on the Netgate Global Support dialogue.
WebGUI Setup 2
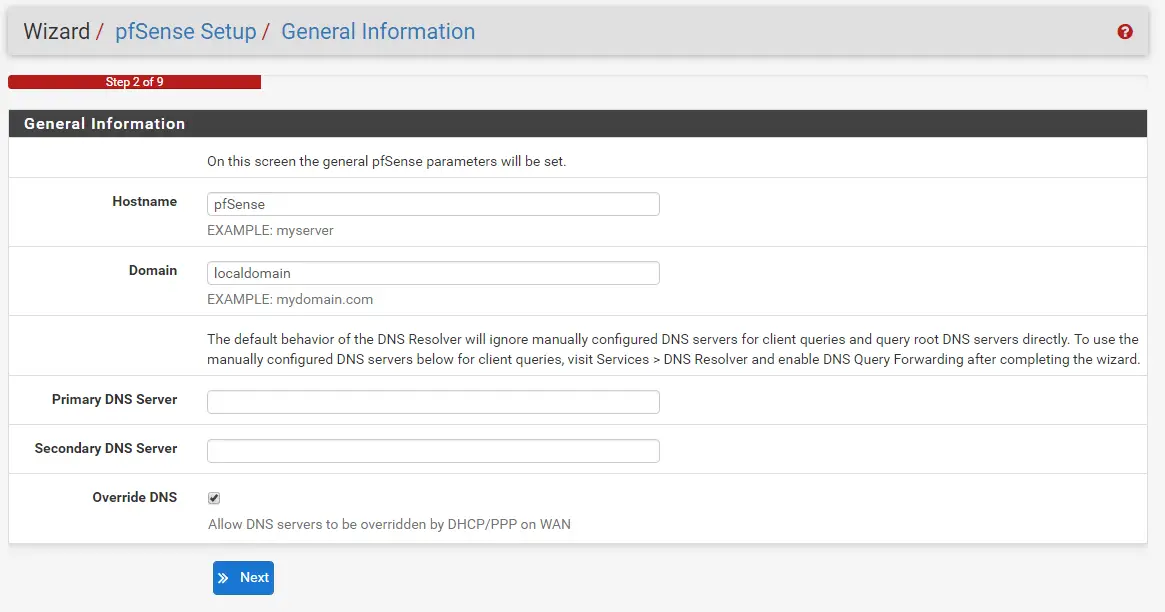
Choose a Hostname and a Domain. If you don’t have a Domain, leave it as localdomain. Click Next.
WebGUI Setup 3
Choose your Timezone, and leave the Time server hostname as default. Click Next.
WebGUI Setup 4
Now, to configure your WAN Interface, it depends on how you connect to the internet. Here in Europe, we mostly use PPPoE, and we need to enter the credentials provided by our ISP. If you already have a working internet connection and just want to connect pfSense to that, use DHCP. Look up your Internet Provider’s information, or ask in the Netgate forums.
If you choose PPPoE, scroll down until you find the PPPoE configuration and enter the details provided by your ISP.
Everything else stays on default. Scroll to the bottom and click on Next.
WebGUI Setup 5
You can either change the LAN IP Address or leave it on default. If you don’t know what that means, just leave it as it is.
WebGUI Setup 6
Change the default admin password and choose a safe password.
WebGUI Setup 7
Click on Reload.
WebGUI Setup 9
Click Finish.
Step 8 – Wrapping Up
Congratulations! If you made it this far, you successfully installed pfSense via USB / Serial Cable!
As the last step, let’s set up the temperature sensor to display the correct values. In the pfSense Web GUI, navigate to System / Advanced / Miscellaneous.
Scroll down until you find Cryptographic & Thermal Hardware. For Thermal sensors, choose either Intel or AMD, depending on which processor type you have.
Scroll down all the way to the bottom and hit Save. Now your Thermal Sensor should display the correct value.
And finally, as promised, to repair your USB Drive after the installation, follow this article. Your USB drive will now have multiple partitions, rendering it unusable. We use Rufus to fix that.
FAQ
Since there are a lot of questions in terms of installing pfSense on a physical device, we try to cover some of the most popular ones in this short FAQ section.
Can pfSense be installed on a Router?
Yes, it is possible to install pfSense on a router. Many routers today come equipped with specialized software that makes it easy to install different types of applications, including pfSense. To install pfSense on a router, you simply need to download the relevant software package and then follow the installation instructions specific to your particular router model. An easy way to find out if your router model is compatible with pfSense (and if it’s possible to install pfSense on it) is by simply running a Google Search like this: “install pfSense on {YourRouterModel}”.
Once you have successfully installed pfSense, you can configure its settings and customize it according to your needs. Whether you want to set up basic firewall rules or enable advanced networking features such as monitoring traffic or creating VLANs, pfSense provides all of the tools necessary for managing your network with ease. So if you are looking for a reliable, flexible networking solution that can be easily managed from a single interface, then consider installing pfSense on your router today.
Is OpenWRT better than pfSense?
The debate over whether OpenWRT is better than pfSense has been going on for many years, with proponents of each side fiercely arguing their case. On the one hand, many argue that OpenWRT’s open-source nature and user-friendly interface make it a superior choice for networking projects.
These users praise OpenWRT for its flexibility and range of supported devices, as well as its extensive library of community-generated add-ons. Others, however, argue that pfSense is a more reliable and stable platform, offering greater stability and reliability overall.
While both platforms are widely used in the networking world, it seems clear that there is no definitive answer to the question of which option is better. Ultimately, it will be up to each individual user to decide which platform works best for them based on their unique needs and preferences.
How much RAM is needed for pfSense?
To determine how much RAM is needed for pfSense, it is important to understand the functions of this powerful firewall. As a rule of thumb, pfSense requires at least 1 GB of RAM to operate effectively. However, this amount can vary depending on the size and complexity of your network.
In general, if you will be using pfSense for moderate-sized networks with many traffic-intensive connections, it is recommended to allocate 2 to 4 GB of RAM per pfSense box. Additionally, if you are using virtual machines for your networking needs, you should allocate slightly more RAM per virtual machine in order to optimize performance.
Ultimately, the amount of RAM needed for pfSense will depend on your specific setup and usage requirements, so it is essential to prioritize resource utilization when choosing a system configuration. By taking these factors into account and doing your due diligence, you can ensure that your network is equipped with the right amount of RAM needed to run smoothly and efficiently.
Is pfSense still Free?
There is a lot of confusion about the status of pfSense, the popular open-source firewall and router software. Some people claim that it is no longer free or open source, while others insist that it can still be used without any restrictions.
At this point, it seems that pfSense is, in fact, still free and open source, though some features may be partially restricted for commercial users. Regardless, this software continues to be an excellent choice for those who want to set up their own firewalls and routers without having to deal with the complexity and expense of traditional commercial products.
Is pfSense a good Firewall?
At its core, a firewall is designed to protect network systems from external threats. As such, choosing the right firewall for your system is essential in ensuring that your data and devices are properly secured. In this regard, many IT experts have praised pfSense as one of the best overall firewalls available today.
With its robust security features and intuitive interface, pfSense offers users a reliable way to keep their networks safe from attack. Additionally, pfSense also receives high marks for its flexibility and customizability. Whether you need routing, VPN configuration, intrusion detection, or any other functionality related to firewalls, pfSense provides a solid platform that can be easily adapted to meet your unique needs.
We believe that pfSense is the best open-source firewall out there and that it is a great choice no matter if you run a small home network or a large corporation – pfSense is capable of handling it all.
Which is better OPNsense or pfSense?
When it comes to choosing a reliable and effective firewall solution for your network, there are many options to consider. For some users, OPNsense may be a clear choice due to its comprehensive feature set and intuitive user interface.
With advanced tools for managing intrusion detection systems and intrusion prevention, as well as robust monitoring and reporting capabilities, OPNsense provides everything you need to keep your network secure.
Alternatively, pfSense offers many of the same features as OPNsense with an equally robust set of tools for managing firewall policies and conditions. Whether you opt for OPNsense or pfSense, you can rest assured that you have made a smart choice for securing your network against external threats.
Can you run pfSense on Raspberry Pi?
No. You can’t run pfSense on a Raspberry Pi. The reason for this is that currently, ARM CPUs are not supported. pfSense or FreeBSD is currently only available as i386 or amd64 images.
Can you run pfSense in a VM?
Yes, you can run pfSense in a VM using tools like VMWare or VirtualBox. You can also install pfSense on ESXi or other hypervisor solutions. We have a guide on how to install pfSense on VirtualBox if you are interested. It is perfectly feasible to run your firewall in a VM, and in fact, many people do.
In our opinion, it’s a question of personal choice, as we don’t see any advantages or disadvantages to using one method over the other.
Does pfSense have a GUI?
Yes, pfSense has a GUI. At first glance, pfSense may seem like just another complex networking platform. However, despite its powerful features and customizable settings, it is also incredibly easy to use. Thanks to its intuitive graphical user interface (GUI), anyone with a basic understanding of networking can easily navigate and configure pfSense.
With just a few clicks, users can set up network policies, create firewall rules, and manage their network traffic. Whether you are a network administrator looking to secure sensitive data or simply a casual user wanting to optimize internet speeds, pfSense makes managing your network an effortless task.
Does pfSense run on Linux?
Yes, pfSense runs on Linux. You can use VirtualBox to run pfSense on Linux, given that your flavor of Linux supports the use of VirtualBox – which most modern Linux distributions do.
Specifically, whether or not pfSense runs on Linux will depend on the version of Linux that you are using, as well as the specific configuration of your system. Some versions of Linux are more suitable for hosting pfSense than others, so you may need to do some research and experimentation in order to find out if your particular setup is compatible. That said, most experts agree that pfSense should be able to run effectively on any modern version of Linux.
Does pfSense have antivirus?
Yes, pfSense has antivirus capabilities. These capabilities come in the form of additional packages like ClamAV or HAVP. These antivirus proxies scan all incoming packages for malware or virus signatures.
Has pfSense ever been hacked?
Yes, pfSense has been hacked in the past – but so has every other firewall on this earth. If the device was made by humans, it could be hacked.
pfSense has some of the most advanced security features in the industry, and as such, it presents a formidable challenge to hackers. Its real-time monitoring functionality and Intrusion Detection System (IDS) work 24/7 to constantly scan for potential threats on every single port of the system. Additionally, all traffic coming into and out of pfSense is encrypted and authenticated, making it all but impossible for an unauthorized party to access sensitive information.
To decrease the chance of getting hacked dramatically, ensure you are always running the latest version of pfSense and keep your devices up to date.
Can pfSense block websites?
Yes, pfSense can block websites. There are several options available for doing this, some of which are:
- Using DNS Overrides.
- Using Firewall Rules to block websites by creating an Alias. (If the website’s IP address stays the same)
- Using a Proxy.
All of the instructions on how to do that can be found in the official pfSense documentation.
Can pfSense block applications?
Yes, pfSense can be used to block applications on your network. For example, you can use pfSense to set up custom rules that block certain websites or IP addresses or that prevent users from running specific types of applications such as game servers or torrent clients.
Additionally, pfSense is fully customizable and highly scalable, allowing you to tailor it to meet your specific needs and manage your network with ease. Whether you’re looking to protect sensitive data or simply keep kids away from inappropriate content, pfSense has everything you need to control your network traffic and maintain a safe online environment. So if you’re looking for an effective way to block applications on your network, pfSense is a good choice.
Does pfSense have IPS?
Yes, you can install an IPS / IDS on pfSense using the pfSense Package Manager. Popular IDS systems are Snort and Suricata.
Conclusion
It can be a struggle to install something like pfSense via Serial Cable if you do it for the first time. That’s why we thought it might be a good idea to go through each and every step in detail. We hope you were able to install pfSense from USB and establish an internet connection. pfSense is a fantastic open-source firewall that teaches you a ton of things when you use it in your home network.
If you want to learn more about pfSense and deepen your knowledge, check out the pfSense Fundamentals Bootcamp or continue with some of the related articles below.
👀 This Tutorial has some related Articles!
👉 The Complete pfSense Fundamentals Bootcamp
👉 Install pfSense from USB – The Complete Guide
👉 Install pfSense on VirtualBox
👉 The Complete pfSense OpenVPN Guide
👉 The Complete pfSense DMZ Guide
👉 Generate SSL Certificates for HTTPS with pfSense
👉 The Complete pfSense Squid Proxy Guide (with ClamAV!)
👉 pfSense Site-to-Site VPN Guide
👉 pfSense Domain Overrides Made Easy
👉 pfSense Strict NAT (PS4,PS5,Xbox,PC) Solution
👉 The Best pfSense Hardware
👉 Traffic Shaping VOIP with pfSense
👉 pfSense OpenVPN on Linux – Setup Guide
👉 pfSense Firewall Rule Aliases Explained
👉 Email Notifications with pfSense
👉 pfSense DNS Server Guide
1-May-2023
Hello Stefan
I came across your very interesting website within the last week
as I began to install the latest CE 2.6 version of pfsense on a new hardware
device I recently purchased. Your /install-pfsense-from-usb-ultimate-guide/
is excellent, with plenty of detail & is well presented.
I have been running Negate’s 1100 for the last 3 years, but this is
the first time I have installed pfsense from scratch. The experience will
come in useful when I install an image of v23.01 on the Netgate 1100, which is
unable to be updated from 22.05 due to the limitied partition size.
The only errata I found in your install guide was under the heading
“Can you run pfSense on Raspberry Pi?”
While I agree with your statement that Raspberry Pi wont run pfsense,
I disagree that “ARM CPUs are currently not supported” by pfsense.
According to the spec on the Netgate website, both the 1100 & 2100 appliances
use the Dual core ARM Cortex A53 processor to run pfsense plus.
Thanks again for the informative guide.
regards
Chaz