If you are new to pfSense and you have just set up a new Box, you won’t have a secure connection to it by default. You probably remember connecting to your pfSense for the first time, that you had to add a security exception. We are going to fix this today and I will show you how to Enable SSL for pfSense. We want to get rid of this red warning in your browser and make sure we Enable HTTPS for pfSense.
But before we start, we are going to make sure we are still able to have access to our Firewall in case anything goes wrong and you can’t access the Web Interface anymore. There can be problems if you use older Browser Versions than the ones used in this Tutorial, so we want to make sure you won’t lock yourself out.
🚀 This guide has been completely updated in August 2022
⚠️ If you would like to learn more about pfSense, I highly recommend you check out my pfSense Fundamentals Bootcamp over at Udemy. This is the most up-to-date as well as the highest-rated pfSense course on the internet.
Table of Contents
- Step 1 – Make sure we have a Backdoor in Place
- Step 2 – Creating a new Certificate Authority and Certificate for SSL
- Step 3 – Google Chrome
- Step 4- Firefox
- Step 5 – Enable SSL for pfSense
- Step 6 – Wrapping Up
- Conclusion
👀 This Tutorial has some related Articles!
👉 The Complete pfSense Fundamentals Bootcamp
👉 Install pfSense from USB – The Complete Guide
👉 Install pfSense on VirtualBox
👉 The Complete pfSense OpenVPN Guide
👉 The Complete pfSense DMZ Guide
👉 Generate SSL Certificates for HTTPS with pfSense
👉 The Complete pfSense Squid Proxy Guide (with ClamAV!)
👉 pfSense Site-to-Site VPN Guide
👉 pfSense Domain Overrides Made Easy
👉 pfSense Strict NAT (PS4,PS5,Xbox,PC) Solution
👉 The Best pfSense Hardware
👉 Traffic Shaping VOIP with pfSense
👉 pfSense OpenVPN on Linux – Setup Guide
👉 pfSense Firewall Rule Aliases Explained
👉 Email Notifications with pfSense
👉 pfSense DNS Server Guide
Step 1 – Make sure we have a Backdoor in Place
Log in to your pfSense Firewall first. We will create a few security Backdoors in case we get locked out. Further Documentation can be found here.
Creating a pfSense Backup
The first thing we are going to do is to create a Backup of your working Configuration. Therefore, navigate to Diagnostics / Backup & Restore. Select as in the Screenshot below and Download your configuration as XML.

Enabling SSH on pfSense
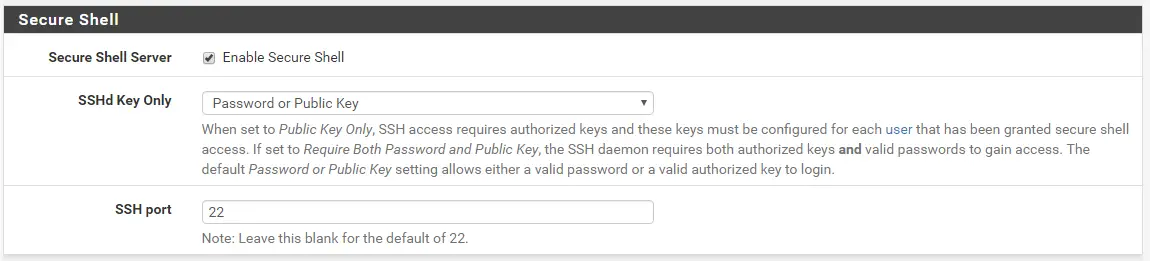
Now we are going to enable SSH. This allows us to access our Firewall via something like PuTTy in case we can’t access the Web GUI anymore. Navigate to System / Advanced and scroll down until you find Secure Shell.
Tick the box to enable SSH and leave the SSH port on its Default of 22 or change it as desired. You can log in to your pfSense via SSH using your Admin Password. Optionally, you can choose to create a Public Key. After we have finished with our Enable SSL for pfSense settings, you can choose to disable SSH again if you wish to, although for Home Usage it should be fine to leave it on.
Enabling Serial Communications
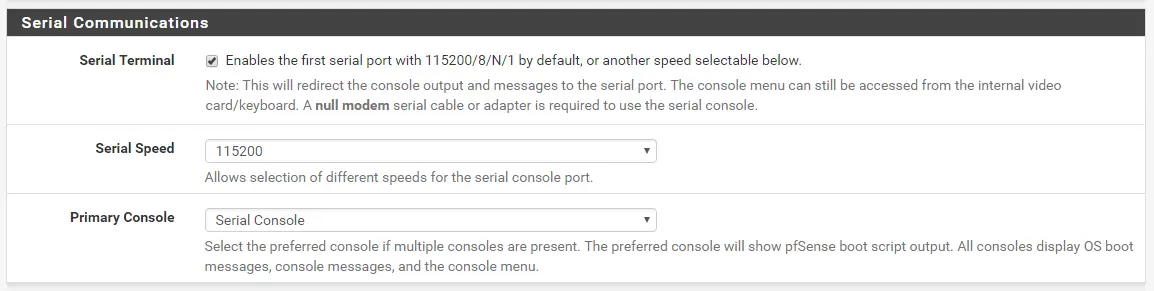
In case your pfSense Device has a Serial Port, you could also enable this Port. You find this Option right underneath the Secure Shell Field. Just tick the Box Serial Terminal to enable it, so you have another way to access your pfSense in case something happens. I recommend leaving this setting enabled anyway, for home use.
That should give us enough options to restore our previous configuration in case you experience any problems. Let’s get started with the actual Enable SSL for pfSense Tutorial then, shall we?
Step 2 – Creating a new Certificate Authority and Certificate for SSL
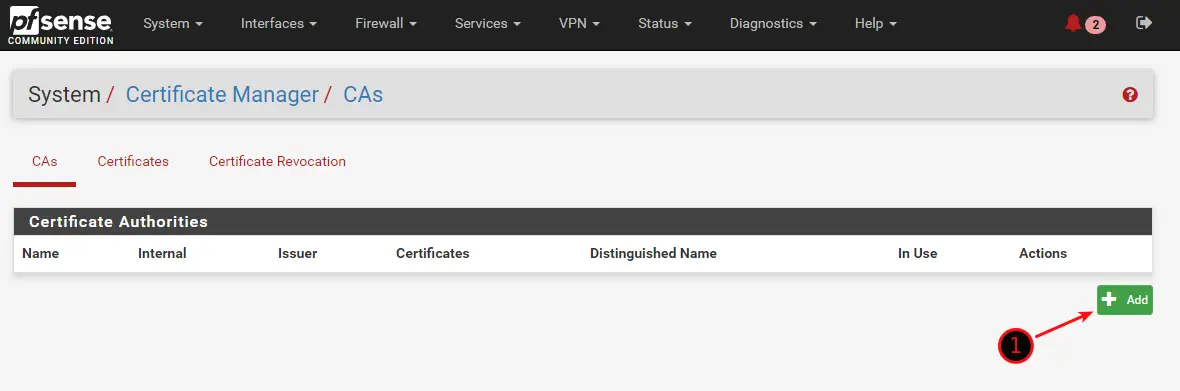
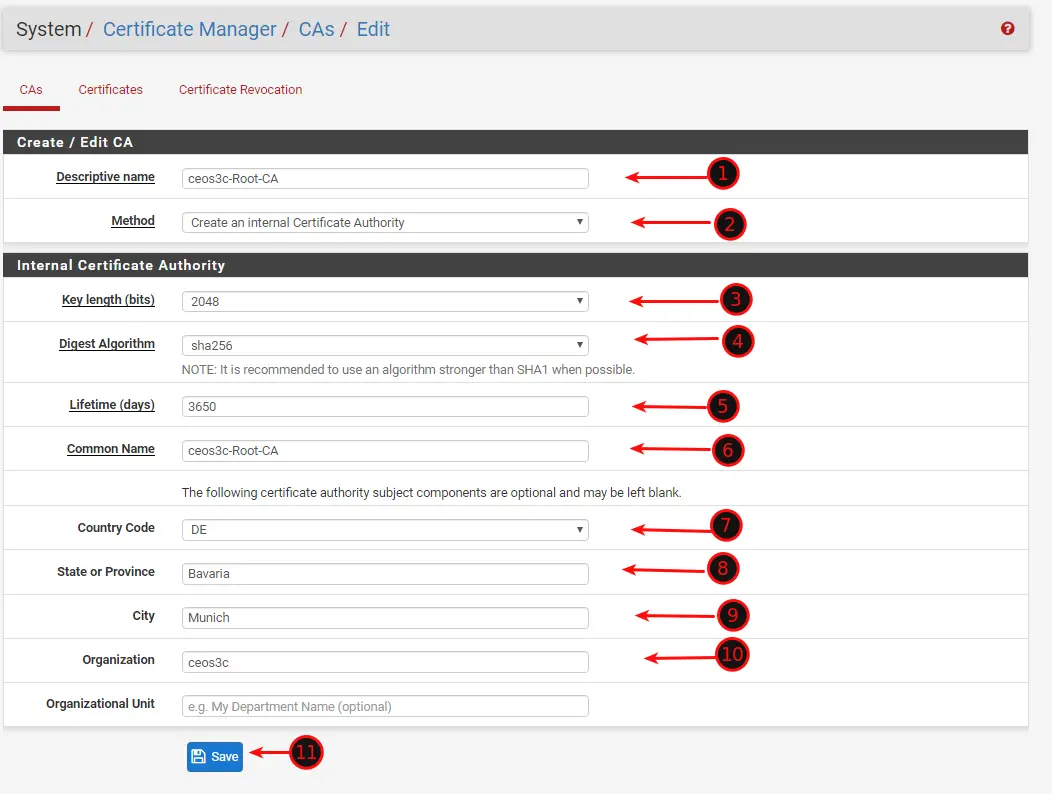
First, we are going to create a new SSL Certificate Authority on pfSense. Navigate to System / Certificate Manager / CAs and click on Add.
Enter everything as in the Screenshot Below. Add Additional Details if you want to, like your Location.
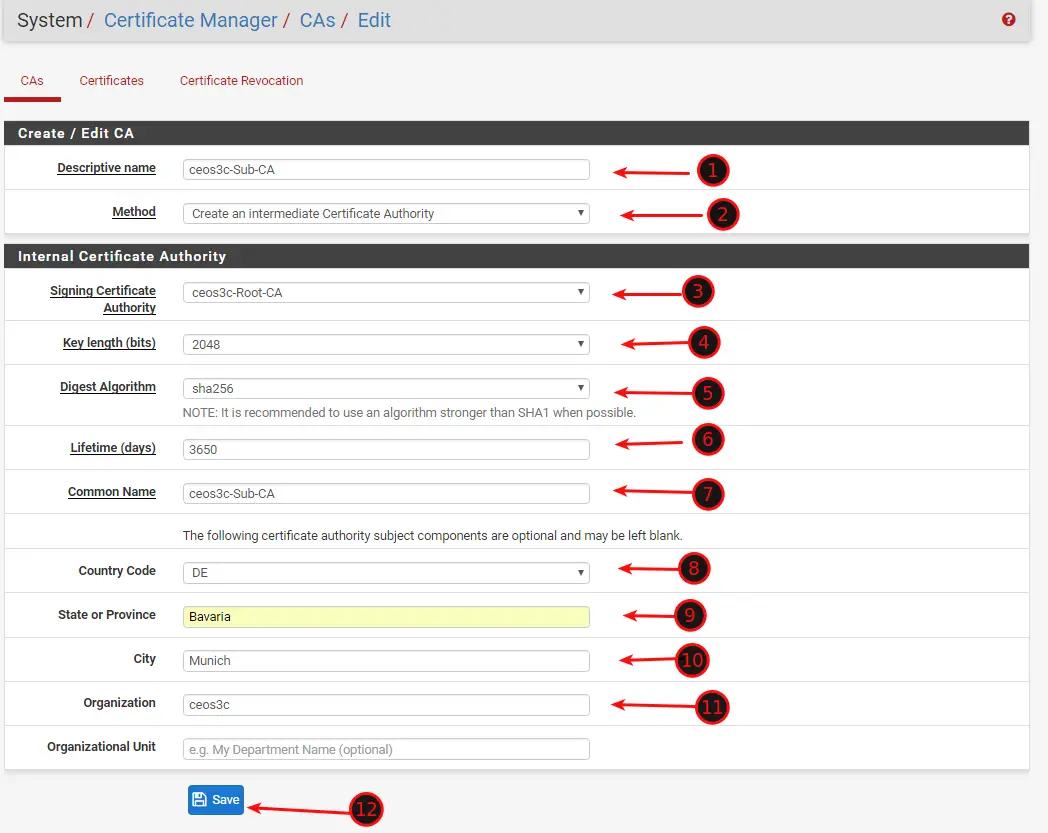
Creating a Sub Certificate
Next, we need to create an Intermediate Certificate Authority. So on System / Certificate Manager /CAs click on Add once again.
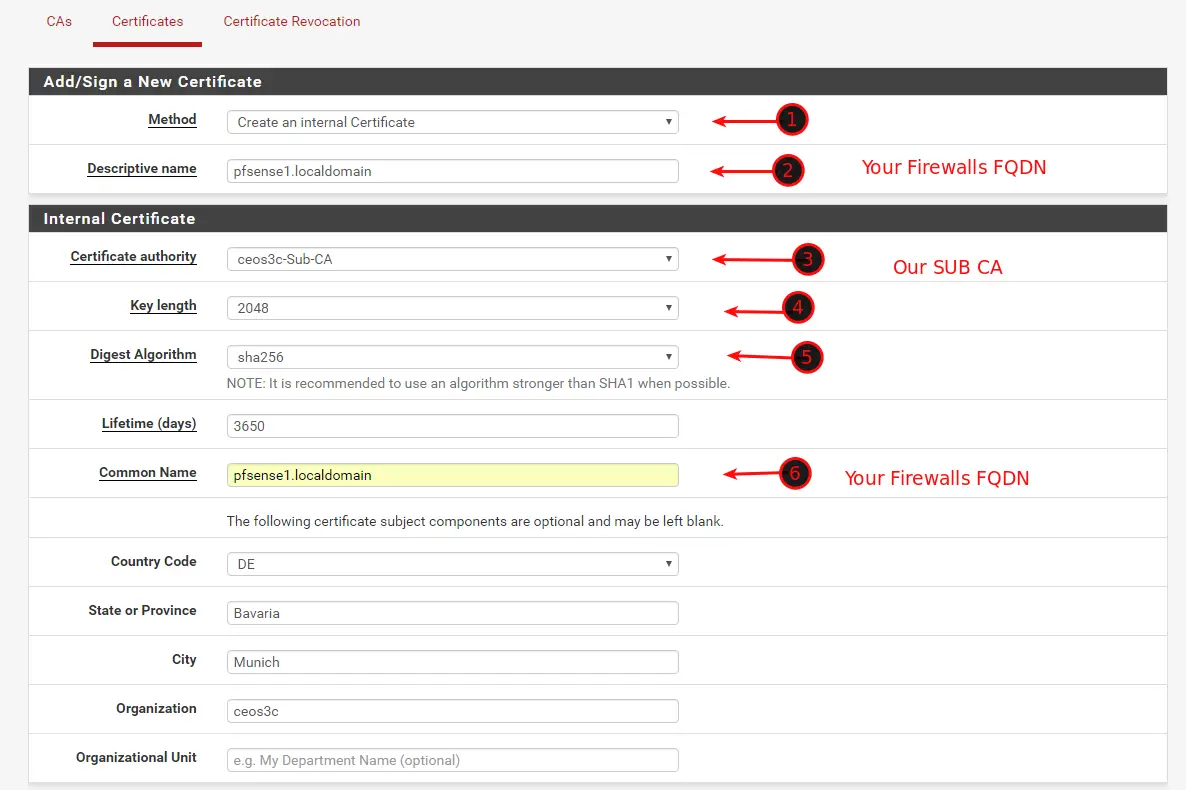
Creating a new Certificate
Now click on the Certificates Tab at System / Certificate Manager. Click on +Add/Sign to add a new Certificate. Fill everything out as in the Screenshot below. Make sure to put your pfSense Fully Qualified Domain Name in the Fields on Steps 2 and 6.
You can see your pfSense FQDN on System / General Setup under System. Your FQDN is the combination of Hostname and Domain separated by a dot. So if your Hostname is pfsense1 and your Domain is Local Domain, your FQDN is pfsense1.localdomain. This is what you want to put in there.
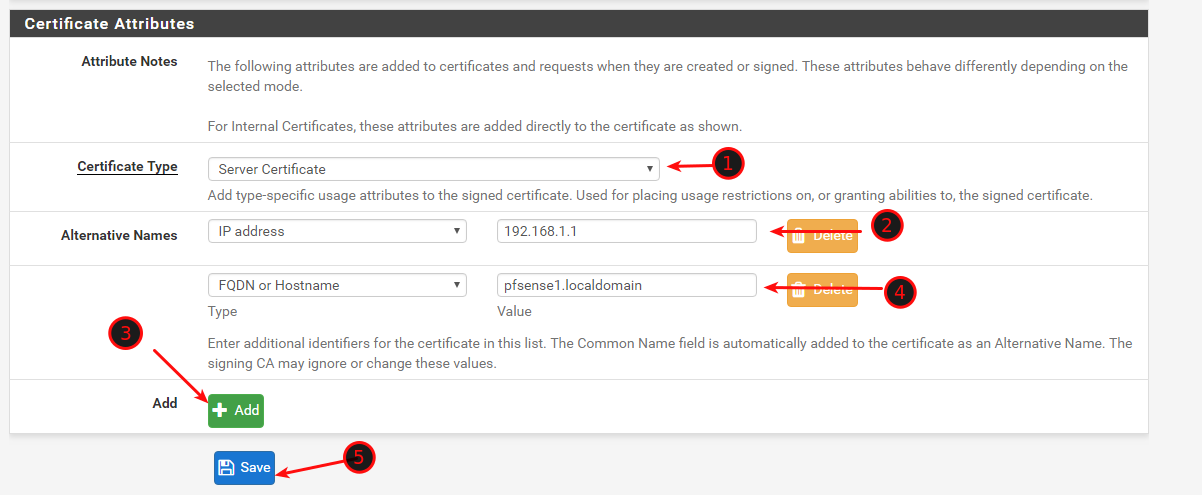
Make sure you put the IP Address of your pfSense Firewall in Step 2 and the FQDN of your Firewall at Step 4. Also, make sure you have a Server Certificate selected at Step 1.
Exporting the Certificate Authorities
Navigate back to System / CAs. This is important. Click on Export on both CAs.
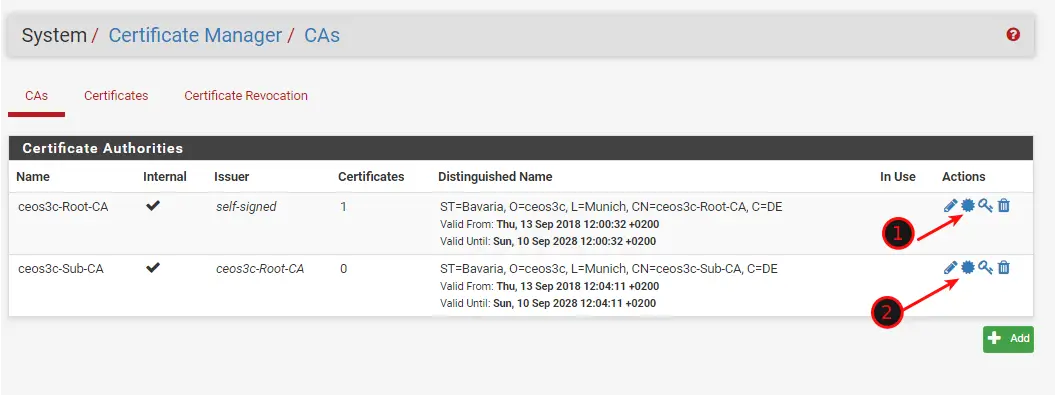
Now there are 2 ways how to implement those Certificates. It depends on which browser you use.
For Chrome, we need to Import both Certificates to the Windows Certificate Root, for Firefox we need to Import the Root-CA only directly into Firefox. I just hope and assume that no one of my readers is using the abomination that is Internet Explorer or even Edge.
Let us start with Chrome.
Step 3 – Google Chrome
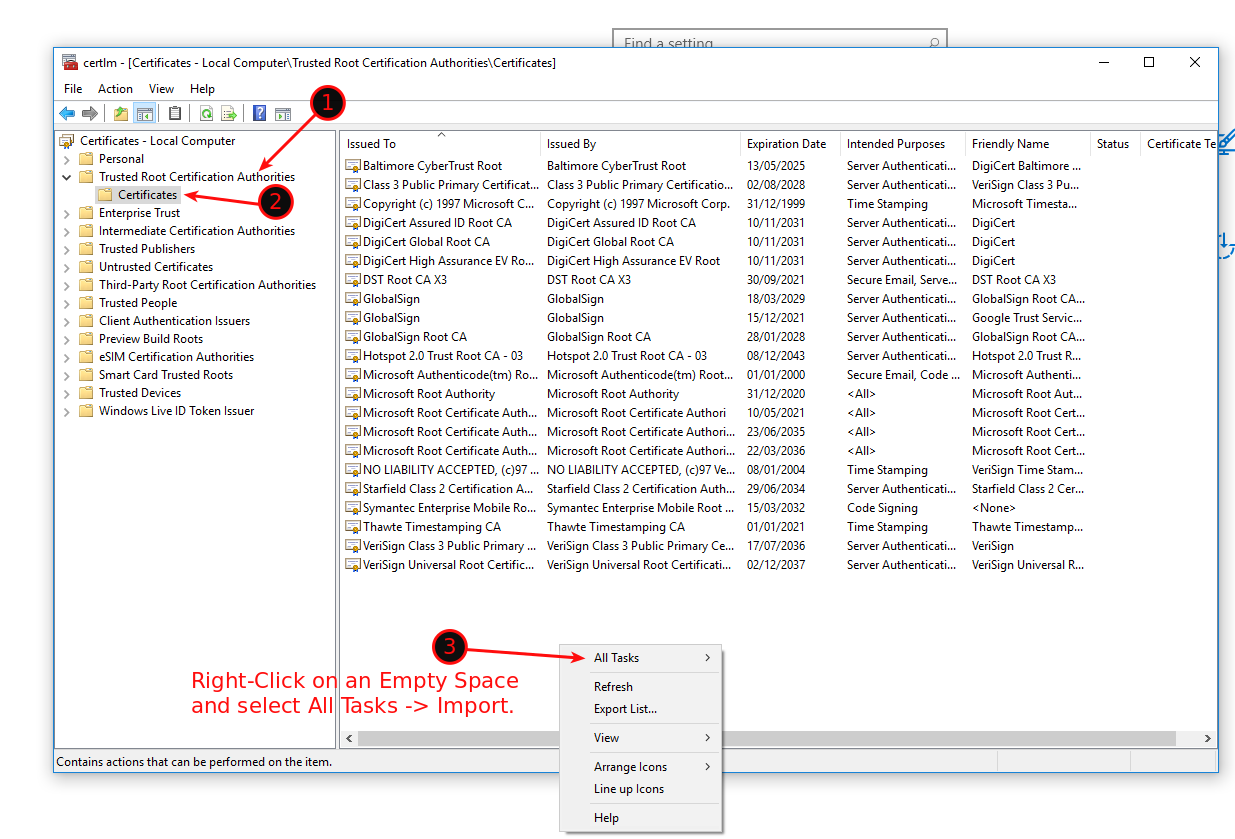
For Google Chrome, we need to Import the Root-CA to our Windows 10 Certificate Root. Open your Windows Settings and Search for “Certificate”. Open the Manage Computer Certificate settings.

In there, navigate to Trusted Root Certification Authorities / Certificates and right-click somewhere on the right side on an empty space, and select All Tasks -> Import. Select the Root CA you downloaded from your Firewall.
Select Place all certificates in the following Store: Trusted Root Certification Authorities. Click Next and Finish.
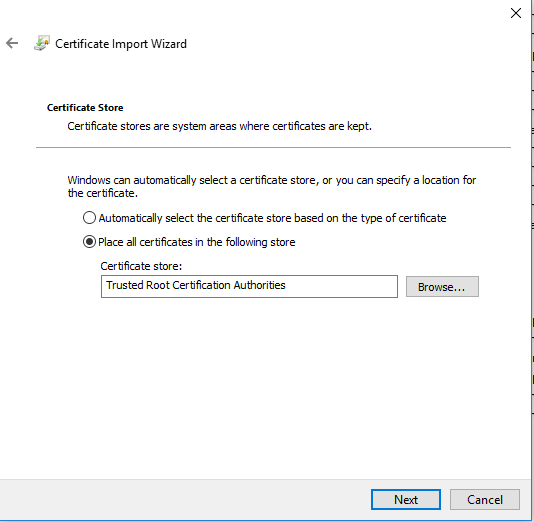
Now navigate to Intermediate Certification Authority / Certificates and repeat the step above, but this time import the SUB-CA.
If you only use Chrome, continue with Step 5.
Step 4- Firefox
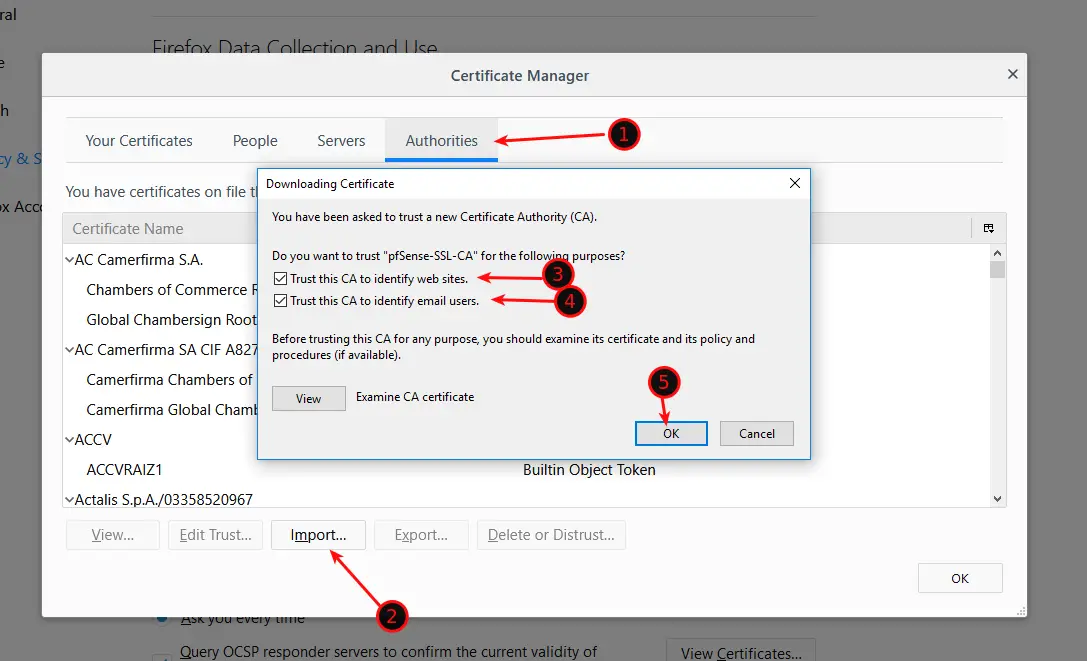
On Firefox, we need to manually import the Root-CA only. To do that, open Firefox and head to Options / Privacy & Security / View Certificates.
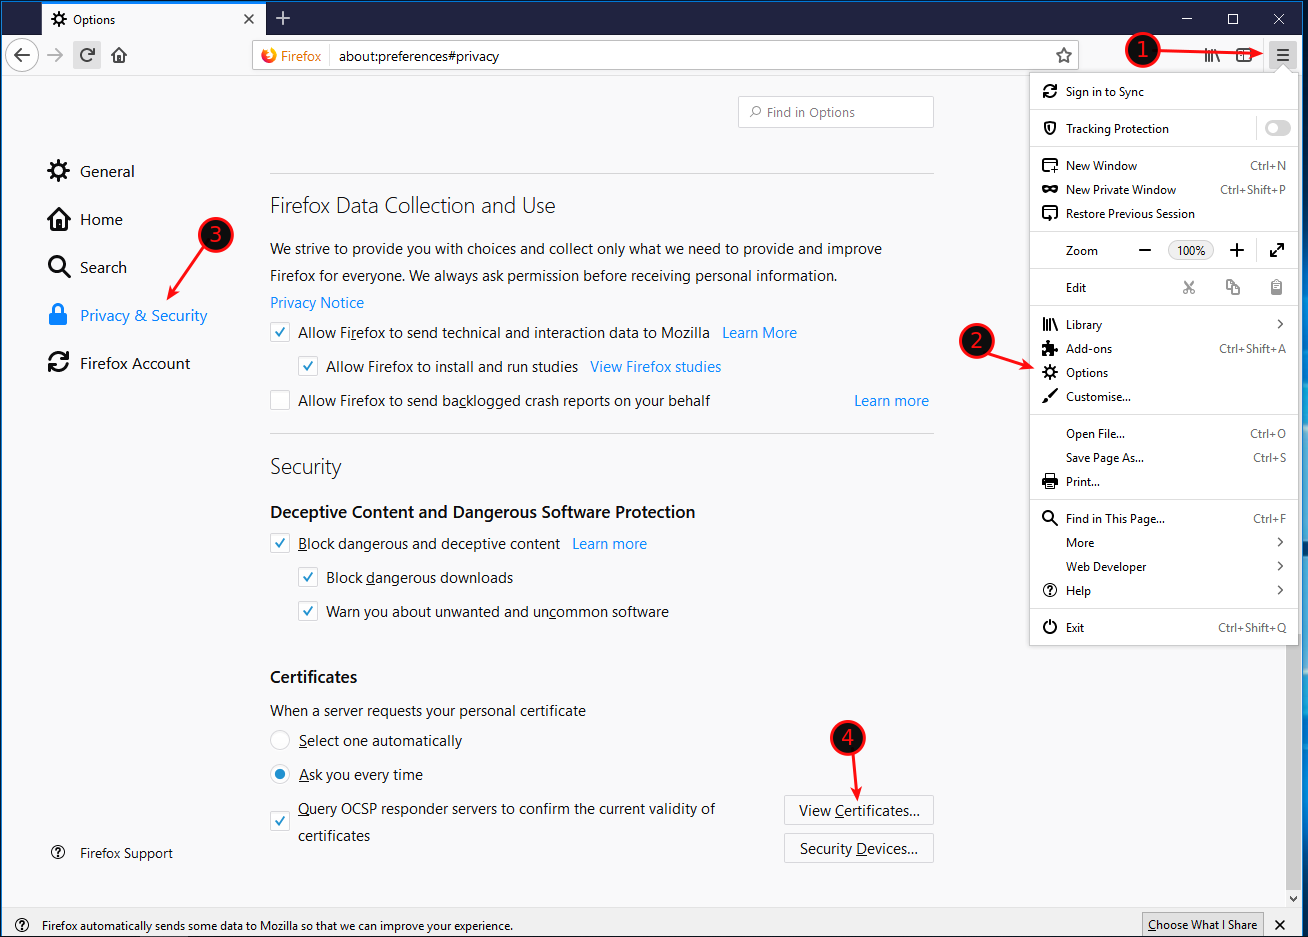
Click on Authorities and Import the pfSense Certificate from your Downloads folder. Check both Checkmarks.
Continue with Step 5 for the last thing we need to do to enable SSL for pfSense.
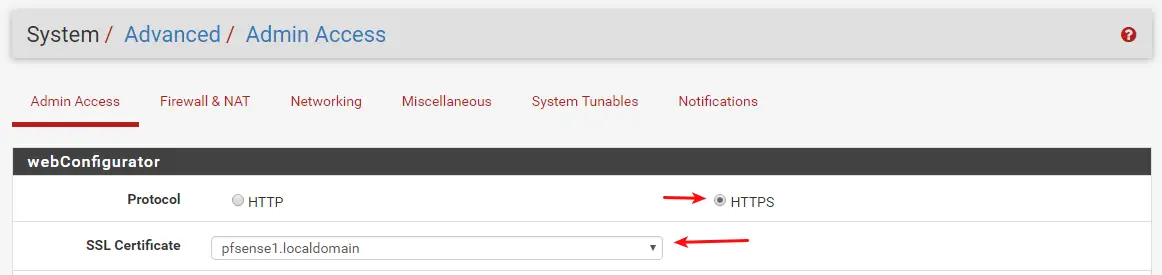
Step 5 – Enable SSL for pfSense
Log back into your pfSense Firewall and Navigate to System / Advanced / Admin Access.
Make sure HTTPS is selected as Protocol and now change the SSL Certificate to the one you have created. Scroll down and click on Save. Now, when you restart your Web Browser, you should see a Secure Connection to pfSense when accessing it next time..
Step 6 – Wrapping Up
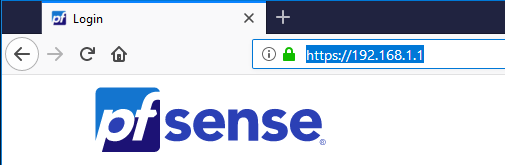
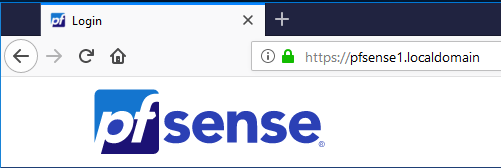
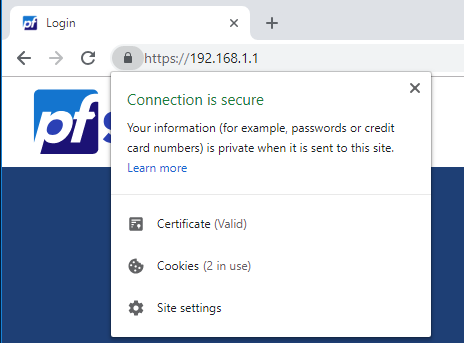
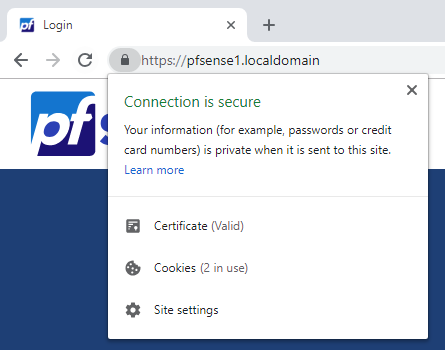
Because you have specified Alternative Names in the Certificate, you will be able to securely access your firewall with either the FQDN or the IP Address. See the examples below.
Firefox via IP
Firefox via FQDN
Chrome via IP
Chrome via FQDN
As you can see, it works. This ensures that you have a secure connection to your pfSense Firewall. Don’t miss out on other pfSense Tutorials and also check my YouTube Channel for a lot of pfSense Video Tutorials!
Conclusion
This is how easy it is to enable SSL for pfSense. If you want to learn more about the pfSense firewall, check out some of the related articles below if you want.
👀 This Tutorial has some related Articles!
👉 The Complete pfSense Fundamentals Bootcamp
👉 Install pfSense from USB – The Complete Guide
👉 Install pfSense on VirtualBox
👉 The Complete pfSense OpenVPN Guide
👉 The Complete pfSense DMZ Guide
👉 Generate SSL Certificates for HTTPS with pfSense
👉 The Complete pfSense Squid Proxy Guide (with ClamAV!)
👉 pfSense Site-to-Site VPN Guide
👉 pfSense Domain Overrides Made Easy
👉 pfSense Strict NAT (PS4,PS5,Xbox,PC) Solution
👉 The Best pfSense Hardware
👉 Traffic Shaping VOIP with pfSense
👉 pfSense OpenVPN on Linux – Setup Guide
👉 pfSense Firewall Rule Aliases Explained
👉 Email Notifications with pfSense
👉 pfSense DNS Server Guide
Hi!
Thanks for the tutorial, really great.
Is it also possible to create certificates for other devices in the network in this way?
NAS / Switch …
Thank you so much, I have always wanted to learn a bit more about certs, and everything that goes with them. I really appreciate your efforts here.
Thank you very much ! It’s awesome
Great instructions – got it on the first try!
Now… would you consider instructions for hapless Edge users 🙂
This was extremely helpful. Thank you!
You are welcome!
Same Question as Chris. Why did you make a Sub-CA and not derived the Cert from the Root CA directly?
IIt doesn’t work no matter what I do.
Chrome version: 106.0.5249.91
Edge version: 105.0.1343.53
pfSense version: 22.05-RELEASE (amd64)
It always gives me:
Your connection isn’t private
Attackers might be trying to steal your information from 192.168.10.24 (for example, passwords, messages, or credit cards).
NET::ERR_CERT_AUTHORITY_INVALID
Issuer: ceos3c-Sub-CA
Expires on: Sep 30, 2032
Current date: Oct 3, 2022
I’m very sorry – it’s my fault!
In “Creating a Sub Certificate”, I haven’t noticed that there is a difference between:
1. “Create an intermediate Certificate Authority”
2. “Create an internal Certificate Authority”
🙁
Now it works! 🙂
Thank You!
this one works well for the LAN Interface, but it doesn’t for WAN interface, my WAN interface runs on public ip, could you guide how to?
this certificate procedure works well for the LAN interface, but it doesn’t work for the want interface. in the certificate I did add my wan address too, my wan works on public ip. any guidance
Worked Great .. Thanks for taking the time and screen shots..Got me going Straight away.
I have tried this several times now in a lab environment and get looked out of the WebGUI each time. Started with a fresh install of pfSense 2.4.4. Any ideas where I may be going wrong? Client is Ubuntu with Firefox, but I have also had the issue with Win7 Chrome and Firefox.
change the FQDN to IP when writing the IP
I always wondered how to do this, thanks for the write up!
You are welcome!
followed your tutoriall but there is a problem in creating the internal certificate. this is the error message:
DNS subjectAltName values must be valid hostnames, FQDNs or wildcard domains.
what does it mean? thanks!
Worked awesomely, instructions were perfectly clear and concise, and more importantly, the interface pics were up-to-date, thanks for taking the time to make this guide
What about Chrome under Mac OS X? I got it to work by just adding the Root-CA to the KeyChain Access app but should it have?!?!? Why did I make a Sub-CA? Thanks.
under Firefox, You should import the new certificate created earlier and put it in trusted authority and it will work like a charm 😉
Great article but you should have added serious warning at the start that you should verify availability and access to either one of these:
– enable the HTTP backdoor (disable once working)
– enable and test SSH access (preferred)
– check serial port access (last resort and has to be available)
– Ethernet access to special port for configuration (if exists)
When you get the message such as “SEC_ERROR_INADEQUATE_CERT_TYPE” or some other error, you know that you can access the firewall and fix it. Right now you would be locked out and struggle to get back in if you didn’t.
Yes, I did set the wrong certificate type because it just got moved to a new pfsense box and not everything got tested and configured. Old one is broken so now I have to put much more effort into this to get it fixed. Now I have to get a serial cable to get to this (putty would have been easier):
“viconfig”
find https (“/https”, command mode of vi)
https
change it to
http (use X to delete on left)
“:wq” to save the config file
then select option 11 to restart webconfigurator
Via SSH it would have been a lot easier. Another good source to read is:
https://doc.pfsense.org/index.php/Locked_out_of_the_WebGUI
SSH trick is not suitable if SSH is not enabled. Back to serial port access if you have one.
Gert, thanks for pointing that out. I will update the guide accordingly.
Gert, today I tasked myself with re-creating the whole article and thoroughly testing it. You should now have a much easier time following the steps 🙂
Well, following this article was very frustrating. As soon as I swapped the SSL cert and saved, I could no longer get to the UI. Both Firefox and Chrome reported „NET::ERR_CERT_AUTHORITY_INVALID“ no matter what I did. I used several different computers with Firefox, Chrome, and Safari. I verified each time that the CA was correctly trusted, but it still wouldn’t load. I FINALLY was able to get to the pfSense ui up by installing an OLD version of Firefox that let me add an exception to visit the site. Of course I immediately swapped the SSL cert back to the web configurator things worked fine again.
Hello david, I need your help here. Can you please mention which version of Firefox?
You can tell firefox to use Windows CA
about:config
security.enterprise_roots.enabled “true”
i had to explicitly trust the cert in my laptop. after that it worked. thx for the post!
For some reason is not working for me 🙁
I am getting NET::ERR_CERT_AUTHORITY_INVALID
Sorry, it is working in Google Chrome. But not in Firefox.
Thank you!
Great you were able to solve it on your own!
Almost great instructions. Chrome has a restriction that means this won’t work
https://support.google.com/chrome/a/answer/7391219?hl=en
You need to change the instructions to ensure that your FQDN is ALSO in the Alternative Names field
Thanks for the guide!
Thanks for pointing that out, Rob! Changed the guide, works like a charm!
Would be better if graphics were in English too??
Useful info.. Thanks much
You are welcome 🙂