There are a lot of different code editors out there, but lately, many developers have found a liking for Visual Studio Code. I personally switched over to VSCode from Atom and Sublime a while ago and I am not looking back. VSCode is such an awesome piece of software (and it’s completely free, too), that I don’t need to use anything else for my daily needs. In this tutorial, I show you how to install VSCode on Kali Linux.
Should you also happen to need assistance in installing Kali Linux on Windows – I got just the guide for you.
👀 This Tutorial has some related Articles!
👉 How to get started in Cyber Security – The Complete Guide
👉 How to get started with Bug Bounties
👉 Terminal Customization Series
👉 Best Ethical Hacking Books
👉 Download Kali Linux Safe & Easy
👉 Best Ethical Hacking Tools
👉 Install VSCode on Kali Linux
👉 Dual Boot Kali Linux with Windows
👉 Install Kali Linux on VirtualBox – Complete Beginner Guide
👉 Top Things to do after installing Kali Linux
👉 WiFi Adapter for Kali Linux – The Ultimate Guide
👉 Nmap Beginner Guide Series
👉 Metasploit Tutorial Series
👉 Burp Suite Beginner Guide
Table of Contents
- Step 1 – Downloading the VSCode package
- Step 2 – Install VSCode on Kali Linux
- Step 3 – Starting VSCode
- Step 4 – Update VSCode on Kali Linux
- Conclusion
Step 1 – Downloading the VSCode package
The easiest way to install VSCode on Kali Linux is by downloading the VSCode deb. package and installing it via Apt. By doing it this way, you are automatically installing the apt repository that is necessary to automatically update VSCode, which is what we want.
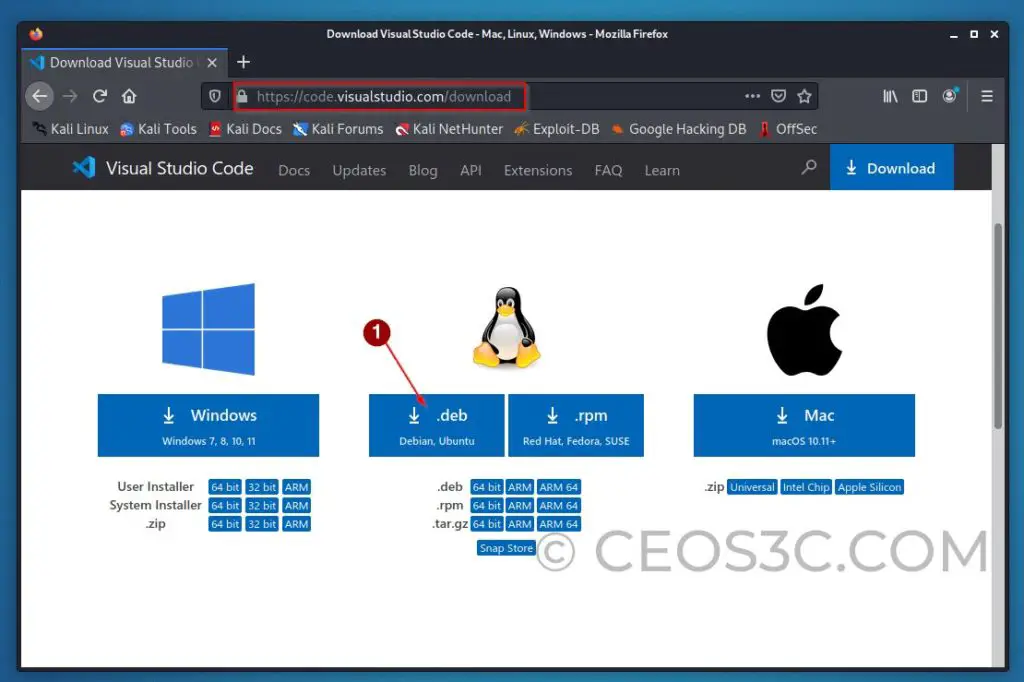
On your Kali machine, head over to the VSCode Downloads Page and select the .deb file to install VSCode.

The file will now be saved inside your Downloads folder.
Step 2 – Install VSCode on Kali Linux
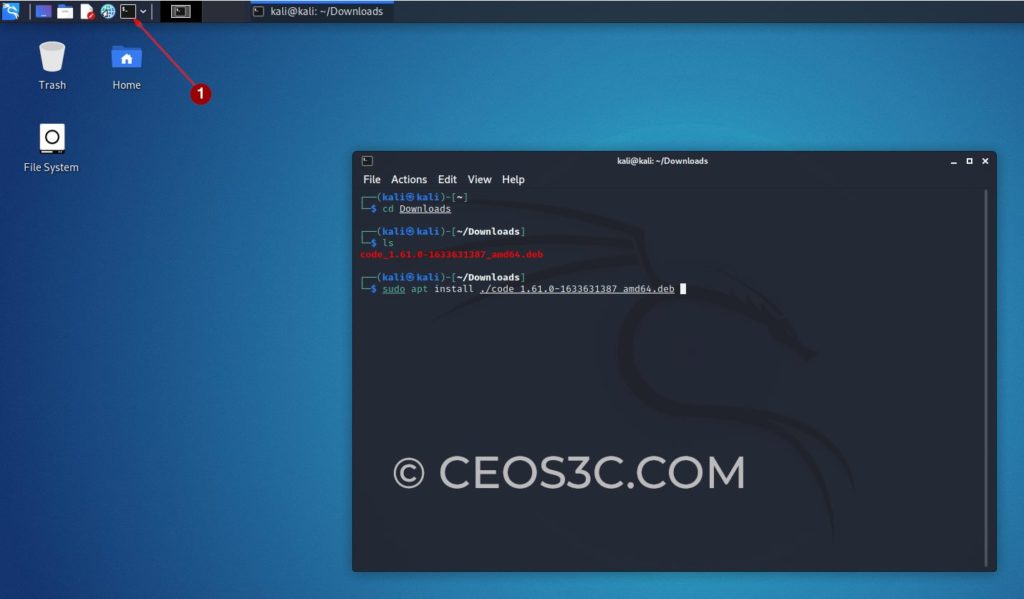
Once downloaded, we need to install VSCode on Kali Linux. Gladly, that’s very easy now. Open up your Kali Terminal by clicking on the icon and navigate to the Downloads folder.
cd Downloads
sudo apt install ./code_amd64.deb
Make sure to select the file you have downloaded for this.

This is all that you need to do to install VSCode on Kali Linux – No importing repositories or messing around with GPG keys!
Step 3 – Starting VSCode
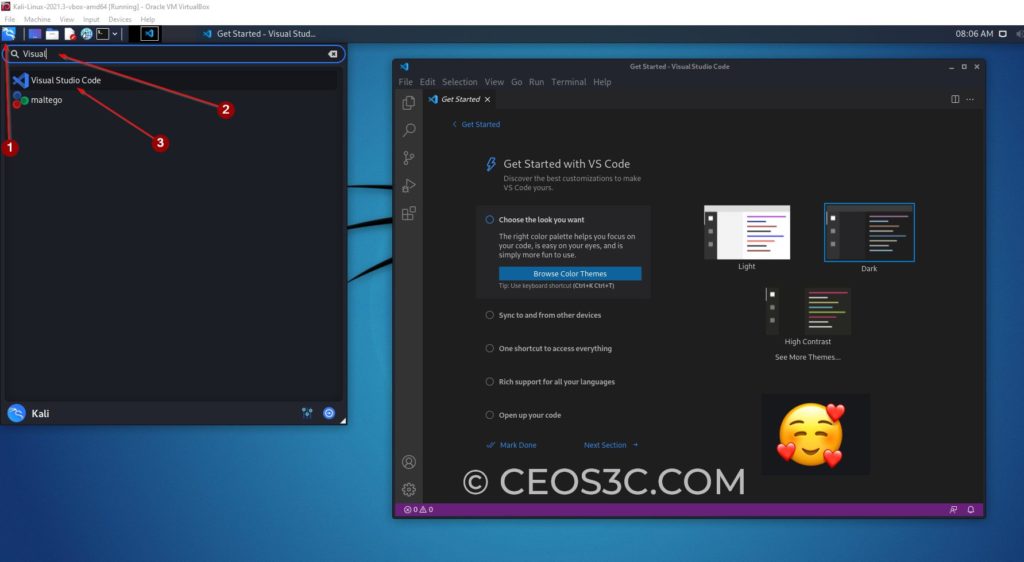
And that’s it already! You can now start VSCode on Kali Linux via the App menu.

Step 4 – Update VSCode on Kali Linux
VSCode usually notifies you if an update is available while using the app, but since we installed it in a way that also installed the apt repository, we can simply update VSCode by using apt.
sudo apt update -y && sudo apt upgrade -yThis will also bring VSCode to the latest version.
Conclusion
And there you have it. That’s as easy as it gets. Now you are able to use VSCode in Kali Linux. I really enjoy working with VSCode because of its ease of use and because of its extensive extension library.
There are extensions for almost anything you can think of, from colored bracket pairs to syntax auto-completion et cetera. On top of that, it runs really fast and had never even once crashed on me. It is also fully integrated with Git, making it very easy to work with your Git repository.
Once you get used to using Virtual Studio Code, you probably will not go back to your old editor (except, your old editor is VIM of course!), but that’s a whole topic on its own.
Check out some more related tutorials:
Install WSL 2 on Windows – Complete Beginner Guide
Customizing WSL 2 and Windows Terminal
Install Kali Linux in Dual Boot with Windows
The BEST Hacking Books to learn Hacking!
Top Things to do after Installing Kali Linux


Thank you so much! That is the first time that I’ve successfully installed and actually used Visual Studio on Kali.
May you live longer. I find this *very useful*. It’s so far the easiest method I have found.
thanks alot
thanks man
E: Unsupported file ./code_1.76.2-1678817801_amd64.deb given on commandline
open download folder then in console type: sudo apt instal (and just move instalation file behind word instal and hit enter)
I have the same problème
Problem solve
Just use kali linux X64
use this command :- sudo dpkg -i ./code_1.95.1-1730355339_amd64.deb
sudo apt install ./code_1.95.1-1730355339_amd64.deb
sudo apt –fix-broken install
sorry, but i have problem to install this package 🙁
Very easy thank
Thanks my friend its really helpful to me.You are a legend
You’re welcome! 😊
wow thanks a lot bro
really helpful
Thank you bro 🙂
Thank you
You are most welcome!
THANKS A LOTTTTTT
You bet!
Stefan, i keep trying and nothing works keep E: unsupported
thanks any help will be great
luc
I like your style! Thanks for the content!
Thank you so much. Appreciated!
Thanks for this post
Just easily explained it !!
Thank you my friend!
Try like this
sudo apt install ./code_1.65.2-1646927742_amd64.deb
dont forget put this ./
Thank you so much bro
very comprehensive and easy steps
Thanks!!
Thank you very much
You’re welcome! 🙂
Thanks it worked..
I downloaded the deb package like a week ago,had difficulty finding an “Install” option😂.. terminal is key with linux.
You should do more linux related tutorials🤷♀️
mine didn’t work, please help e find another way
niceees
Very easy to follow steps. It’s very helpful. Thanks a lot.
very easy when following the steps you describe. Really
thanks!
thank it’s very helpful