
Kali Linux isn’t recommended for beginners. Period. That’s the first thing you should learn. It’s a Linux distribution built for security professionals. I know, I know. That’s not going to stop you. So I put this list of the top things to do after installing Kali Linux together, so you can at least run it without shooting yourself in the foot.
A lot has changed since I first wrote this. Kali dropped the root-by-default login years ago, the archive signing key was replaced in 2025 and broke apt update for everyone on an older image, and Kali 2026.2 moved the repository config to a new file format. All of that is covered below.
I keep this article updated, so bookmark it and come back once in a while. Last updated for Kali Linux 2026.2.
The Short Version
If you just want the checklist, here it is. Details for each point are further down.
- Fix the archive signing key if
apt updatethrows a missing-key error. - Set your keyboard layout.
- Update and upgrade the system.
- Change the default
kalipassword. - Take a VM snapshot before you touch anything else.
- Run
kali-tweaksfor hardening, metapackages and shell settings. - Install a drop-down terminal and your code editor.
- Install GVM (the tool formerly called OpenVAS) and the rest of your toolkit.
- Set up a VPN.
- Snapshot again, then go learn something.
I also recommend reading my free Getting Started in Cybersecurity guide right after this one, plus the Best Hacking Books list. I own every book on that list and wouldn’t recommend them if they weren’t good.
Table of Contents
- The Short Version
- Step 1 – Changing the Keyboard Layout
- Step 2 – Updating Kali Linux
- Step 3 – Change the Default Password
- Step 4 – Take a Snapshot (VM only)
- Step 5 – Creating a Low Privileged User Account
- Step 6 – Run kali-tweaks
- Step 7 – Install Guake Terminal
- Step 8 – Customizing your Terminal
- Step 9 – Install your Favorite Code Editor
- Step 10 – Installing GVM (formerly OpenVAS)
- Step 11 – Installing your favorite Tools
- Step 12 – Setting up a VPN
- Step 13 – Learn Kali Undercover (and BackTrack Mode)
- Step 14 – Educate yourself!
- FAQ
- Conclusion
⚠️ Kali Linux Wiki
➡️ Download Kali Linux Safe & Easy
➡️ Install Kali Linux on VirtualBox
➡️ Install Kali Linux on VMWare Workstation
➡️ Dual Boot Kali Linux with Windows
➡️ Install Kali Linux on WSL 2
➡️ Install Kali Linux on a Laptop
➡️ Install VSCode on Kali Linux
➡️ Install OpenVAS on Kali Linux
➡️ Install Docker on Kali Linux
➡️ WiFi Adapter for Kali Linux
Step 1 – Changing the Keyboard Layout
This makes sure we’re all on the same page, and you don’t end up asking “where the hell is my & button?!”.
Tip:
The Kali Linux default login is still
User: kali
Password: kali
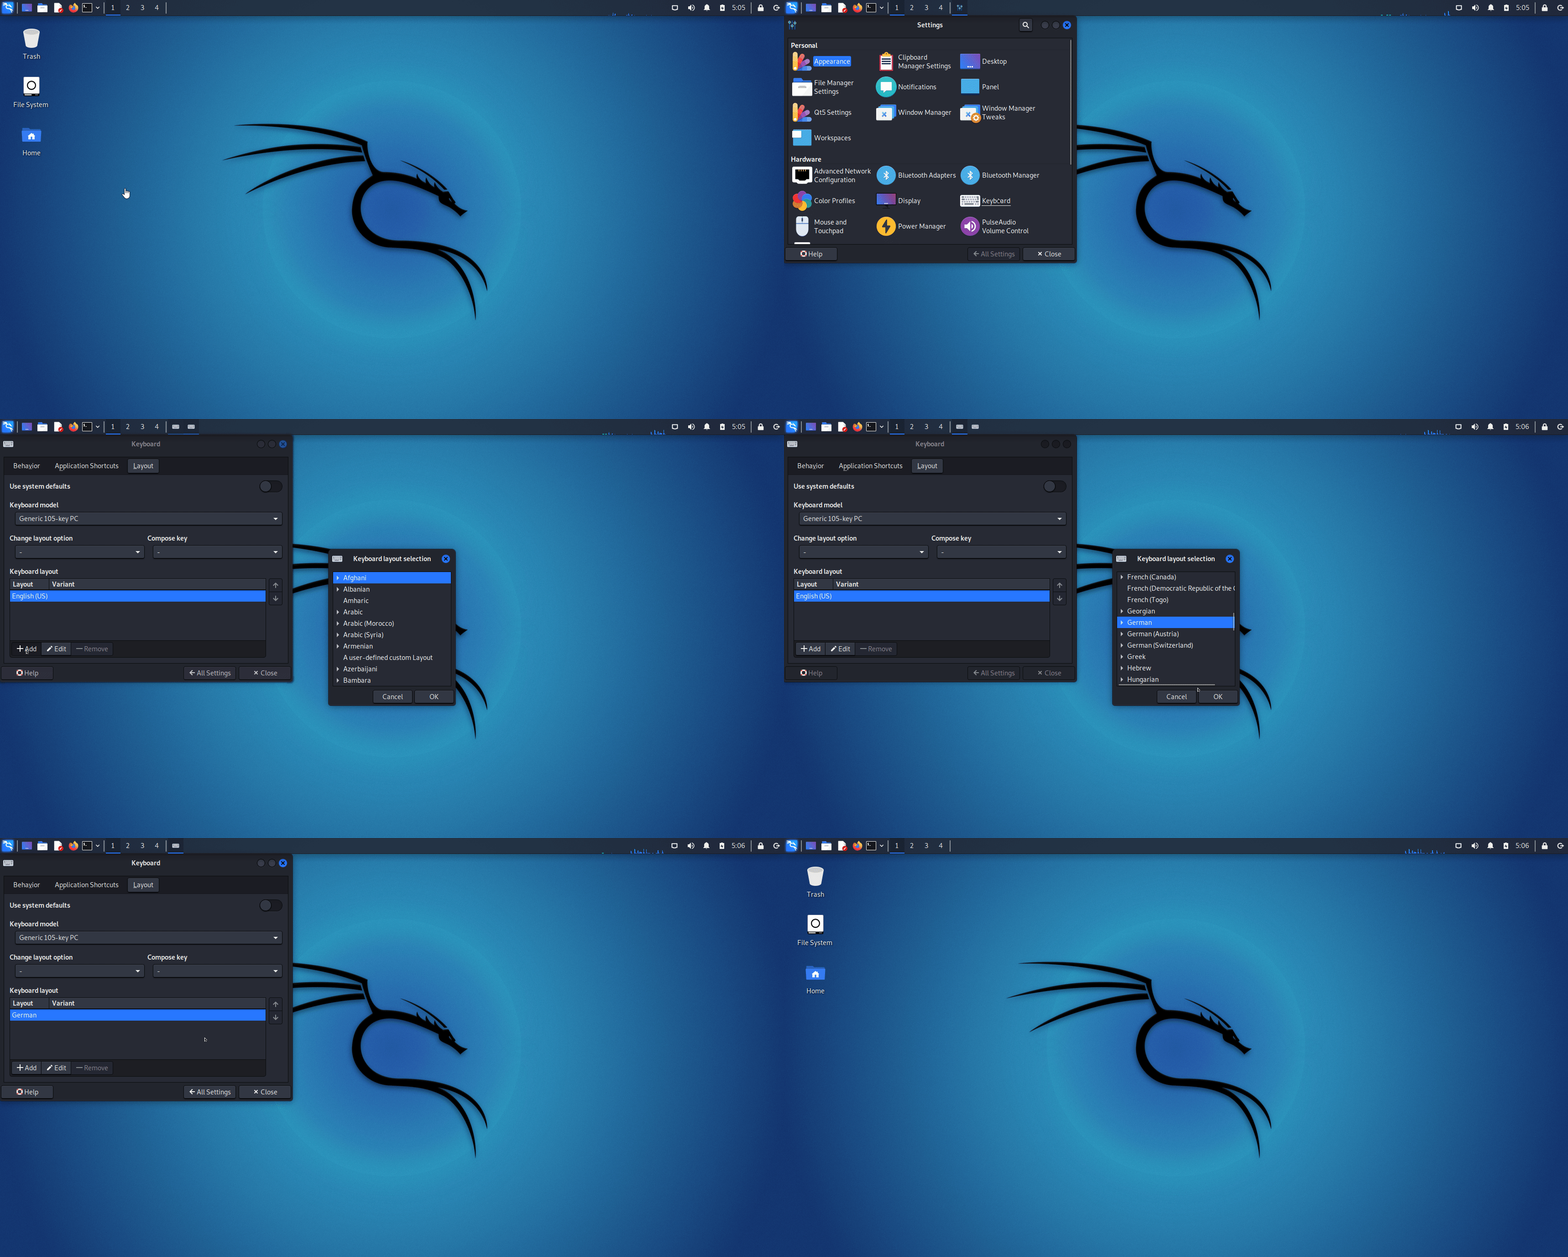
Change Kali Keyboard using the Settings Menu
The simple way. If you’re outside the US, you probably want to do this before anything else. Open the settings menu and search for “keyboard”.
Change Kali Keyboard Layout using the Terminal
The quicker way.
sudo dpkg-reconfigure keyboard-configurationCode language: Bash (bash)Choose Generic 105-key PC unless you have something special.
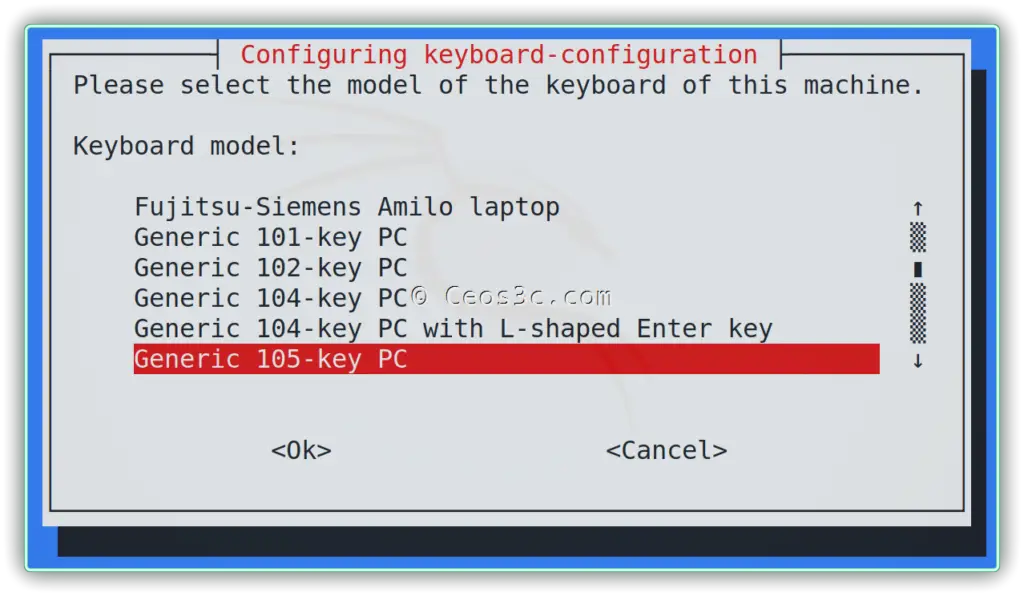
Pick your layout with the arrow keys. If you’re outside the US, scroll to the bottom and select Other. Hit Enter, select The default for the keyboard layout, hit Enter again, add a compose key if you want one, then keep hitting Enter until you’re out. Finally, restart the keyboard service.
sudo systemctl restart keyboard-setupCode language: Bash (bash)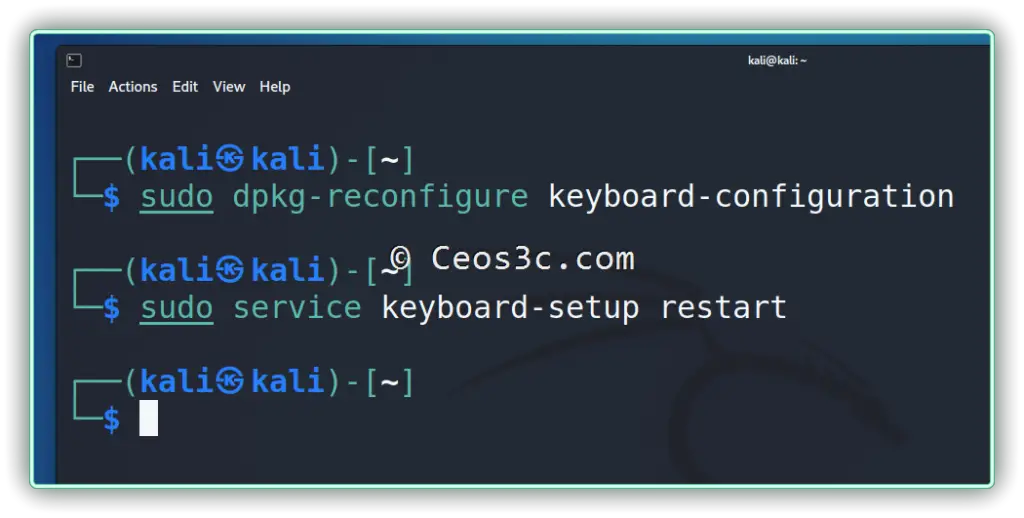
Step 2 – Updating Kali Linux
The first real thing to do after installing Kali Linux is to update it. I don’t want to start working with an outdated system or outdated tools, and neither should you.
sudo apt update && sudo apt full-upgrade -yCode language: Bash (bash)If it asks whether to restart services during package upgrades, say yes.
Small note on the commands, because people still copy the old ones around: apt full-upgrade is what you want on a rolling release like Kali. It’s the same thing the old apt-get dist-upgrade did, just with the modern apt front end. Plain apt upgrade refuses to remove packages, which on Kali means it will quietly skip half your updates.
After a big upgrade there are usually leftover packages nobody needs anymore. Clean them up.
sudo apt autoremove -yCode language: Bash (bash)Fix the Kali Signing Key Error (Very Common)
If your apt update blows up with something about a missing key ED65462EC8D5E4C5 or an /usr/bin/sqv sub-process error, you’re not doing anything wrong. Kali lost control of its old archive signing key in early 2025 and had to publish a new one. Every image older than 2025.1c hits this.
The fix is one command.
sudo wget https://archive.kali.org/archive-keyring.gpg -O /usr/share/keyrings/kali-archive-keyring.gpgCode language: Bash (bash)The new key fingerprint is 827C8569F2518CC677FECA1AED65462EC8D5E4C5 and it’s valid until April 2028. Run sudo apt update again and it should go through. If you’d rather start clean, just download a current Kali image instead, which already ships the new key.
Check Your Repositories (New Format in 2026.2)
As of Kali 2026.2, fresh installs no longer use /etc/apt/sources.list. The repository config moved to /etc/apt/sources.list.d/kali.sources in the deb822 format, which looks like this:
Types: deb
URIs: http://http.kali.org/kali/
Suites: kali-rolling
Components: main contrib non-free non-free-firmware
Signed-By: /usr/share/keyrings/kali-archive-keyring.gpgCode language: HTTP (http)
Both formats still work, so nothing breaks if you upgraded from an older install. If you want to move over anyway, apt does it for you and keeps a backup:
sudo apt modernize-sourcesCode language: Bash (bash)One thing worth checking either way: make sure non-free-firmware is in your components list. Miss it and your WiFi adapter will refuse to load its firmware, which is a fun afternoon of debugging the wrong problem.
Step 3 – Change the Default Password
Kali still ships with kali / kali on live images, VM images and ARM images. Everyone on the planet knows that. Change it.
passwdCode language: Bash (bash)The root account has no password set by default on modern Kali, and honestly you should leave it that way and use sudo. If you have a specific reason to set one:
sudo passwd rootCode language: Bash (bash)Step 4 – Take a Snapshot (VM only)
I still don’t recommend installing Kali manually in VirtualBox or VMware. Kali gives you pre-built VM images that import in about a minute and come with the guest tools already set up. Detailed walkthroughs here: Kali on VirtualBox and Kali on VMware. If you want it on bare metal next to Windows, read the dual boot guide instead.
Small win in Kali 2026.2: the VM images stopped shipping graphics firmware they never used, which cut the initrd from around 200 MB to 60 MB and made QEMU VMs boot roughly three times faster. Nice change nobody asked for and everybody benefits from.
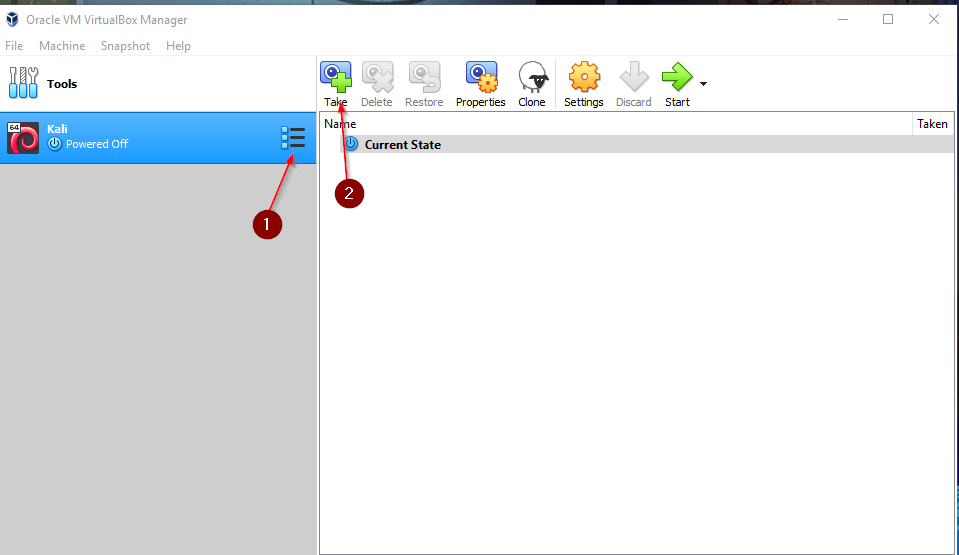
Take a snapshot of your fresh install now. You will break something at some point. Reverting takes ten seconds, reinstalling takes an hour.
In VirtualBox, select your Kali VM, click the dropdown icon next to it, pick Snapshots, then click take. Name it something useful like “Fresh install + updates, DATE”, because in three months you won’t remember.
Enable Shared Clipboard and Drag & Drop
Copying a command from your host into the VM by hand gets old fast. In your VirtualBox window go to Devices then Shared Clipboard and Drag & Drop, and set both to Bidirectional.
If the shared clipboard stops working, which it does, I have a fix for you.
Step 5 – Creating a Low Privileged User Account
Kali has shipped with a non-root user since 2020.1, so the default kali account is already low-privileged. If you’re fine using it, skip this step. If you want your own user, here you go.
sudo adduser usernameCode language: Bash (bash)This creates the user and a home directory for them.
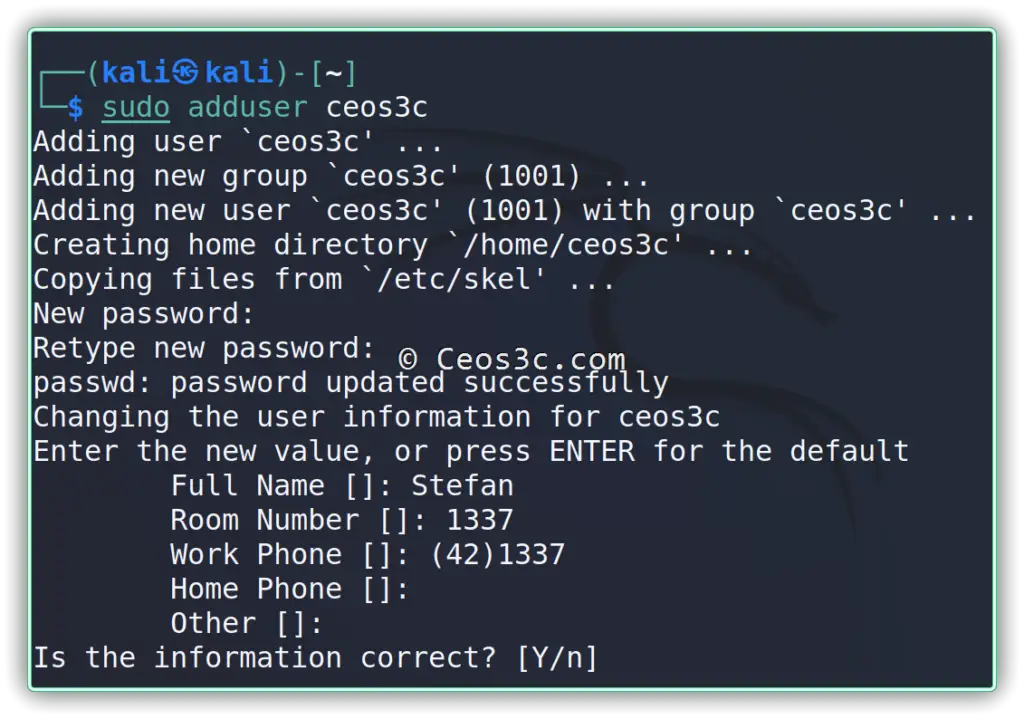
Check that it worked:
ls /home/Code language: Bash (bash)Now add the user to the sudo group. “sudo” is short for “superuser do”, and being in that group is what lets you put sudo in front of a command to run it as root. If you don’t know this already, stop and go learn the Linux basics first. Kali will be much less painful afterwards.
sudo usermod -aG sudo usernameCode language: Bash (bash)Kali defaults to ZSH now, so set your new user’s shell to match instead of dropping them into BASH:
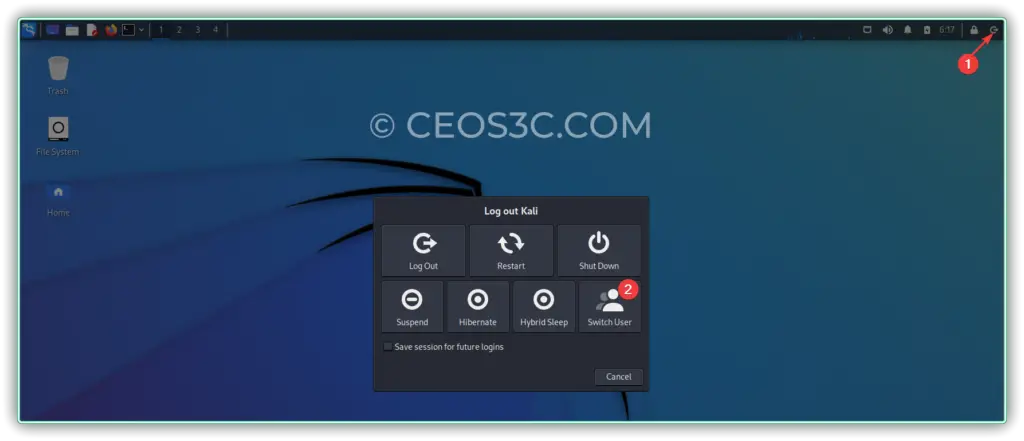
sudo chsh -s /usr/bin/zsh usernameCode language: Bash (bash)Log out of the kali account and log back in as your new user. The logout option is in the upper right corner.
Step 6 – Run kali-tweaks
This is the step most people skip, and it’s the one that saves the most time. kali-tweaks is a menu that handles a bunch of config you’d otherwise do by hand.
sudo apt install -y kali-tweaks
sudo kali-tweaksCode language: Bash (bash)
What’s in there:
- Hardening – toggles things like legacy SSH algorithm support. Turn legacy support on if you keep failing to connect to old boxes in a lab, off otherwise.
- Metapackages – install whole tool categories instead of hunting packages one by one.
- Network Repositories – enable or disable the bleeding-edge and experimental branches.
- Shell & Prompt – switch between ZSH and BASH, pick a prompt style, turn the two-line prompt on or off.
- Virtualization – guest tooling fixes, including the Hyper-V Enhanced Session Mode toggle.
On the metapackage side, the default desktop image ships kali-linux-default. If you want the bigger set that used to be the default, install kali-linux-large. Only go for kali-linux-everything if you have a lot of disk and a lot of patience.
sudo apt install -y kali-linux-largeCode language: Bash (bash)Step 7 – Install Guake Terminal
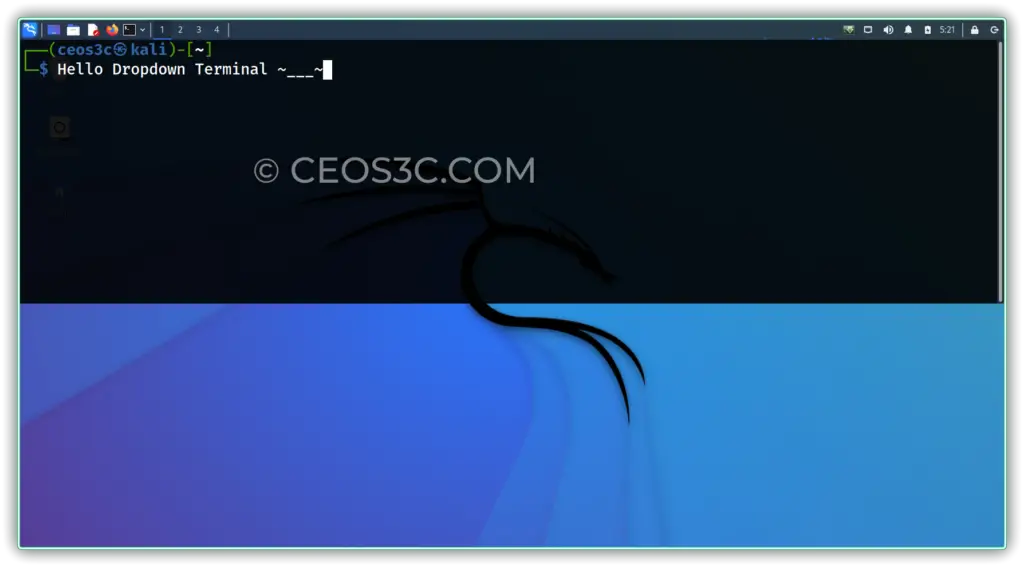
Installing Guake Terminal can’t be missing from a list of things to do after installing Kali Linux. I love this drop-down terminal and can’t work without it anymore.
If you ever played Quake 3, you’ll remember pulling down a console with the tilde key to type things like “god” or “noclip”. Same idea, on your desktop. The name was well chosen.
sudo apt install -y guakeCode language: Bash (bash)Then make it start with your session:
sudo cp /usr/share/applications/guake.desktop /etc/xdg/autostart/
sudo reboot nowCode language: Bash (bash)
After the reboot, pull Guake down with F12. If you want to rebind that to tilde or circumflex (^) and do the rest of the customization, read this. I use circumflex for obvious reasons.
Step 8 – Customizing your Terminal
Credit where it’s due, the Kali team fixed the default shell years ago. ZSH is pre-installed, the prompt is readable, and the color scheme doesn’t hurt. For most people that’s enough.
If you want to go further, I have a whole tutorial series on terminal customization that I recommend you read whether you change the theme or not. It’s written for WSL2, but both systems are Debian based, so everything transfers to Kali.
Quickest quality-of-life change if you don’t want the full tour: switch the prompt style in kali-tweaks under Shell & Prompt. The two-line prompt gives long paths room to breathe.
Step 9 – Install your Favorite Code Editor
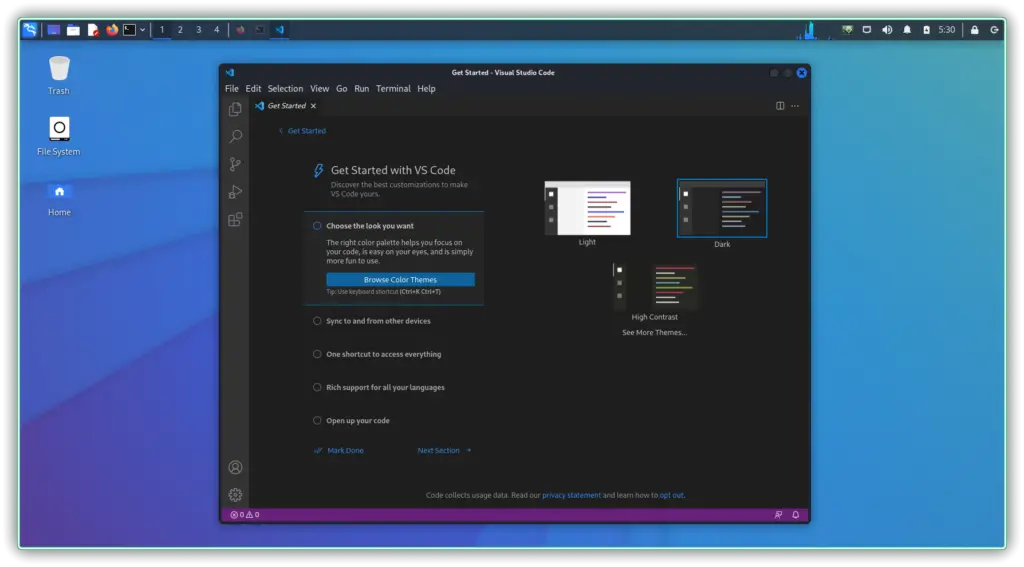
I used Atom and Sublime for years, then switched to Visual Studio Code and never looked back. I write most of my Python on Kali in it. The extension library is the reason.
Installing it is quick. There’s also a dedicated article with video if you get stuck.
Downloading the Visual Studio Code deb package
Grab the VSCode .deb package, 64-bit. Installing the deb also adds Microsoft’s apt repository, so VSCode updates along with everything else from then on.
Install Visual Studio Code
cd ~/Downloads
sudo apt install ./code_*_amd64.debCode language: Bash (bash)
That’s it. Launch it from the app menu.
Step 10 – Installing GVM (formerly OpenVAS)
Quick naming note, because it confuses everyone: the project is called Greenbone Vulnerability Management now. OpenVAS is just the scanner engine inside it. On Kali the package is gvm, and most tutorials still say OpenVAS.
sudo apt install -y gvm
sudo gvm-setupCode language: Bash (bash)
gvm-setup sets up PostgreSQL, generates certificates and pulls the vulnerability feeds. The feed sync takes a long time. Go make coffee, or three. When it’s done it prints a generated admin password, so write that down.
Then check and start it:
sudo gvm-check-setup
sudo gvm-startCode language: Bash (bash)
The web UI lands on https://127.0.0.1:9392. Kali 2026.2 standardized this <tool>-start and <tool>-stop pattern across services, and the start scripts now print default credentials and open the browser for you, which is a small thing that removes a real annoyance.
The full walkthrough with screenshots is in my Install OpenVAS on Kali Linux article. I run scans with it in the background all the time and it regularly turns up something worth looking at.
Step 11 – Installing your favorite Tools
This part is personal preference. Here’s what’s actually on my box in 2026. For more depth, read the Best Ethical Hacking Tools article.
Web
- Burp Suite
- Caido, if Burp’s Java memory habits annoy you
- Nuclei
Recon and subdomain enumeration
- Subfinder
- Amass
- httpx and dnsx
- Katana
- Gowitness
Directory brute forcing
- ffuf
- feroxbuster
- Gobuster
- Turbo Intruder (Burp extension)
General
- Metasploit
- NetExec, which replaced CrackMapExec
- BloodHound
- Hydra, John the Ripper, Hashcat
- SecLists
- KeePassXC
- Obsidian for notes, since Cherrytree and Evernote are long gone from my setup
- Flameshot for screenshots
Most of these are one apt command away:
sudo apt install -y ffuf feroxbuster subfinder httpx-toolkit nuclei seclists keepassxc flameshot netexecCode language: Bash (bash)I also wrote a small Python script years ago called the ceos3c-baseline-installer that sets up my usual toolkit on a fresh box. It’s old and I’d treat it as a starting point rather than something to run blindly, but the idea still holds. It’s on my GitHub.
Step 12 – Setting up a VPN
I always run a VPN when I’m working on a security distribution. Ideally you set it up on your router, so every device is covered without thinking about it. On the machine itself works too.
I use NordVPN because that’s what I’m on. I have an affiliation with them, so if you sign up through my link I get a small cut, which helps pay for server costs. I only recommend things I actually use.
Doing bug bounty work, I need to rotate IPs quickly to avoid getting banned by target sites. I have an alias set to “reconnect” and NordVPN drops me on a fresh node.
Install NordVPN on Kali Linux
sh <(wget -qO - https://downloads.nordcdn.com/apps/linux/install.sh) -p nordvpn-guiCode language: Bash (bash)Drop the -p nordvpn-gui if you only want the CLI.
Log in to NordVPN on Kali Linux
You need to be in the nordvpn group or you’ll get a permissions error on the first connect.
sudo usermod -aG nordvpn $USERCode language: Bash (bash)Reboot, then log in and connect. Login opens a browser window these days rather than asking for your password in the terminal.
nordvpn login
nordvpn connect
nordvpn settingsCode language: Bash (bash)
Step 13 – Learn Kali Undercover (and BackTrack Mode)
Not a security step, a practical one. kali-undercover makes your desktop look like Windows in one command, which is handy when you’re working in a coffee shop or a client office and don’t want a dragon wallpaper starting conversations.
kali-undercoverCode language: Bash (bash)Run it again to switch back. Kali 2026.1 added a second mode that turns the desktop into BackTrack 5, purely for nostalgia:
kali-undercover --backtrackCode language: Bash (bash)Full walkthrough in my Kali Undercover Mode article.
Step 14 – Educate yourself!
You have the setup. Now the actual work starts. Cybersecurity is a huge playground, and it gets overwhelming fast if you don’t have a direction to walk in.
Two articles that will keep you busy for months:
Also check the Cybersecurity category here and my YouTube channel, where everything is aimed at beginners.
Ethical Hacking Courses
I learned a lot from online courses. There’s a lot of trash out there, but I rate what Heath Adams (@thecybermentor) puts out. He doesn’t assume prior knowledge and goes step by step, much like we do here.
His Practical Ethical Hacking course moved my skills more than anything else I’ve done. Others worth your time:
- The Practical Ethical Hacking Course – Heath Adams
- Linux 101 – Brent Eskridge
- Windows Privilege Escalation – Heath Adams
- Linux Privilege Escalation – Heath Adams
TCM Academy also runs its own certifications now, and there’s an all-access pass if you want everything. I keep a subscription running.
FAQ
What is the first thing to do after installing Kali Linux?
Update the system with sudo apt update && sudo apt full-upgrade -y. If that fails with a missing key error, install the current archive keyring first, then update. Change the default password right after.
What is the default username and password for Kali Linux?
It’s kali / kali on live images, pre-built VM images and ARM images. Vagrant boxes use vagrant / vagrant. If you install from the installer image, you pick your own username and password during setup.
Why does apt update fail with a missing key error on Kali?
Kali replaced its archive signing key in April 2025 after losing access to the old one. Any image older than 2025.1c ships the dead key. Install the new keyring with sudo wget https://archive.kali.org/archive-keyring.gpg -O /usr/share/keyrings/kali-archive-keyring.gpg and run apt update again.
Do I still need to create a separate user in Kali Linux?
No. Kali stopped logging you in as root back in 2020.1, and the default kali account is already unprivileged. Creating your own user is nice for habit and for shared machines, but it isn’t the security fix it used to be.
Should beginners use Kali Linux?
Probably not as a daily driver. Kali is a working tool for people who already know Linux. If you’re starting out, learn on Debian or Ubuntu, then run Kali in a VM for security work. You’ll spend far less time confused.
Conclusion
That’s my list of things to do after installing Kali Linux. None of it is complicated. Update the system, fix the key if it bites you, change the password, snapshot, run kali-tweaks, then install the tools you’ll actually use rather than all of them.
Kali moves fast, so this list keeps changing. Check back once in a while.
👀 This Tutorial has some related Articles!
👉 How to get started in Cyber Security – The Complete Guide
👉 How to get started with Bug Bounties
👉 Terminal Customization Series
👉 Best Ethical Hacking Books
👉 Download Kali Linux Safe & Easy
👉 Best Ethical Hacking Tools
👉 Install VSCode on Kali Linux
👉 Dual Boot Kali Linux with Windows
👉 Install Kali Linux on VirtualBox – Complete Beginner Guide
👉 Top Things to do after installing Kali Linux
👉 WiFi Adapter for Kali Linux – The Ultimate Guide
👉 Nmap Beginner Guide Series
👉 Metasploit Tutorial Series
👉 Burp Suite Beginner Guide

Thanks a lot for your detailed article
My installation was successful! And I only had to install Kali Linux on Virtualbox 4 times, and OpenVas only twice…
Why are there so many errors(? I’m a complete noob. But I have followed 2 instructors and copied them verbatim(including you, Stefan, in this article), and I end up with different results(errors)? We’re in 2024, and I hear artificial intelligence is mentioned in every other sentence… Why aren’t computers smarter than this? Apple seems to be to a very large degree without errors(did I swear inside the church, here?).
I would like to start a cybersecurity bachelor in august, but it seems unnecessarily tedious when I run into all these stupid errors all the time. Good thing I am not angry like I was when I was young, or this poor computer would be on the sidewalk…
Hi Stefan.
I’m doing Complete ethical hacker bootcamp, and tring to copy everything you say on this page. I am a complete(!!) noob, and sometimes I get silly problems because of that.
I have tried to copy everything, but after following you on the step about copy and paste between Windows and Kali, it doesn’t work. I set ‘Shared clipboard’ and ‘Drag and drop’ to bidirectional, but it doesn’t work. I also rebooted Kali a couple of times. Thank you.
Hello after installing Guake Terminal I chose “y” for reboot, after the reboot it did not auto start or open when pressing F12. While executing this command I did not want to make a mistake by missing a space or some type of mistype, previous mistypes led me to copy and paste. I went to the Guake preferences and chose these settings manually. I’m wondering am I the only one who had this problem? I feel perplexed since I copied straight from here and pasted in my terminal. Is my question even clear?
hi do you have something for start with kex nh? i started my journey with installing on my gsm
sorry if i wrongly use words im just begginer of begining
Not sure I understand the question
Virtualbox Kali Linux: How do I get past the lower level account trying to login? Plug in screen name and password. Pressed enter. Screen flash and then it goes back to login splash screen. I ran the commands you recommended for getting a lower level account authorized. It just keeps looping over and over again.
RA3 was the best, thanks for the ‘console’ tip!
Woa! I played RA3 for years of my live!
I installed Kali Linux on my HP laptop. But it can’t boot up directly. I have to select the grubx64.efi every time. Please help me to fix it. I tried every possible way to fix it.
Did you Google this specific issue?
Hi Mr. ceos3c
I always fallow your guide. For the step 2 Update and upgrade I encounter and error and I can not upgraed when I use the command in this guide step 2. in the past work flawless. I research on Kali Linux page and the one that work for me was as fallow:
sudo apt update && sudo apt -y full-upgrade
Enjoyed your post. I just installed Kali just to educate myself on cyber security.
BTW: You have two Step 11’s
Hah, thank you Paul!
I’m constantly updating stuff so those things do happen. Thanks for pointing it out and good luck on your journey!
How to: Install openvas in kali linux
To install openvas you used to type apt-get install openvas and right after that typed openvas-setup. But now that is not working anymore. The first part still works though but the openvas-setup command will give an error: openvas-setup: command not found.
So whats that all about. Turns out this has something to do with a name change from the developers of openvas. The company is Greenbone and they are updating the branding towards more public visibility of Greenbone. More info in this thread https://community.greenbone.net/t/is-openvas-manager-and-gvmd-the-same/1777
To fix this you should type the following commands:
sudo apt install gvm to install openvas, or rather Greenbone Vulnerability Management
sudo gvm-setup to setup the tool for the first time use
sudo gvm-feed-update to update the feed only
sudo gvm-start/stop to start or stop the service
Thanks for pointing that out!
It is interesting, on my side, I`m also able to able to do snapshot with Hyper-V, KVM and XEN, not just with VMWare and VirtualBox, not you ? so you should follow your own advice and Educate Yourself ! 🙂
I do not use those tools, hence I don’t see the need to educate myself on them.
Not sure what your goal was with your comment. Very helpful article, and you comment just makes you look facetious. I know tone is everything with statements, but damn. Maybe you should write your own article on your own tools and experiences?
Hello, I just signed up for your course and was guided here to update Kali Linux with: sudo apt update && sudo apt dist-upgrade -y and now Kali will not work and is showing only a black screen. Please assist, thank you.
I don’t have a course 😀
I had the same issue and had to get to command line by using this site: https://miloserdov.org/?p=3343 and then run dpkg –configure -a to finish the packages. You do have to mount the filesystem then unmount when complete. This restored mine and I took a snapshot.
Thanks for the article!
Thank you, This post is really helpful.
I get the wireless not detected problem while installing kali 2020.2
*Wireless Connection is not showing while installation. I think the internal wifi adapter can not be detected, is there any solution ??
hi thanks for the article can you add csf firewall it’s good options !
So I would just like to mention that at least for me when downloading OpenVAS that didn’t take very long however when running the ” openvas-setup ” you where pretty spot on with that step taking a while (Like it was right around 1.2Gb’s @ 1.4Mb/s within my VM). But, Very good suggestion and I think it certainly is worth moving up a spot or two on you list.
Good day. he developer of Fluxion shut down the product recently, but you can get an older version of it using the command above instead:
wget https://raw.githubusercontent.com/wi-fi-analyzer/fluxion/master/install/install.sh && bash install.sh
See also link: https://github.com/wi-fi-analyzer/fluxion/issues/69
Hi there, thanks for leaving this here!
Hi,
Just like to say your site is excellent. I just installed the lscript and even though I don’t know what a lot of the programs on there are yet, it looks fantastic. It’s a great help having people as yourself willing to do these things for free for people starting out and trying to learn =)
I’m trying to learn all about Kali Linux and the things associated with it in my spare time, so to have great tutorials etc is great for me as I’m trying to learn it myself without anyone to mentor me. I’ve done quite a few courses on certain things and I’m currently trying to learn Python.
My problem is, I seem to be learning things in the wrong order and thus have to go back and redo things to try and understand them better. But, as they say – Rome wasn’t built in a day =)
I look forward to really scouring your site (after a few more courses) as there looks a plethora of great articles for me to learn new things and redo things I have done already, but with better tutorials. I already have lots of your articles bookmarked for future learning from your excellent newsletter. I can’t remember how i came across your site but it was a good day when I found it.
Again, total respect and a big thank you for your time and efforts in helping people like myself =)
Keep up the good work and have a great day!!
Hey man! Thank you for leaving such a long comment! I built the Website for exact this reason. Hearing that it actually fulfills it’s purpose is great. And I know the struggle, I currently learn Python myself, so also a little bit of reverse-order on my side as well. Just stick with it and stay curious, you will eventually end up where you want to be. It’s good that you have the “Rome wasn’t built in a day” mindset, because you need to realize one thing: It takes time, a lot of it. And patience on top of it 🙂
Good luck to you! Thanks again. Appreciate the praise!
You should add command line FTP,nfs tools and maybe Filezilla which won’t be installed by default and they all are in repos.
Hey Erkan,
good call! I might add it when I update the List next time.