
Out of popular demand, I created this complete beginner guide on how to install OpenVPN on pfSense. This was one of the most requested tutorials that you guys wanted to have. As always, my guide is accompanied by a video and I guide you through each and every step, so you can easily follow along.
If you like to deepen your knowledge with pfSense and take your skills to the next level, I highly recommend checking out my complete pfSense Fundamentals Bootcamp on Udemy.
🚀 This guide has been completely updated in August 2022
Table of Contents
- Step 1 – Creating a NO-IP Account
- Step 2 – Setting up DynDNS in pfSense
- Step 3 – Installing the Client Export Package
- Step 4 – Configure OpenVPN on pfSense using the OpenVPN Wizard
- Step 5 – Creating a VPN User
- Step 6 – pfSense OpenVPN Client Export
- Step 7 – Installing OpenVPN on Windows and Connecting
- Troubleshooting
- Conclusion
👀 This Tutorial has some related Articles!
👉 The Complete pfSense Fundamentals Bootcamp
👉 Install pfSense from USB – The Complete Guide
👉 Install pfSense on VirtualBox
👉 The Complete pfSense OpenVPN Guide
👉 The Complete pfSense DMZ Guide
👉 Generate SSL Certificates for HTTPS with pfSense
👉 The Complete pfSense Squid Proxy Guide (with ClamAV!)
👉 pfSense Site-to-Site VPN Guide
👉 pfSense Domain Overrides Made Easy
👉 pfSense Strict NAT (PS4,PS5,Xbox,PC) Solution
👉 The Best pfSense Hardware
👉 Traffic Shaping VOIP with pfSense
👉 pfSense OpenVPN on Linux – Setup Guide
👉 pfSense Firewall Rule Aliases Explained
👉 Email Notifications with pfSense
👉 pfSense DNS Server Guide
Step 1 – Creating a NO-IP Account
If you have a Static IP Address or already got a different DynDNS Service in place, you can continue with Step 2. For everyone else, we first set up a NO-IP Account because we will need it later on. Head over to NO-IP and create yourself a hostname. I recommend choosing a generic hostname so nobody can guess it.
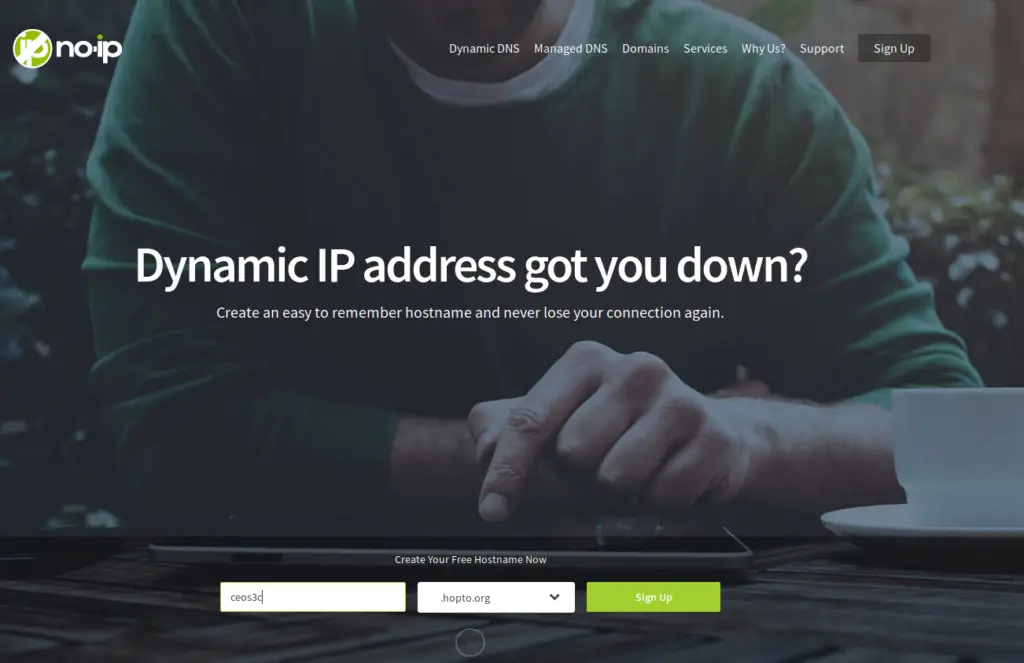
After clicking on Sign Up fill out the required fields and create your account. The free account requires you to confirm your hostname every 30 days. Activate your account via email. Log in to NO-IP with your account once confirmed and create a Username as prompted.
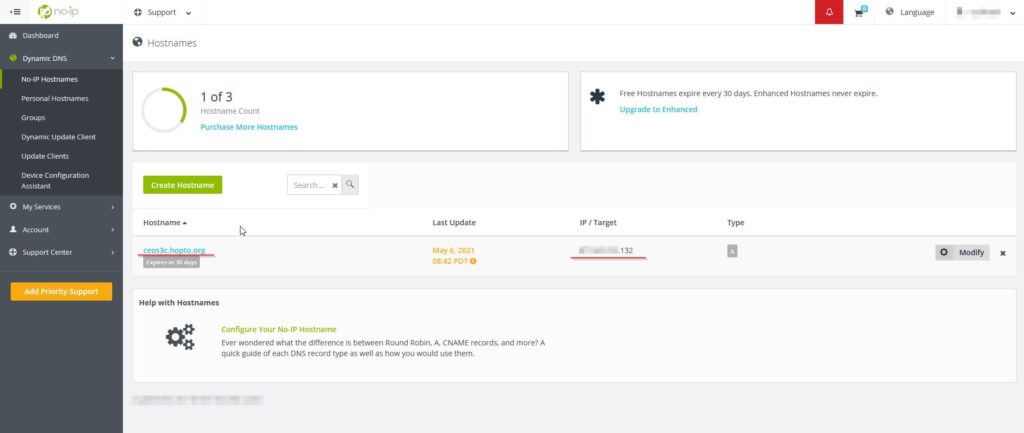
In your NO-IP Dashboard navigate to Dynamic DNS -> No-IP Hostnames and you should already see your IP Address and your DynDNS Name. In case you use another IP, adjust the entry accordingly. If you want to confirm that the IP is correct head to this website.
Good, now we have a DynDNS account, we can set this up in pfSense next.
Step 2 – Setting up DynDNS in pfSense
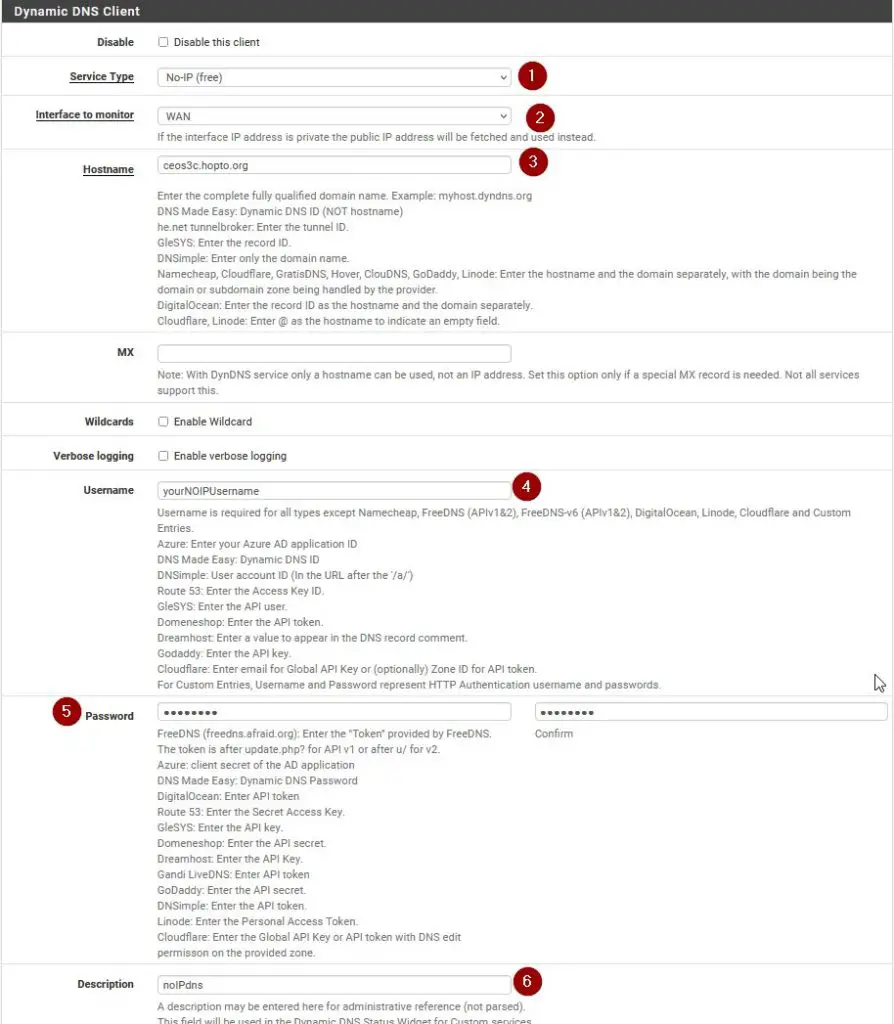
In pfSense, navigate to Services / Dynamic DNS and click on +Add. Now fill out the required fields as in the screenshot below. Choose your service from the list of services. In case you opted for NO-IP Free like me, choose No-IP (free).
Interface to Monitor is WAN. The hostname is the hostname you set up for yourself on No-IP, in my case ceos3c.hopto.org. Scroll down and enter your No-IP Username and Password. Give the service a description and click Save.
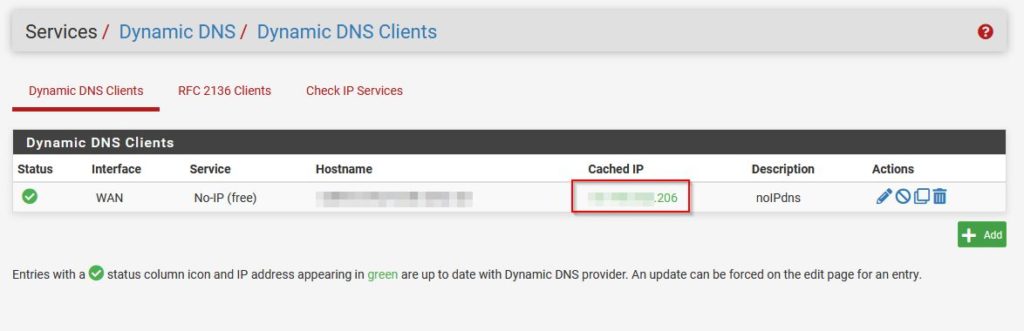
Once this is done, you should see the Cached IP in green, which means the IP is up to date.
We are done setting up DynDNS and we can go ahead and continue with installing the OpenVPN Client Export Package on pfSense.
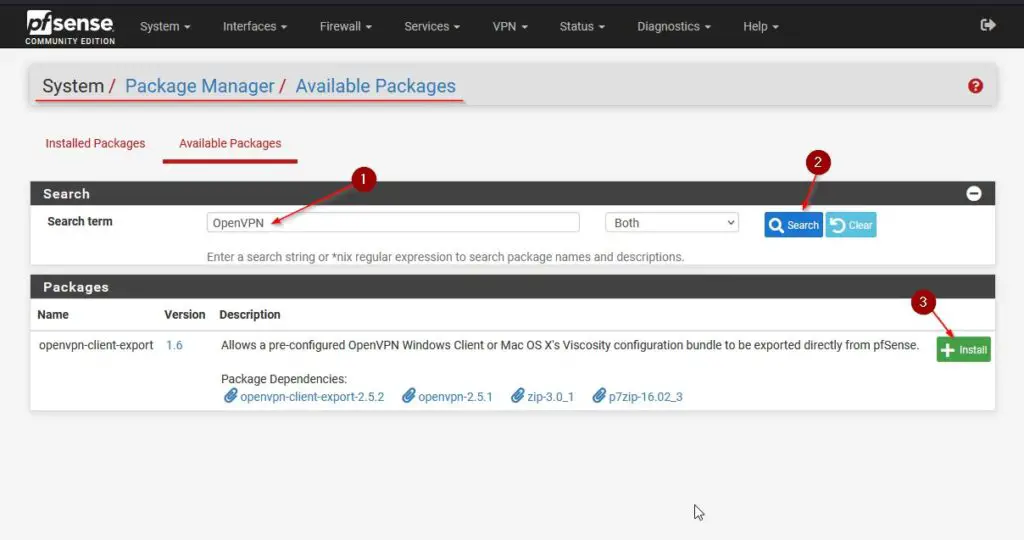
Step 3 – Installing the Client Export Package
To be able to later download our OpenVPN installer package, we need to install the Client Export Package first. Navigate to System / Package Manager / Available Packages and then search for OpenVPN. Click on +Install next to the openvpn-client-export package.
⚠️ If you would like to learn more about pfSense, I highly recommend you check out my pfSense Fundamentals Bootcamp over at Udemy. This is the most up-to-date as well as the highest-rated pfSense course on Udemy.
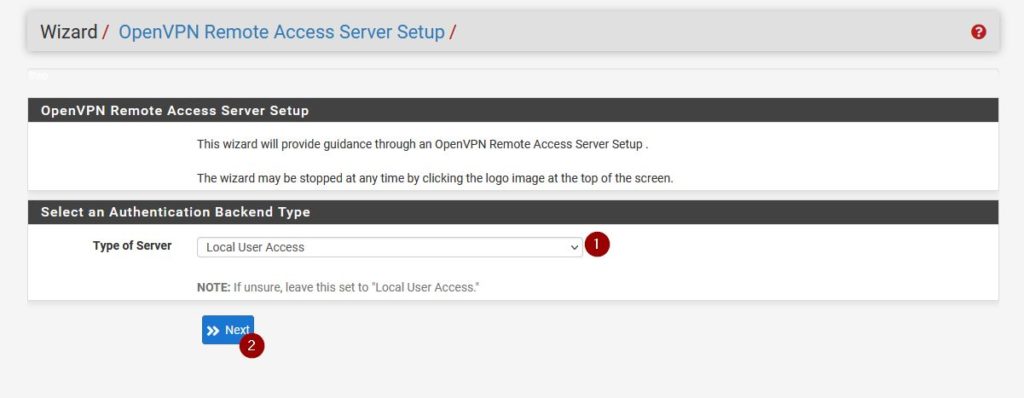
Step 4 – Configure OpenVPN on pfSense using the OpenVPN Wizard
We are lucky since this got a whole lot easier than it used to be. We can use the pfSense OpenVPN Wizard to help us with the setup process. Navigate to VPN / OpenVPN and click on Wizards to start the process.
Server Type
As Type of Server choose Local User Access.
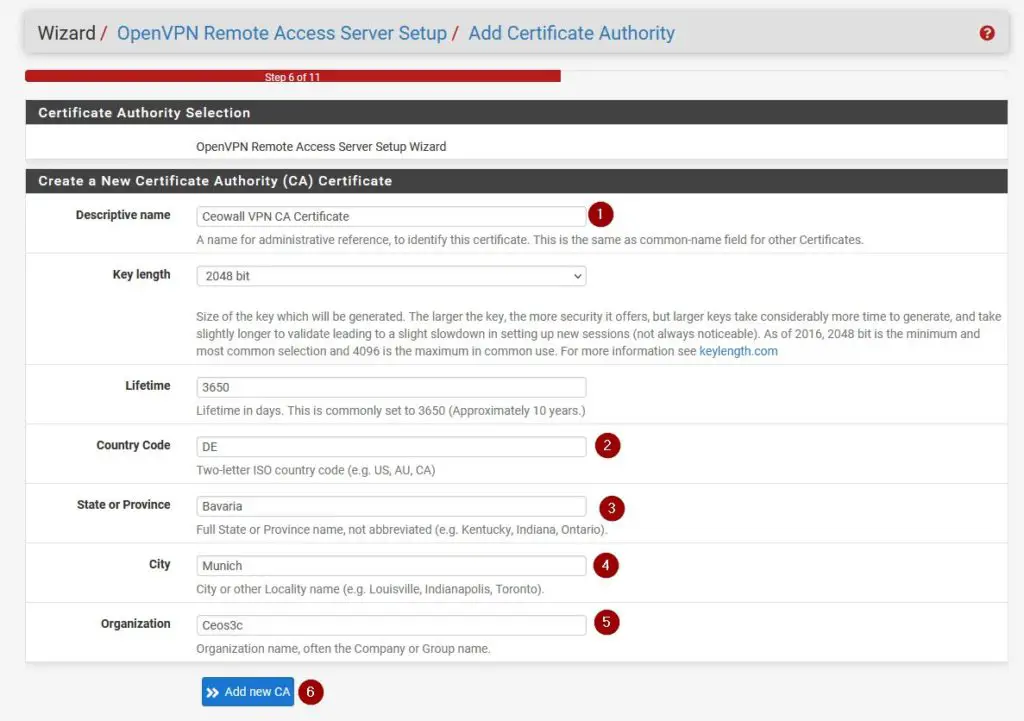
Creating a Certificate Authority
Create a new Certificate Authority and give it a descriptive name. Click on Add new CA to continue.
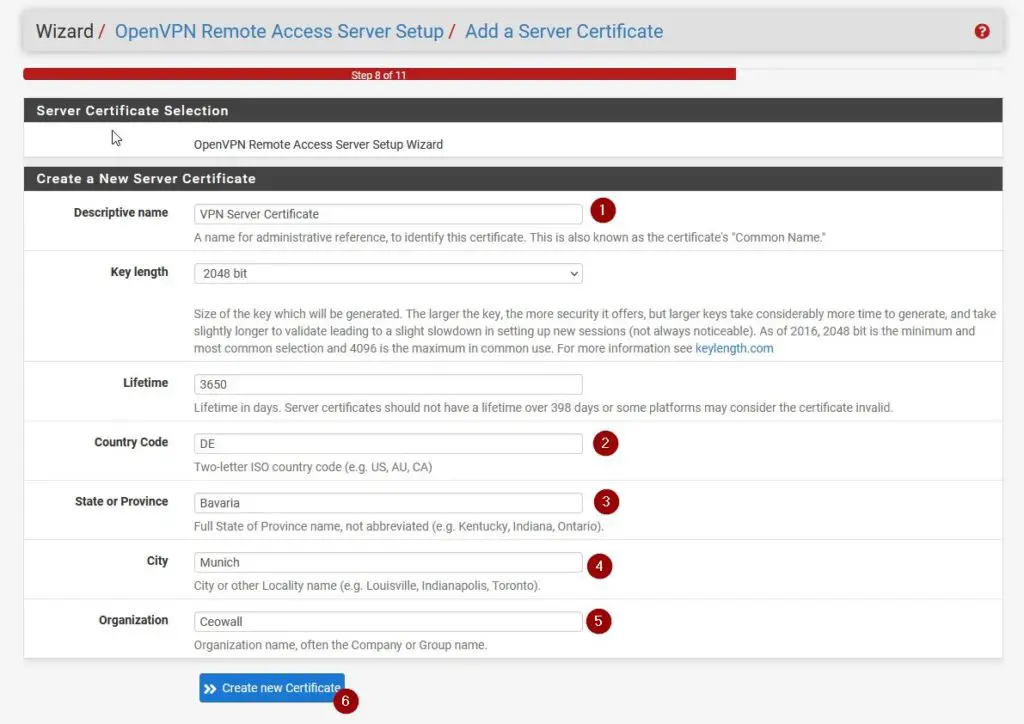
Creating a Server Certificate
Basically the same as above, give it a descriptive name and fill it in like in the screenshot below.
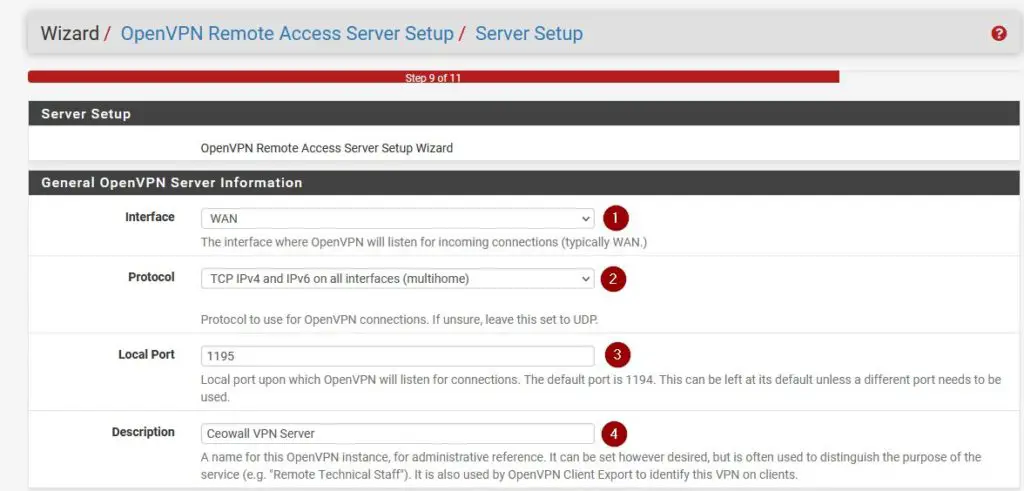
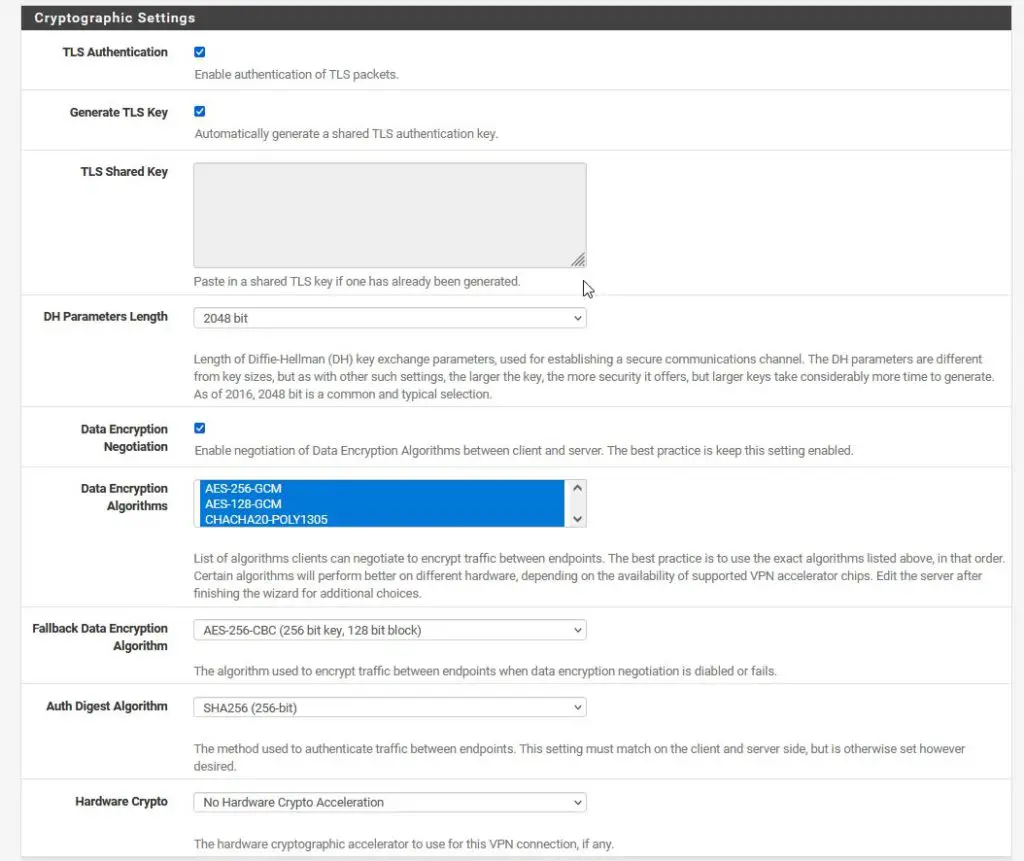
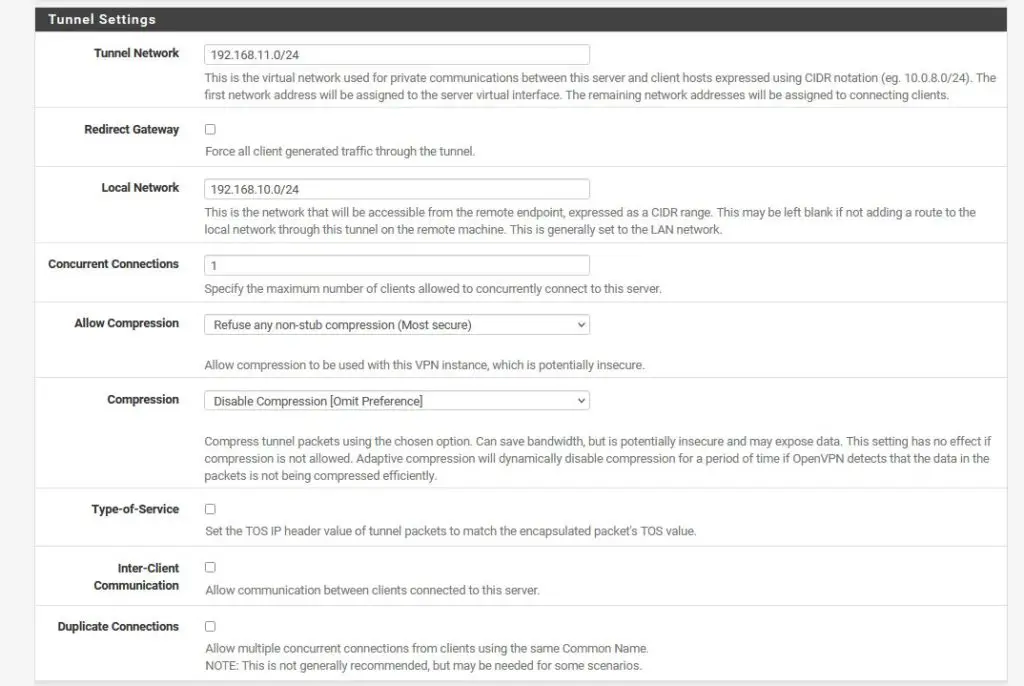
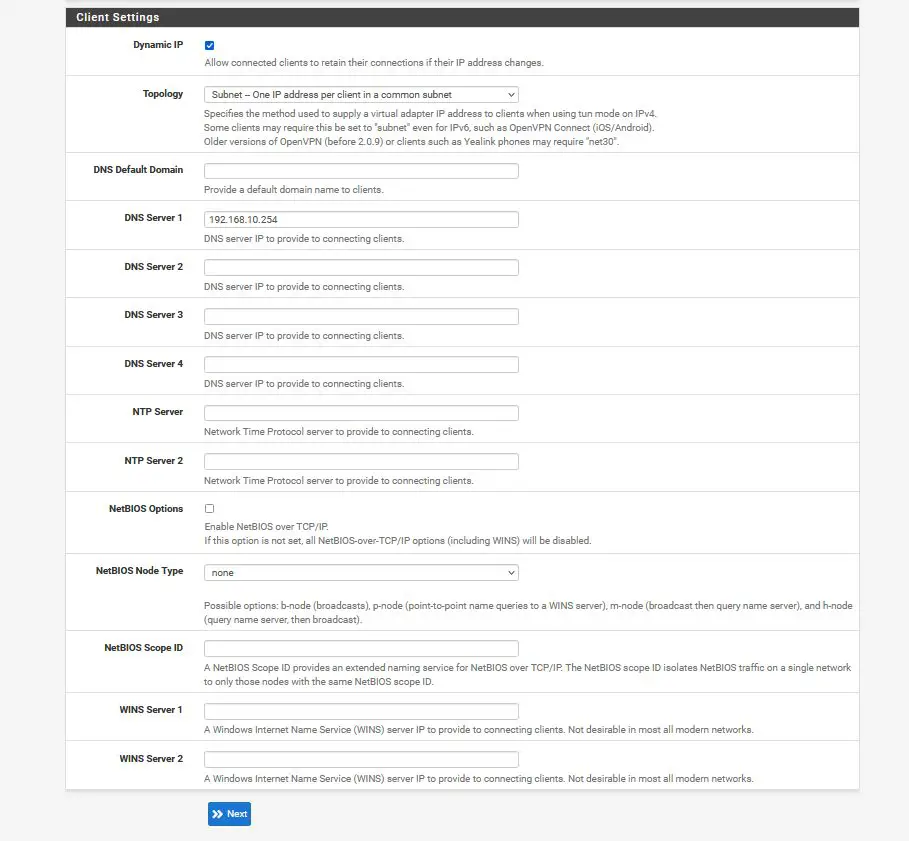
Server Setup
Now we need to set up the Server for OpenVPN on pfSense. Make sure to select everything as in the screenshots below. This part does not fit into one screenshot, so it’s dissected in multiple ones.
General OpenVPN Server Information
Cryptographic Settings
Tunnel Settings
This is an important step. Choose an IP range that is not yet in use as your Tunnel Network. So in case your regular home network has the address range of 192.168.10.0/24, choose something like 192.168.11.0/24 as your tunnel network. This is basically the IP range that will be used for your VPN clients. So if you connect to your VPN later, your client will have an IP of 192.168.11.2.
PfSense will scream at you if you use a subnet that is already in use.
The Local Network address is the address of, you’ve guessed it, your local network.
If you do not want to be able to access your local network when connecting to your VPN, leave this field empty. Otherwise, if you would like to access resources in your local network through your VPN, like a NAS or something, fill in the Local Network IP range here.
Client Settings
The only thing I’ve changed here is the DNS Server. If you want, you can push your local pfSense as a DNS server to your connected clients, so you can resolve internal network names. This is optional, although I recommend doing it.
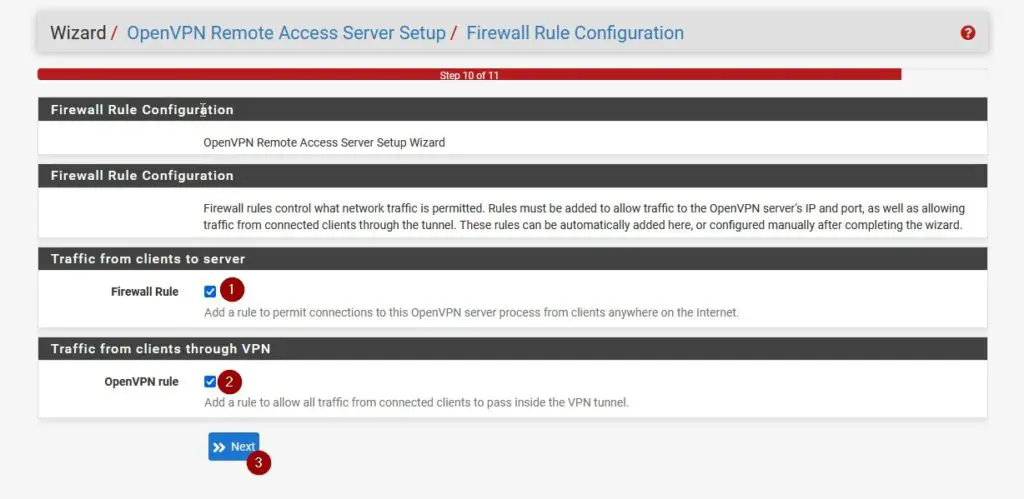
Firewall Rules
Make sure to check both checkmarks to create the appropriate firewall rules.
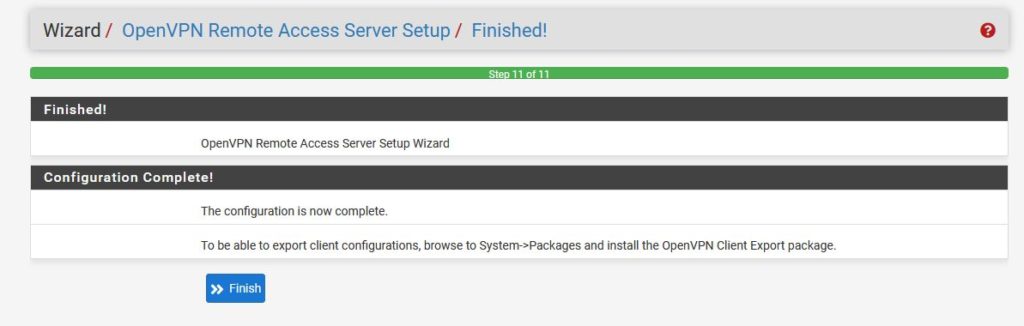
Finishing the Setup
Finally, click on Finish to install the pfSense OpenVPN Server.
Step 5 – Creating a VPN User
This is the last step we need to do to configure OpenVPN on pfSense on the pfSense side. Navigate to System / User Manager and click on +Add to add a new user.
Give your user a Username and Password, then make sure to check “Click to create a user certificate“. Fill in everything as in the screenshot below. Make sure to select the correct Certificate Authority that we had created earlier. When you are ready, click on Create User.

Magnificient, we are as good as done.
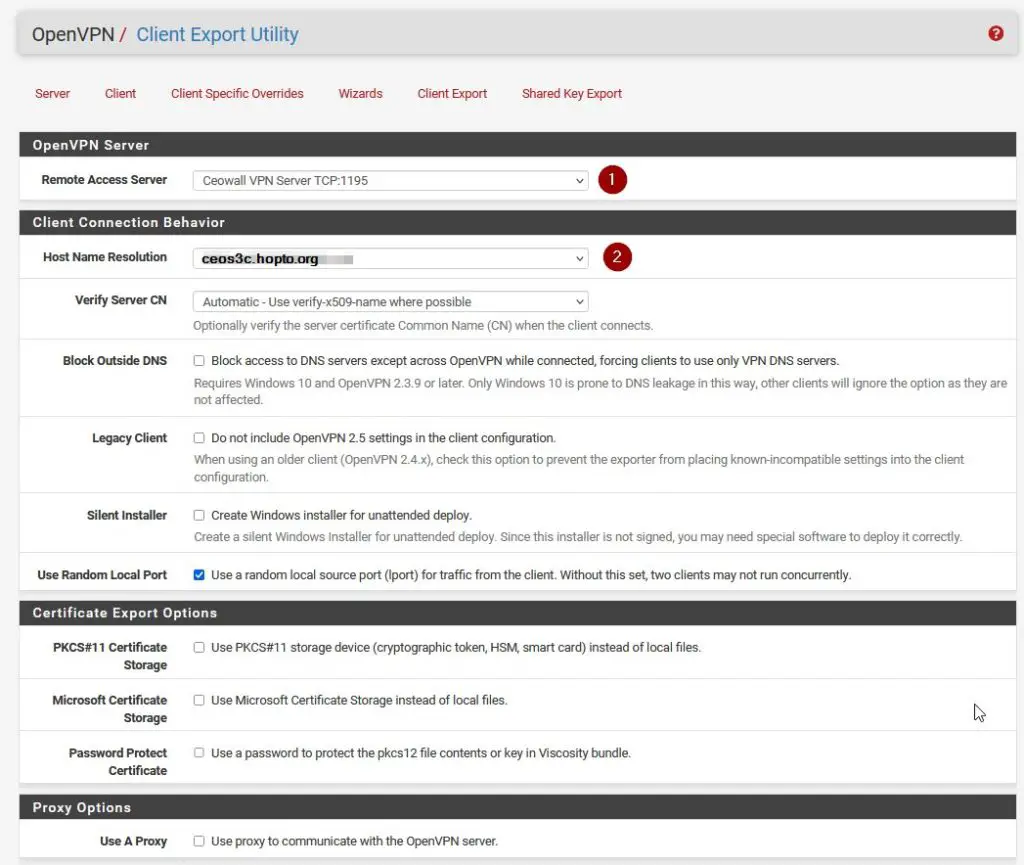
Step 6 – pfSense OpenVPN Client Export
Now our Client Export tool that we had installed earlier comes into play. Navigate to VPN / OpenVPN / Client Export. Make sure to choose your VPN Server and for Host Name Resolution choose your DynDNS Name that you have set up earlier, or select Other in case you use a different Dynamic DNS / IP method.
OpenVPN Server & Client Connection Behaviour
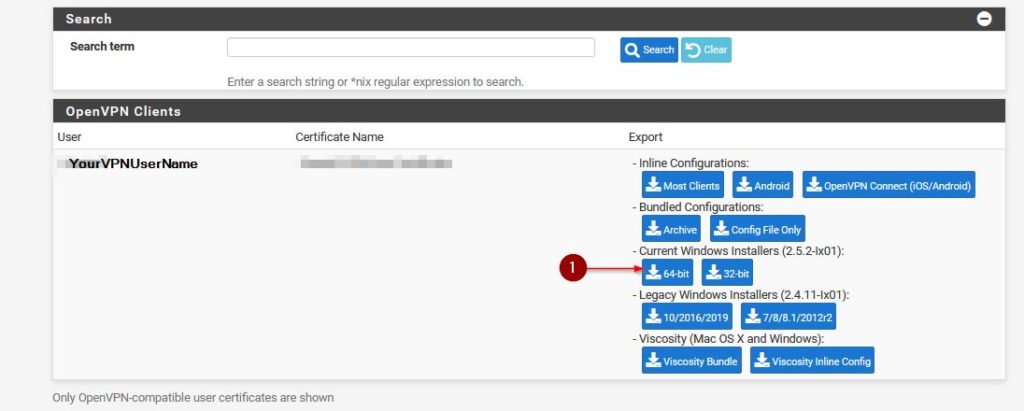
OpenVPN Clients
Then scroll down a bit to find your VPN User that we just created in the previous step and select the appropriate package to download. For Windows 10 that would be the Current Windows Installer 64-bit.
Step 7 – Installing OpenVPN on Windows and Connecting
The package you have just downloaded is the package you want to install on your remote computer.
Simply transfer it to your remote computer and run through the installer, leaving everything as default and agreeing to everything with “Yes“. There might be the need to install a TAP network driver, do that if you get asked.
Now a great way of testing your setup is by using your mobile phone as a hotspot. If you are connected to your internal network via WiFi and you try to connect to your VPN, it won’t work.
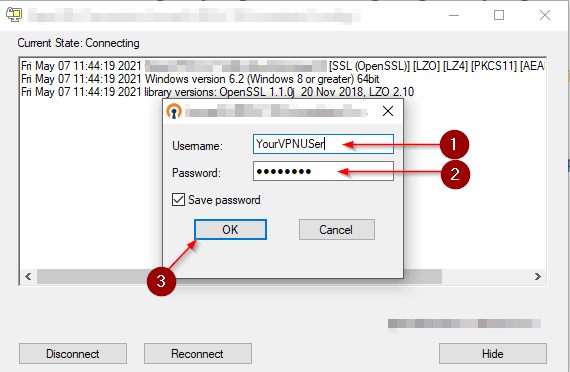
To connect, make sure to start the OpenVPN GUI from your start menu or from your desktop. A small monitor icon with a locker on it appears in your taskbar.

Right-click on it and select Connect. Enter your VPN Username and Password. Click on OK to connect. The little monitor icon should turn green if the connection was successful.
That’s it. If you have followed through each step correctly, you should be connected and able to use your internal network’s resources.
In case you want to install OpenVPN on Linux, here is the guide for you!
Troubleshooting
In case you run into any problems these are the first things to check:
- Is the OpenVPN Service running? Navigate to Status / Services. Eventually, restart your pfSense if you’re not able to start it.
- Check your Firewall Rules of all Rules were created, both the WAN and the OpenVPN Rule
- Check if you entered the correct subnet mask (192.168.1.0/24) on your Tunnel and Local Network in your OpenVPN Config. It has to be .0/24 on the end, not .1/24 or something like that.
- Check the System Logs under Status / System Logs to get hints
Conclusion
It can be a bit confusing if you go through this process for the first time, but once you have it set up, it’s a gift that keeps on giving. You have successfully learned how to install OpenVPN on pfSense! If you want to dive deeper, my pfSense Fundamentals Bootcamp covers everything you need to know to operate a pfSense firewall with confidence, including a complete OpenVPN setup from scratch.
Thank you for this detailed guide! I’ve been trying to set up OpenVPN on pfSense for a while now, but was getting frustrated with the complicated instructions. Your guide made it so much easier to understand and follow. I’m excited to try it out and see how it works for me. Great job!
Thanks for sharing this ultimate beginner guide on installing OpenVPN on pfSense! I’ve been looking for a straightforward guide like this for ages, and yours is the first one that has finally helped me understand the process. Your steps are clear and easy to follow, and I love how you provided detailed explanations for each step. I’m excited to try this out and see how it works for me. Great job!
Hi,
I am facing issue, I can ping or access windows machine and cannot access linux machines when I connect by OpenVPN. Will You please guide me to resolve this issue.
Kind Regards
Hi,
everything worked fine using your guide.
Then I updated to pfsense version 2.6.0 and vpn also works, but I am not able to export any configuration via “Client Export”-tool.
I get always error message “A private key cannot be empty if PKCS#11 or Microsoft Certificate Storage is not used. Failed to export config files!”
Server mode is set to “Remote Access (SSL/TLS + User Auth).
When I change this to “Remote Access SSL/TLS” or “Remote Access (User / Auth) I am able to export config but I am not able to connect. Client hangs while connecting.
Would be great if someone can help!
THX
Hi Stefan,
Thank you for your providing the steps – your procedure was easy to follow. My client was able to connect and browse the internet: I have ticked the option “Redirect IPv4 GatewayForce all client-generated IPv4 traffic through the tunnel, and enable DNS Server set to interface IP of the OPENVPN (dns1: 192.168.70.1 and dns2:8.8.8.8).
I have pfBlockerNG which works well on my LAN and OPT1, now I am wondering how can I extend the pfBlockerNG to work with my OpenVPN clients. Any advise?
Thank you
hello… i followed your other video for fixing SSL on Pfsense first so i already have a CA. so do i need to create another CA like you did in this video or can skip that step?
Hello I followed your tutorial, I have the pfSense ISO for Microsoft hyper-v so when I set up the pfSense VM I went to the web configurator with my IP address. There I went through the steps of trying to install openvpn on my laptop but when I got to the 64-bit installer and downloaded it windows defender wouldnt let me run that file so I uploaded it to virustotal.com and 3 security vendors flagged it as malicious. Now I ran a full scan of windows defender and it says I have hacking tools installed. I all did was follow your tutorial and now I have malware
Brilliant!
I have successfully set up VPN for my home and office thanks to your excellent guide. Thank you very much.
On my setup, I only used UDP and port 1194 though, not your TCP + port 1195.
Also for my home, I made use of an old laptop running on pfSense 2.3.3 32-bit only, and it still does the job.
Cheers!
Bob
Hey Bob,
thanks so much. Glad to hear that! 🙂
plase Can you making video for openvpn site to site with dyndns and VPN ipsec site to site with dyndns
The tutorial was great could you advise how to access the Local Lan now. I can only ping the router but not access the computers in any way.
Great write up sir. Just want to ask, if my WAN is multiwan (WAN1 and WAN2) and it’s a combined GW, how to choose the interface to monitor? GW Group Combined instead of WAN 1 or WAN 2? Pls advice. Thanks…
Sorry for double posting but I guess something went wrong, I have to say thank you for the excellent tutorial that allow me to test and setup my pfsense virtual box inside my network, I did like this, my network is with subnet 192.168.0.x so I set up my pfsense lan as 192.168.0.10/ 24 (correct ?) then I had to change my router/gateway address to 192.168.1.254 and set my wan interface as 192.168.1.200/24 (maybe 24 wrong) After that I had to change the gateway of my client as 192.168.0.10 and enable port forwarding from my router to wan ip for openvpn access and all work perfectly.
Two questions not clear for me. First, I not want to allow my vpn client to use my dsl connection for browse internet, they will be only allowed to do a remote desktop session with a client pc inside my network and eventually browse internet from there only. How to do that ? The last question is, how to enable the pfsense on the same subnet without change lan and wan addres ? I am in a situation where at an office they have a network setup with subnet 192.168.0.1 and they can’t change it, they go outside on internet passing on a firewall hardware that have no vpn appliance on and then connect to dsl router on address 192.168.1.254 so eventually on pfsense I would put a lan ip as 192.168.0.10 and wan ip as 192.168.0.203 but seems I can’t because ip overlap. Any solutions ? Thank you again for the helpfull tutorial !
You need to put your ISP modem/router in bridge mode to get a wan address on pfsense. Contact ISP on how to do that.
Thank you very much for the very informative tutorial, I’m a total beginner on pfsense possible usage but I would like to ask you some more explanation for my case. I did understand that pfsense in my case had to be setup with wan address like 192.168.1.200 static not dhcp . lan is set as 192.168.0.10 / 24 (?correct?) I had to change the ip inside my network on my clients to subnet 192.168.0.x and put a gateway as 192.168.0.10 and all traffic route on the pfsense correctly (at least the internet part I test) Then I set up a VNC as you show on the tutorial and forward the port to my address of wan 192.168.1.200 and all connect perfectly too to my VNC and I could ping the machines inside my 192.168.0.x network too and doing remote desktop perfectly. What I not want to do is allowing vpn users to use my pfsense as router for their internet connections. I would like just allow them to browse the internal network and eventually use their remote desktop for browse internet. Last thing, is possible to use lan and wan with same ip range subnet ? I’d like to test the pfsense on an office with some pc and one server where they have to stay with the 192.168.1 subnet and connect to their gateway router on same subnet, Is that possible to do like so ? Thank you very much for the help.
Excellent step-by-step instruction. Go mine working today 🙂
Great!
I am glad to hear that.
Thanks for your time and write up. I’m receiving the error “Error: TLS Key negotiation failed to occur within 60seconds”. Should i be able to ping my hostname from the web? I set my WAN firewall rule to block all IP4 and 6 traffic. I think this may be the issue. The OpenVPN connect rule is under the block all rule. So it should not matter but i could be wrong. Thanks. Also, do i need to select only the LAN and Localhost for Outgoing Network Interfaces?
Hi sir thanks for the tutorial. But I do received an error while try to connect using a laptop which is connected to my phone’s hotspot. “Error: TLS Key negotiation failed to occur within 60seconds”.
I’ve disabled my firewall and anti virus
I’ve disabled the DNS Resolver
Checked the firewall rules that has been created from WAN and OpenVPN int
But still error occurred. What could be the problem? Thanks!
Hi sir, Thank you for the tutorial… But even though i followed it step by step I still encountered the “error: TLS Key negotiation failed to occur within 60seconds”. I’ve already disabled my firewall and anti virus.. then re do the tutorial but still receiving the same error. Should I disabled the DNS Resolver? When I tried to install it on my computer within the network the connection established but unidentified network on the TAP Driver, then when I’m installing and connecting using a laptop which is connected to a phone’s hotspot.. I get the error about TLS. Please help thanks!
Great write up and Video! Thanks for taking the time.
I implemented quickly and works great.
One question, how do I configure pfSense to allow the VPN Client to have outgoing Internet access when connected by VPN?
I have my client connecting to the VPN server successfully. Client is able to access internal servers / systems on the 192.168.1.0/24 network.
But when I try to access public internet sites it can’t connect. Disconnect the VPN and able to connect to public internet sites no problems.
Is there additional setup to configure the VPN network (192.168.2.0/24 in your example) to access public internet sites when connected?
Thx.
Are you trying this while you are in the internal network? So, you connect to the VPN while you are actually inside of pfSense’s network? Because that wouldn’t work. If you connect from the outside, you should have internet access.
I got the same issue when follow this instruction, but when I change DNS server to public server 1.1.1.1 or 8.8.8.8 in OpenDNS server settings then and can connect to the Internet. You can try and feedback.
Thank you for this write-up. The good news is, if I use the IP address in my export file, I can connect to the VPN no problem.
I set up a domain using Dynu (e.g. homeserver.somedomain.com) and have successfully setup Dynamic DNS to point to it. I can ping the domain no problem using a PING command in Terminal. However, when I try to use the domain name in my export file, OpenVPN doesn’t connect. I see the following things in the log:
Time Process PID Message
Sep 9 15:39:06 openvpn 24411 172.56.4.120:34855 TLS Error: TLS handshake failed
Sep 9 15:39:06 openvpn 24411 172.56.4.120:34855 TLS Error: Auth Username/Password was not provided by peer
Any suggestions?
Weeeeeeeeell…this is interesting. Using Dynu with pfsense doesn’t allow the web address to redirect through to my VPN. However, I switched to no-ip and…tada…it works! So, choosing a DNS service that works natively with pfsense is important.
I’m now up and running. Thank you so much for this guide. It worked like a charm.
Paul, thanks for coming back and leaving a positive reply. I am happy it worked out for you in the End! If you want, subscribe to the Newsletter (No ads, only content updates). I have a lot of pfSense content in the Making 🙂
Excellent write up! Quick question. Is this a split tunnel design? or is all internet traffic now tunneled through this VPN connection?
worked like a charm, cheers
another question, hostname are not resolved through the VPN. My clients can’t ping the FQDN, qny advices ? thanks
Under the client export make sure the Host Name Resolution is set correctly. It defaults to the WAN ip.
Under Services / DNS Resolver / Outgoing Network Interfaces: Only select LAN and Localhost. That should fix the issue. Also, if you are in a domain environment, do you have Domain Override in Place?
Hi everybody, thanks for the tuto.
I Get that:
Wed Nov 29 09:45:33 2017 TCP/UDP: Preserving recently used remote address: [AF_INET]5.196.43.192:1194
Wed Nov 29 09:45:33 2017 UDP link local (bound): [AF_INET][undef]:0
Wed Nov 29 09:45:33 2017 UDP link remote: [AF_INET]5.196.43.192:1194
Wed Nov 29 09:45:33 2017 VERIFY ERROR: depth=0, error=unsupported certificate purpose: C=FR, ST=Midi-Pyrénée, L=Toulouse, O=Solyann, [email protected], CN=www.solyann.fr, OU=Agence
Wed Nov 29 09:45:33 2017 OpenSSL: error:14090086:SSL routines:ssl3_get_server_certificate:certificate verify failed
Wed Nov 29 09:45:33 2017 TLS_ERROR: BIO read tls_read_plaintext error
Wed Nov 29 09:45:33 2017 TLS Error: TLS object -> incoming plaintext read error
Wed Nov 29 09:45:33 2017 TLS Error: TLS handshake failed
Wed Nov 29 09:45:33 2017 SIGUSR1[soft,tls-error] received, process restarting
Any advice ?
It seems like you made a mistake somewhere in the certificate process. I’d suggest running through it again from the beginning and pay special attention to the Certificate part. The instruction definitely work if you follow along every step.
Found the issue, I made the mistake while not specifying “server certificate” at setp 4.
Thanks for ypour reply
Thank You. Worked perfectly!
Happy to help my friend 🙂
Great tutorial! I’m succesfully connect, but i can access only at remote pfsense and not to the other device of remote network (for exaple printers, pc ecc) Some suggestion? thanks!!
Great writeup with concise instructions on how to get it all running. If people are having issues with the free windows OpenVPN client I would recommend Viscosity OpenVPN client. It works very well with Windows & Mac plus pFSense also supports it as a one click export. The client does cost a little but, but it’s worth avoiding the headache that the free client can sometimes bring.
Lastly after doing the setup I would recommend people research a little about enhancing the security of the VPN by increasing the default encryption selections. Most hardware now a days has support for some type of encryption offloading so increasing from 1024 to 2048 have very little impact on CPU usage.
Thanks for the recommendation!
Hey just wanted to say thank you for a great guide and also for not skipping over any of the small details like many people do.
I’ve had plenty of experience setting up OpenVPN, but there were a few steps in doing it myself on pfSense that threw me. Thanks again!
You are welcome! Thanks for sharing your experience!
Maaaaaaaan!!!! Thanks alot!!!! Been looking for this for ages!!!!! Blessings upon blessings……
Haha, welcome man 🙂
Wonderful, thanks for this step by step. I would like to ask permission to create a manual taking
this step by step as a reference, so I can show to my co-workers how to setup their home firewall, and vpn.
Hi Elvis thanks for asking. Yes you can do that, as long as you do not publish it anywhere online.
Hi, i successfully conected to my remote openn vpn server, but i can’t acces local computers behind pfsense server. What i did wrong? Thanks
If you’re in a Domain you might need to use the FQDN, like, mycomputer.mydomain.com
BTW works excellent for 2.3.4-RELEASE-p1 too…
Great to know. Thanks for the Information.
Thank you very much, really clear and working guide!!
Very welcome!
OMG!!! THANK YOU!! I have been trying to set this up for months now. And this has been the BIGGEST thorn in my side. Thank you so very much!!
Amazing. I do it for comments like these 🙂
Hi, thanks for your tutorial. Im getting this errors in Windows client:
Sat Jun 17 14:10:58 2017 OpenVPN 2.3.12 x86_64-w64-mingw32 [SSL (OpenSSL)] [LZO] [PKCS11] [IPv6] built on Aug 23 2016
Sat Jun 17 14:10:58 2017 Windows version 6.1 (Windows 7) 64bit
Sat Jun 17 14:10:58 2017 library versions: OpenSSL 1.0.1t 3 May 2016, LZO 2.09
Enter Management Password:
Sat Jun 17 14:11:05 2017 Control Channel Authentication: using ‘pfSense-udp-1194-alexmora-tls.key’ as a OpenVPN static key file
Sat Jun 17 14:11:05 2017 TCP/UDP: Socket bind failed on local address [undef]: Address already in use (WSAEADDRINUSE)
Sat Jun 17 14:11:05 2017 Exiting due to fatal error
Any advice?
Thanks
Alex