
NextJS and Tailwind have become my go-to for quickly throwing together a prototype for new ideas and apps I want to build out. NextJS comes with superior SEO features compared to plain React and Tailwind CSS allows you to quickly add styling without the need of writing endless lines of CSS (BORING!).
Now throw Netlify in the mix and you are up and running within minutes, completely for free. In this tutorial, I show you how to create a new project from scratch and how to deploy it to Netlify in a matter of minutes.
Netlify just recently added the feature of auto-detection for NextJS apps. That means you can host your Service Side Rendered (SSR) app on Netlify, for FREE. This is huge.
This is a beginner-friendly tutorial.
Table of Contents
- Requirements
- What are we building?
- My Setup
- Step 1 – Creating the NextJS App
- Step 2 – Installing & Configuring Tailwind CSS
- Step 3 – Cleaning Up
- Step 4 – Running the NextJS App
- Step 5 – Adding Cat Gifs
- Step 6 – Make it look Awesome(🦄)!
- Step 7 – Deploy to Netlify
- Challenge Time!
- Conclusion
Requirements
To follow along, you should have the following in check.
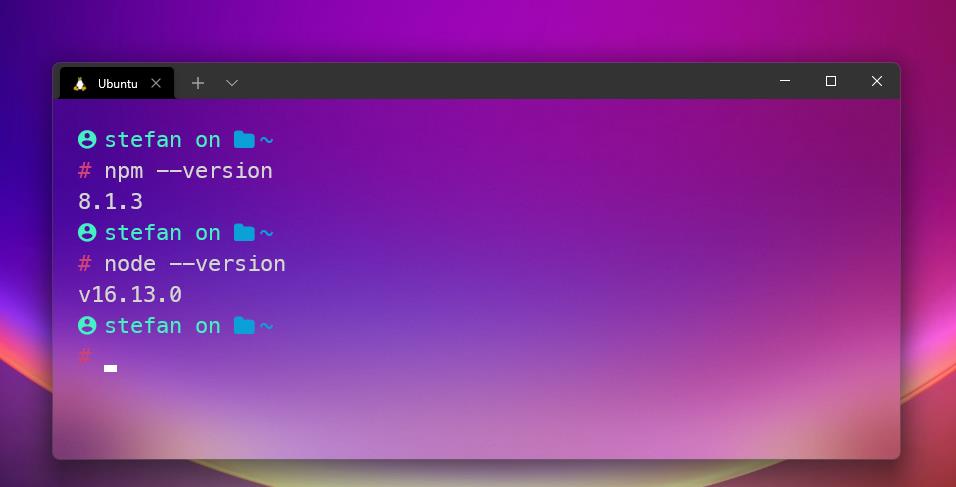
- npm version 8.1.3 or higher
- node version v16.13.0 or higher
- A Netlify account
- A Github account
What are we building?
We just build a very simple app that displays a bunch of cat pictures.
My Setup
I build this App using WSL 2 on Windows 11. If you want to get started with WSL 2 and make your terminal look like mine, I have a whole WSL 2 Tutorial Series for you to dig in!
Step 1 – Creating the NextJS App
To get started, let’s first create our NextJS App.
npx create-next-app@latest cat-app
cd cat-appCode language: Bash (bash)
This sets you up with a basic NextJS app at the latest version.
Step 2 – Installing & Configuring Tailwind CSS
Since Tailwind is fully integrated into NextJS, it is a breeze to set up.
Install Tailwind CSS & Initiate Config Files
npm install -D tailwindcss postcss autoprefixer
npx tailwindcss init -pCode language: Bash (bash)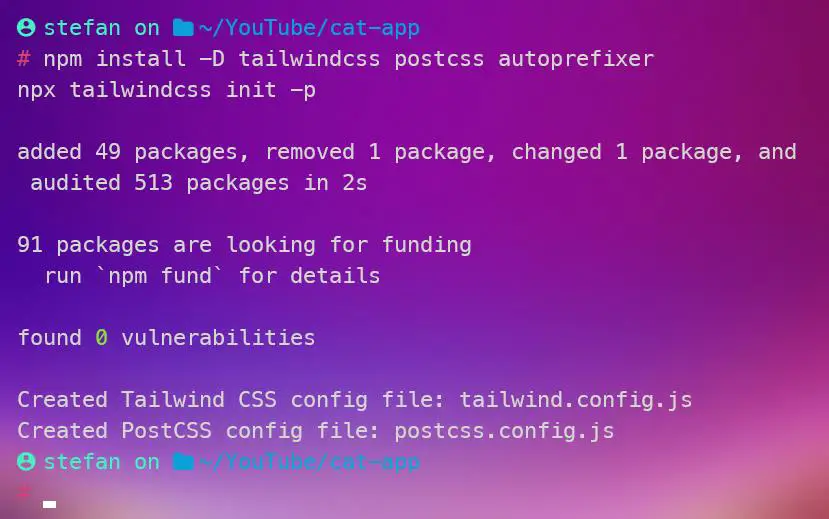
Configure Tailwind CSS Config Files
Open up VSCode or the terminal editor of your choice.
code .Code language: Bash (bash)Now we need to modify tailwind.config.js in the project root and styles/globals.css
Copy the content below inside of your tailwind.config.js file, overwriting everything that is in there.
module.exports = {
  content: [
    "./pages/**/*.{js,ts,jsx,tsx}",
    "./components/**/*.{js,ts,jsx,tsx}",
  ],
  theme: {
    extend: {},
  },
  plugins: [],
}Code language: JavaScript (javascript)
Now find your globals.css file inside of the styles folder and enter the following content.
@tailwind base;
@tailwind components;
@tailwind utilities;

html,
body {
  padding: 0;
  margin: 0;
}

a {
  color: inherit;
  text-decoration: none;
}

* {
  box-sizing: border-box;
}Code language: CSS (css)
As you can see, I leave most of the default NextJS styles in place, as I would use them anyway. That is it. NextJS and Tailwind CSS are now fully functional. Let’s clean up.
Step 3 – Cleaning Up
A new NextJS app comes with a bunch of demo code. Let’s get rid of that first and start with a clean slate.
- Delete 🗑️ Home.module.css inside of the styles 📁 folder
- Delete 🗑️ favicon.ico and vercel.svg inside of the public 📁 folder
- Open index.js inside of the pages 📁 folder and delete 🗑️ all imports and content so it looks like the example below
export default function Home() {
  return (
    <div className='flex flex-col items-center justify-center w-full h-screen'>
      <h1 className='text-3xl'>The Cat App</h1>
    </div>
  )
}Code language: JavaScript (javascript)
Step 4 – Running the NextJS App
Now go ahead and run the app.
npm run devYou should now see something along those lines if you open your browser at http://localhost:3000/
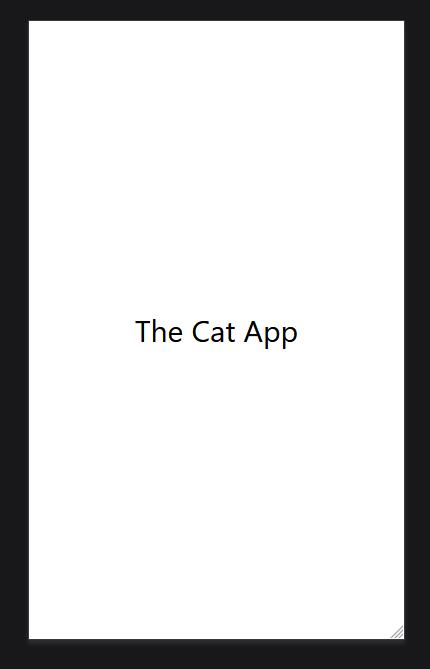
As you can see, Tailwind is working. Let’s add some cat pictures!
Step 5 – Adding Cat Gifs
Since we are approaching 2022, I decided to go for Gifs instead of pictures on a whim. So let’s do just that! Feel free to just upload any images you like of course.
SIDENOTE: Netlify seems to cache our gifs, so once you deploy to Netlify, the gifs are not moving. I’m working on a solution and update this article soon as it’s solved. As this is not affecting the point of this tutorial, I leave it as gifs for now.
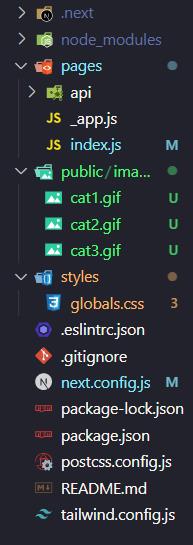
Go ahead and create a folder 📁 called images inside of the public folder 📁. Now head over to Giphy and search for a cat, or click here.


Once you find a furry fella you like, click on it, wait a couple of seconds and right-click the gif, and select Save Image As and save it somewhere, alternatively just grab my 3 images from here.
Once you have them downloaded, rename them to cat1.gif cat2.gif and cat3.gif and finally drag & drop them into your public/images folder.
Your folder tree should look like this now.
Adding a Cat Gif using Next/Image
Good. Back to Index.js. Paste the code below.
import Image from "next/image"
import cat1 from "../public/images/cat1.gif"
import cat2 from "../public/images/cat2.gif"
import cat3 from "../public/images/cat3.gif"

export default function Home() {
  return (
    <div className='flex flex-col items-center justify-center w-full h-screen space-y-8 lg-flex-row'>
      <h1 className='text-3xl'>The Cat App</h1>
      <div className='relative w-32 h-32 overflow-hidden rounded-full ring-2 ring-pink-300 ring-offset-4'>
        <Image
          objectFit='cover'
          src={cat1}
          alt='Picture of Cat1'
          layout='fill'
          priority
        />
      </div>
    </div>
  )
}
Code language: JavaScript (javascript)
What exactly are we doing here? Let’s walkthrough.
On top, we are importing the Image component. This is Next’s powerful Image Optimization Component. Very useful for SEO and for ensuring fast loading speeds. Takes a moment to get used to, but once you know it, it’s awesome.
Then we import our images from our public/images folders.
We put the <Image /> component inside of some divs with a bunch of Tailwind Classnames. I won’t go in-depth in each of them, if you want to learn more about those, read the Tailwind CSS docs.
Inside of the <Image /> component itself, we add a bunch of stuff.
- objectFit=’cover’ → Defines how the image will fit in the parent container (when using layout=’fill’). Basically tells the image not to stretch, but to fit.
- src → Our imported gif
- alt → the alt description of the image (SEO, accessibility)
- layout=’fill’ → Tells the image to adjust it’s size to it’s parent element. Requires the parent element to have the relative class.
- priority → Load this image with priority. Usually used for above the fold (Images that are directly in your view when the page loads) images only.
Cool. If we look at our page again, we got this sleek fellow.

Let’s add a bunch more so he’s not lonely by just duplicating the code a bunch of times.
import Image from "next/image"
import cat1 from "../public/images/cat1.gif"
import cat2 from "../public/images/cat2.gif"
import cat3 from "../public/images/cat3.gif"

export default function Home() {
  return (
    <div className='flex flex-col items-center justify-center w-full h-screen space-y-8 lg-flex-row'>
      <h1 className='text-3xl'>The Cat App</h1>
      <div className='relative w-32 h-32 overflow-hidden rounded-full ring-2 ring-pink-300 ring-offset-4'>
        <Image
          objectFit='cover'
          src={cat1}
          alt='Picture of Cat1'
          layout='fill'
          priority
        />
      </div>
      <div className='relative w-32 h-32 overflow-hidden rounded-full ring-2 ring-pink-300 ring-offset-4'>
        <Image
          objectFit='cover'
          src={cat2}
          alt='Picture of Cat2'
          layout='fill'
          priority
        />
      </div>
      <div className='relative w-32 h-32 overflow-hidden rounded-full ring-2 ring-pink-300 ring-offset-4'>
        <Image
          objectFit='cover'
          src={cat3}
          alt='Picture of Cat3'
          layout='fill'
          priority
        />
      </div>
    </div>
  )
}Code language: JavaScript (javascript)
Step 6 – Make it look Awesome(🦄)!
Before we deploy this bad boy to Netlify, let’s make at least a minor change to it to make it look a tad bit nicer.
Head back to the styles folder 📁 and modify the global.css config file to look like mine, or give it your own touch!
@tailwind base;
@tailwind components;
@tailwind utilities;

a {
  color: inherit;
  text-decoration: none;
}

* {
  box-sizing: border-box;
  padding: 0;
  margin: 0;
}

body {
  background: linear-gradient(-45deg, #ee7752, #e73c7e, #23a6d5, #23d5ab);
  background-size: 400% 400%;
  animation: gradient 15s ease infinite;
}

@keyframes gradient {
  0% {
    background-position: 0% 50%;
  }
  50% {
    background-position: 100% 50%;
  }
  100% {
    background-position: 0% 50%;
  }
}Code language: CSS (css)
There we go. This is more like it.

Step 7 – Deploy to Netlify
Alright, time to deploy our sweet app! Now, I’m not covering anything SEO-related here, this is the topic for another tutorial. This is just quickly throwing an app together and deploying it, like 💥.
Pushing to Github
The easiest way to deploy our NextJS app to Netlify is by integrating Netlify with Github. In your project root folder, initiate a Git repository.
git init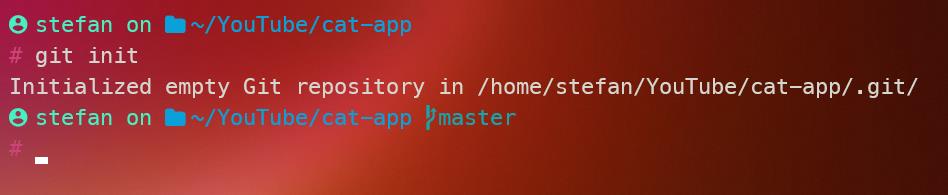
Now, either manually push that to Github or use Github Desktop to add this repository and then push it and publish it.
If you are on WSL 2, you can use wslpath to print your current path in a windows-friendly format.
wslpath -w .Then copy the resulting path.

And paste it into Github Desktop.
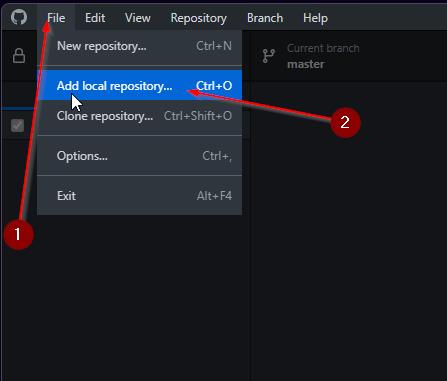
Paste your \\wsl.localhost…… link in the next window. Then fill in a summary, commit and publish the repository. You can either choose to keep the code private or make it public.
Netlify
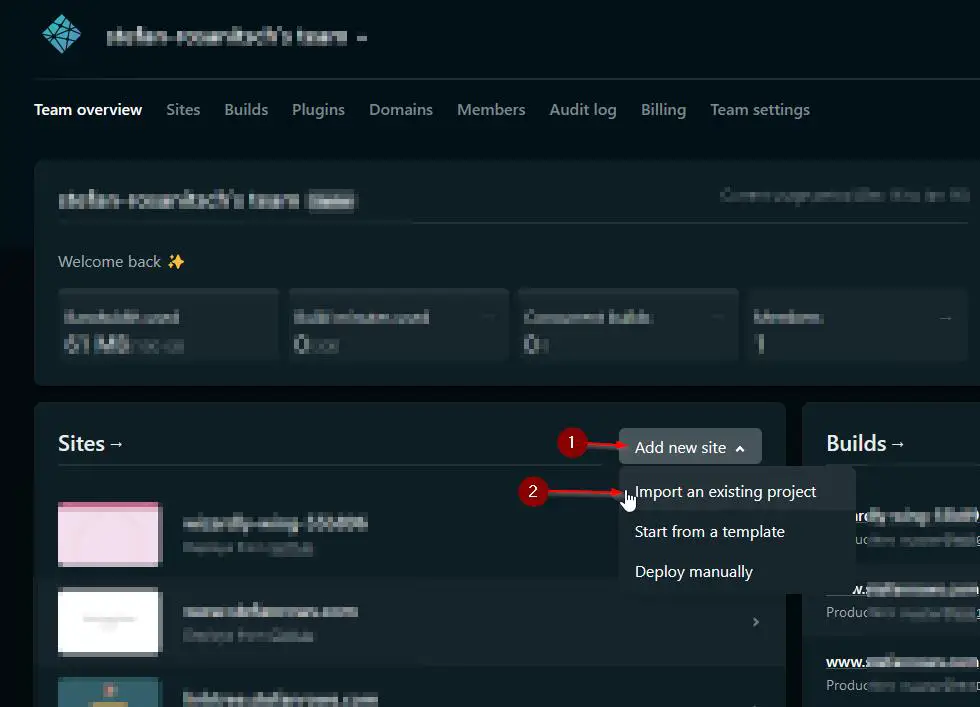
Now head over to Netlify and sign up if you haven’t already. Head to your Dashboard and click on Add new site → Import an existing project.
Then select GitHub.
Another window pops up, if you haven’t authorized Netlify for your Github account yet, do so.
I use per-repository authorization, which means I need to specifically allow a specific repository to be accessed by Netlify. There is a button at the bottom saying “Configure Netlify on Github”.
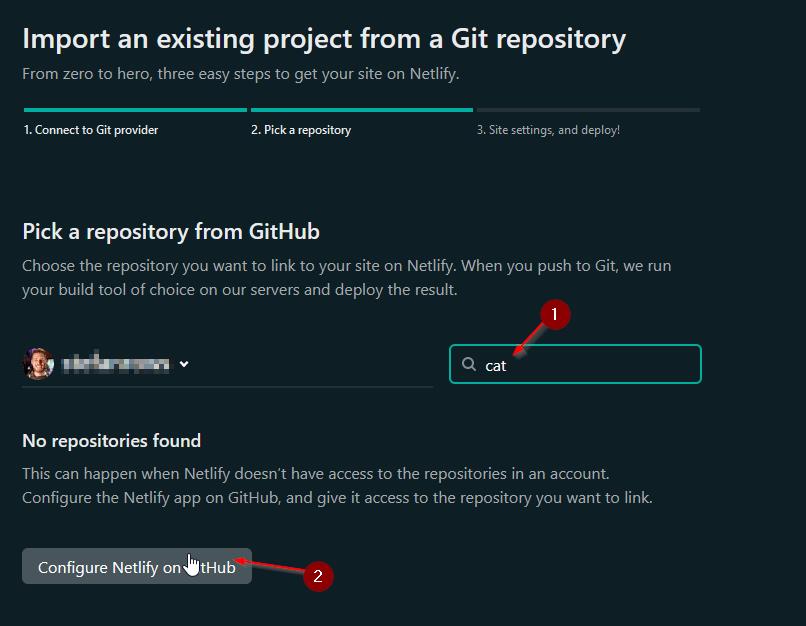
Once you are on Github, search for your cat repo and allow access. Click on save.
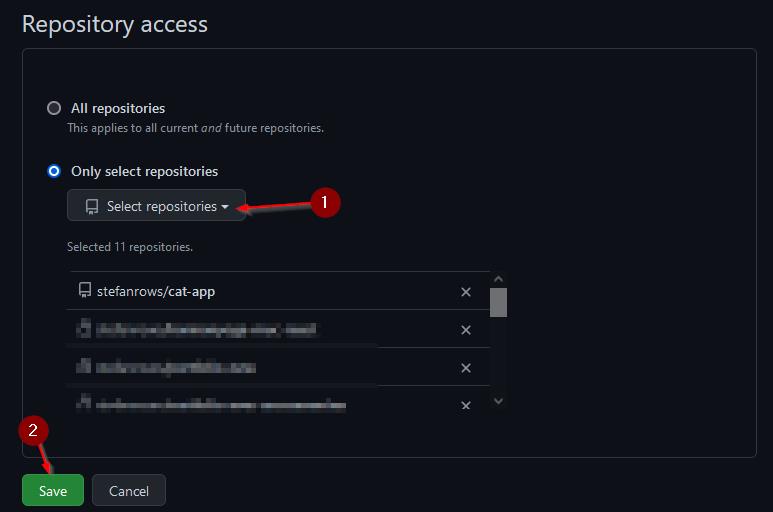
Back in Netlify, select the cat-app to be published.
Publishing the Github Repository
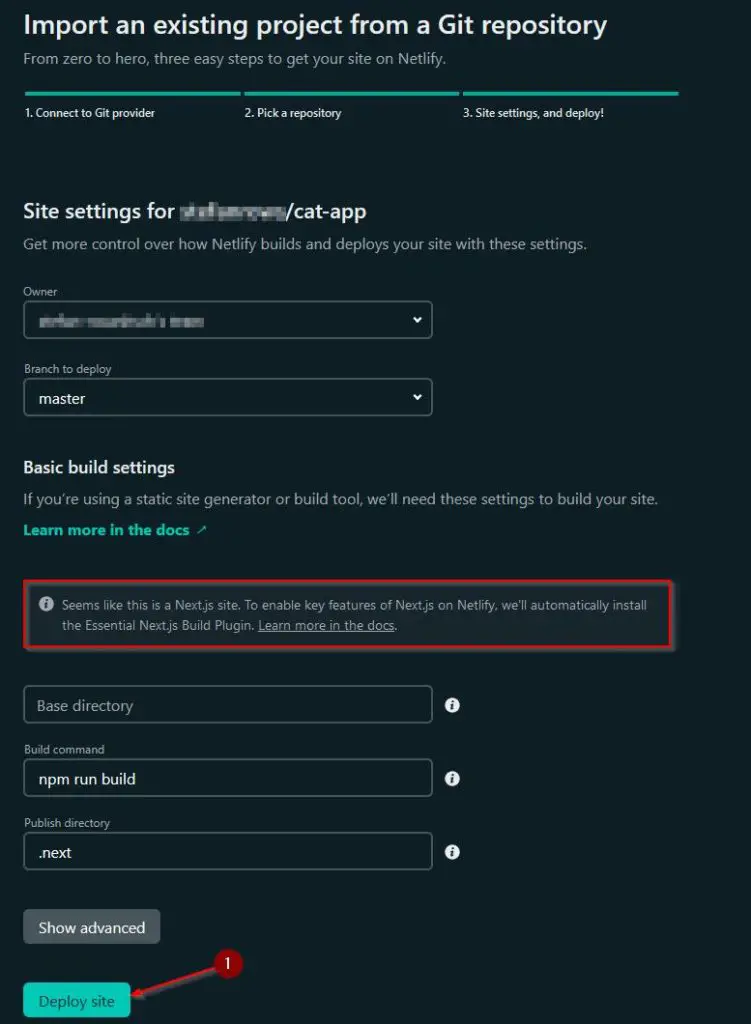
Since Netlify will automatically detect your NextJS app, there isn’t a bunch of stuff we need to configure.
Basically, leave everything as default and click Deploy site.
Now that’s gonna take a couple of minutes to deploy and build. Once it’s done, you can access your site by clicking on the URL up top.
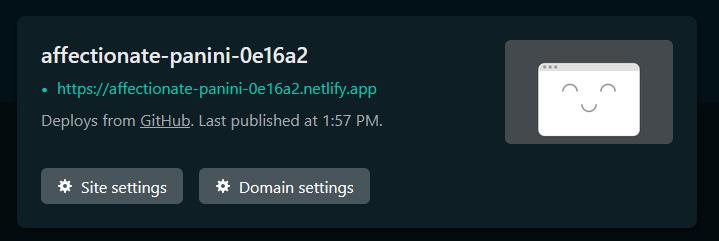
And you should see your site live, created and deployed within minutes by utilizing the power of NextJS and Tailwind CSS.
Challenge Time!
Now that you have become a NextJS expert, why don’t use what you’ve learned and modify the app?
Some ideas from my side:
- Change the layout (It’s not responsive!)
- Change the background
- Add more cats!
- Add dogs
- Make the heading nicer
Or anything else that comes to mind really!
Once you have your personalized version of our cat-app, make sure to share it on Twitter and tag “@ceos3c” with the URL to your Netlify page. (Stefan is going to be really sad if you don’t do that!)
Conclusion
This should give you a good idea of how awesome the combination of NextJS and Tailwind CSS can be, especially if you can host for free on Netlify.
If you guys are interested in more tutorials on the matter (there are lots of layers to that), comment below!
🧑💻 Learn Web Development
👉 Top Programming Languages in 2022
👉 The Fresh JavaScript Framework
🚀 NextJS
👉 NextJS and Tailwind CSS – Complete Beginner Guide
⚛️ React
👉 Build an Input Form with React Hooks
👉 React Styled Components – The Complete Guide
1 thought on “NextJS and Tailwind CSS – Complete Beginner Guide 🚀”