We have been using Ezoic Humix on our blog for the past two months and have tested it extensively. In this Ezoic Humix Review, we share our opinion with you, and we also show you how to use Humix on your own website.
We highly recommend watching the accompanying video to this article since we cover Humix more in-depth in the video, as this article would get too long, covering everything in written form and with screenshots.
Table of Contents
- What is Ezoic Humix?
- Humix Benefits
- Humix and YouTube
- Humix Overview
- How to use Humix
- Importing Videos from YouTube
- Sharing Videos on the Humix Network
- Conclusion
What is Ezoic Humix?
Humix is Ezoic’s answer to the ever-rising popularity of video content on the internet. So far, publishers have had to utilize third-party services like YouTube to cater video content to their viewers on their blogs.
With Ezoic Humix, you are able to upload videos directly to its global video network and display them in your blog. But not only that, but you can also share your videos in Humix’s network so other publishers can display your videos on their blog while you get a share of the revenue.
This also works vice-versa – you can utilize the Humix network to display other publisher’s videos on your own blog articles, ultimately helping you to generate more traffic, and you also get to keep a share of the video revenue from the video of another publisher that has been watched on your own blog.
This enables you to drive more traffic to your blog articles and ultimately generate more revenue even if you are not publishing your own videos.
If you want to learn more about our experience with Ezoic, we invite you to read our 4-Year conclusion.
Humix Benefits
If you use Humix to share your videos on your blog and across the Humix network, you are able to drive more traffic to your site since videos shared on the Humix network will appear on search results and on other publishers’ blogs, linking back to your own blog.
Video content also keeps visitors engaged longer on your site, potentially creating more revenue for you since you create more value for your visitors.
Benefits of Sharing Videos on the Humix Network
If you have your own video content and decide to share your videos across the Humix platform, you benefit from increased traffic and revenue since these videos ultimately link back to your own blog. The revenue split works as follows:
- By sharing your videos on the Humix network, you earn a 50/50 split revenue with the publisher who displays your videos on their site.
- By displaying other publishers’ videos on your site, you also earn a 50/50 split revenue with the publisher who shares their video on your site. (+ The extra SEO boost for displaying a video in your article!)
To benefit fully from the Humix platform, we highly recommend opting in for both options!
Your own Humix Channel
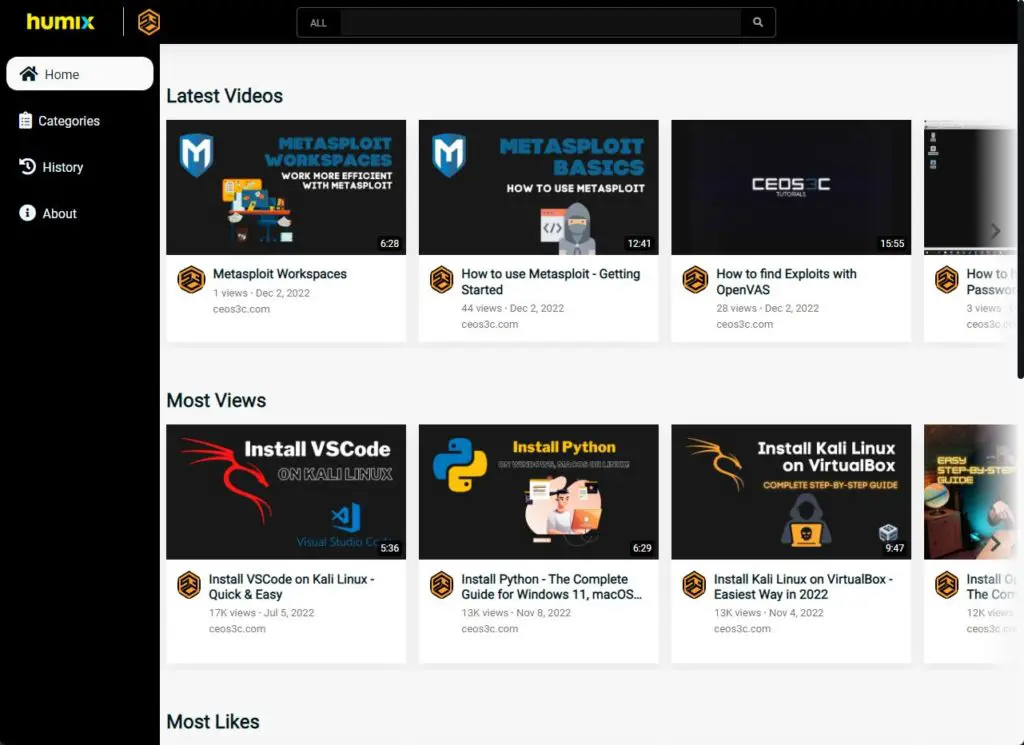
Once you activate Humix, your very own Humix channel will be created on your blog’s domain. For us, it’s: https://www.ceos3c.com/humix
That’s where your videos live. You can share this link with your audience, and they can use it like YouTube to browse your very own video content. With the exception that these videos are your own and not hosted on YouTube but on your own domain!
Humix and YouTube
If you already have a YouTube channel, Humix makes it really easy to import your videos from YouTube to Humix with the click of a button. This is the approach we took; since we already run a successful YouTube channel with lots of videos, we imported all of our YouTube content to Humix.
This step resulted in two major advantages for us:
- Increased site speed since videos embedded with Humix are optimized by Ezoic Leap.
- Increased revenue compared to YouTube.
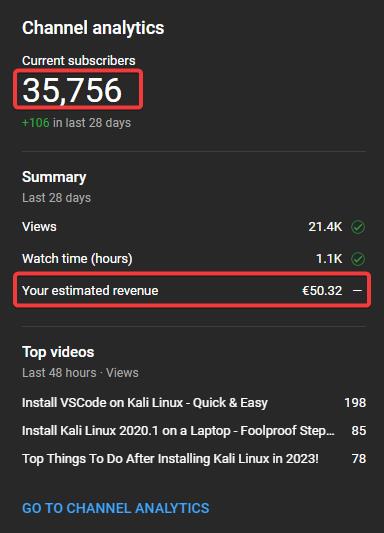
We were actually very surprised by this outcome. We created our YouTube channel in 2016 and have since accumulated more than 37.000 subscribers. While this may sound a lot, the video revenue on YouTube for smaller creators is horrendous (to say the least).
YouTube vs. Humix Revenue
Here is a snapshot of our projected YouTube revenue for December 2022:
And here is a snapshot of our Humix revenue for the past 30 days (after just 2 months of use):
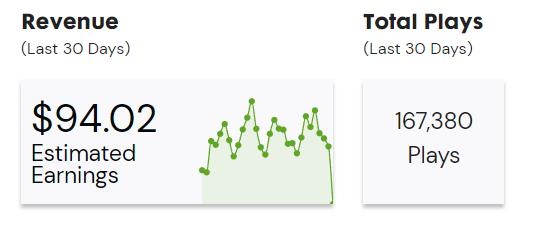
These are the exact same videos as on YouTube. That is almost double the revenue of YouTube.
Humix Overview
Navigate to Humix by either clicking on the Humix icon in your publisher dashboard, or directly open it by clicking on this link.
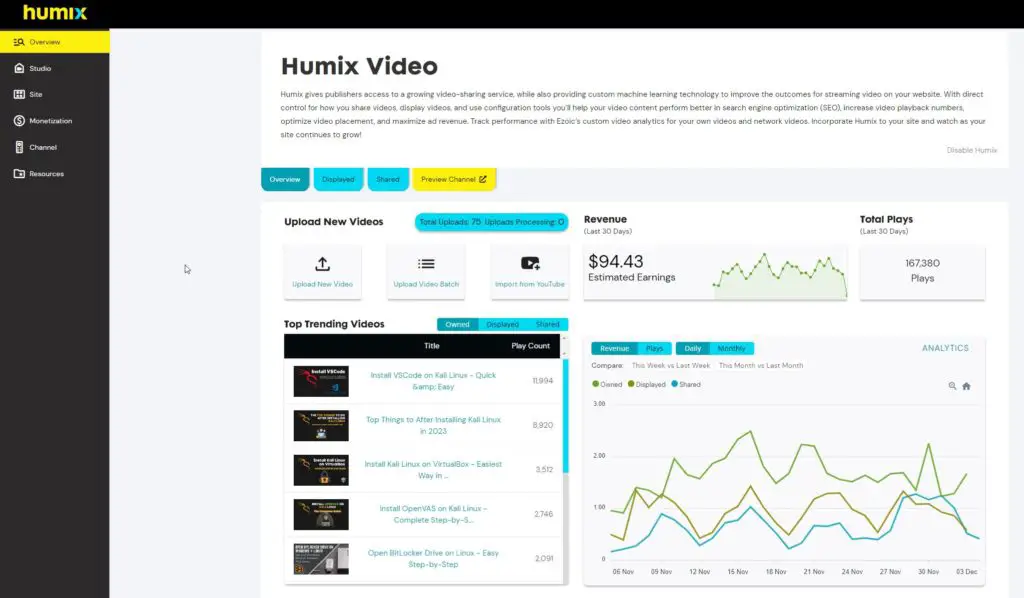
Humix Dashboard
Here, you see everything at a glance. You see your past 30 days’ revenue, your top trending videos, and some analytics. You can also upload new videos or import videos from YouTube from here:
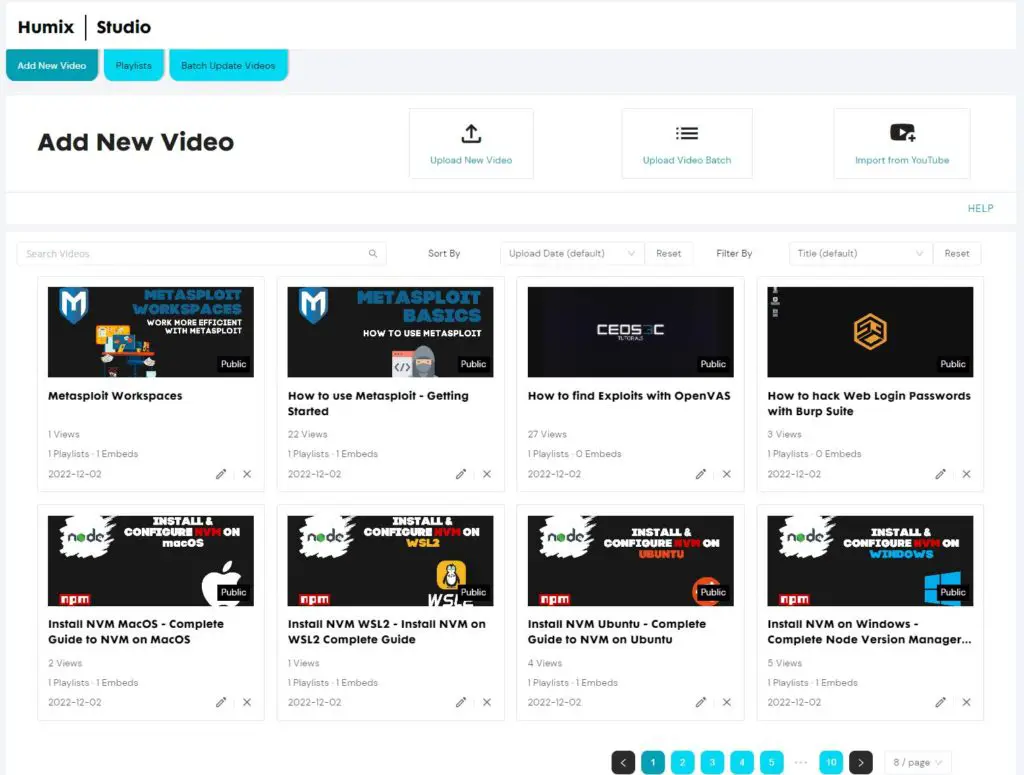
Studio
On the Studio tab, you can see and manage all of your videos and playlists:
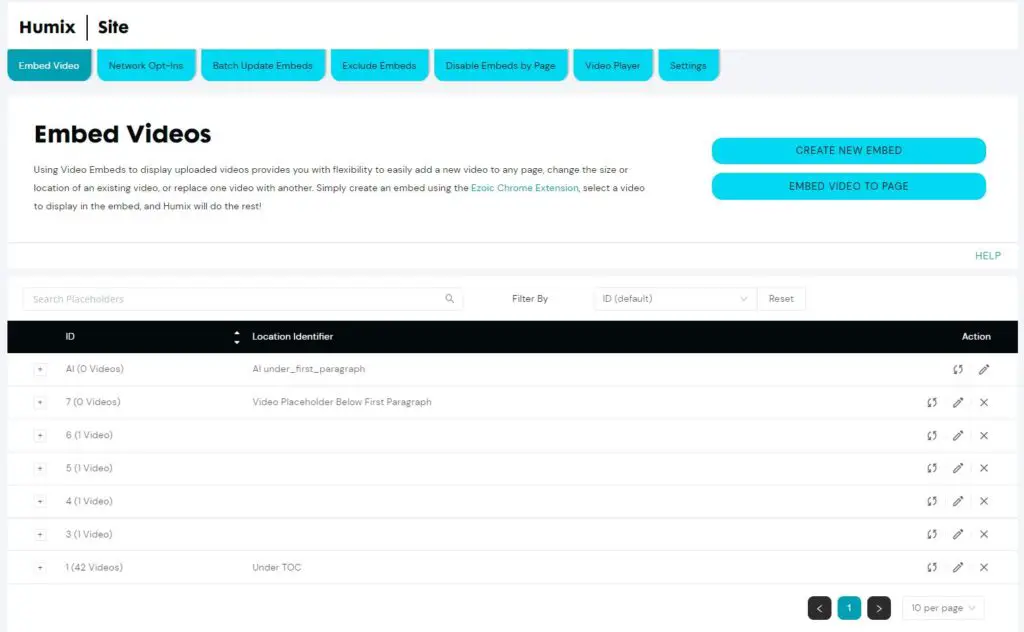
Site
On the site tab, you can manage all of your video placeholders, and you can adjust settings like Network Opt-Ins:
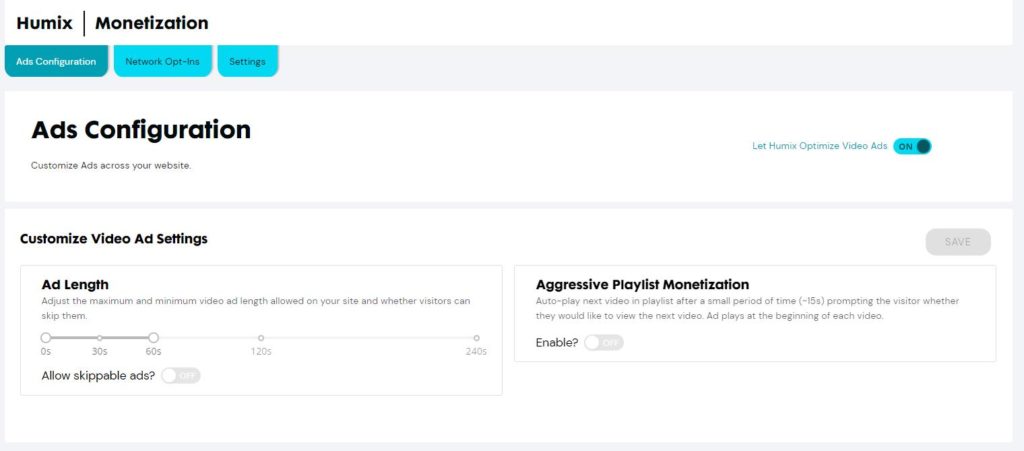
Monetization
The monetization tab allows you to adjust all kinds of monetization settings:
Channel
The channel tab is another overview that allows you to quickly adjust some settings and customize your own Humix channel at a glance:
How to use Humix
It is really easy to get started with Humix. Follow along as we show you how to integrate and set up Humix to your own Network.
Creating a Video Placeholder
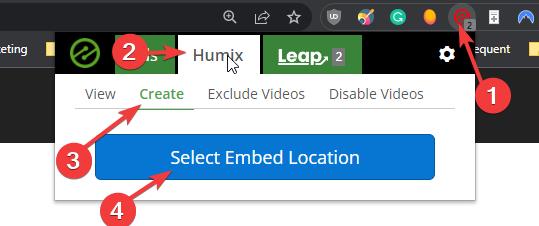
The best way to get started is by creating a video placeholder on your blog using the Ezoic Chrome extension.
- Open the Ezoic Dashboard and make sure you are logged in. Keep that tab open and create a new tab and open your blog and a page where you want to embed your video(s).
- Make sure you are logged out of WordPress.
- Click on the Ezoic Chrome Extension.
- Click on Humix.
- Click on Create.
- Click on Select Embed Location.
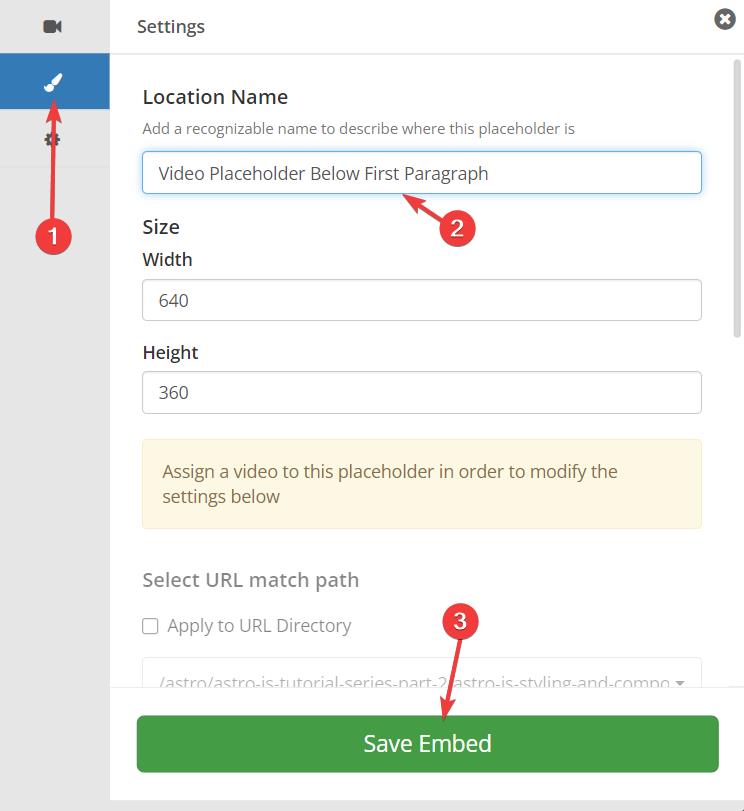
Now choose a location where you want to place your placeholder. For example, below the first paragraph. Then click on Insert here:

- Click on the Edit Brush.
- Enter a name for your placeholder to identify it later.
- Click on Save Embed.
Uploading a Video
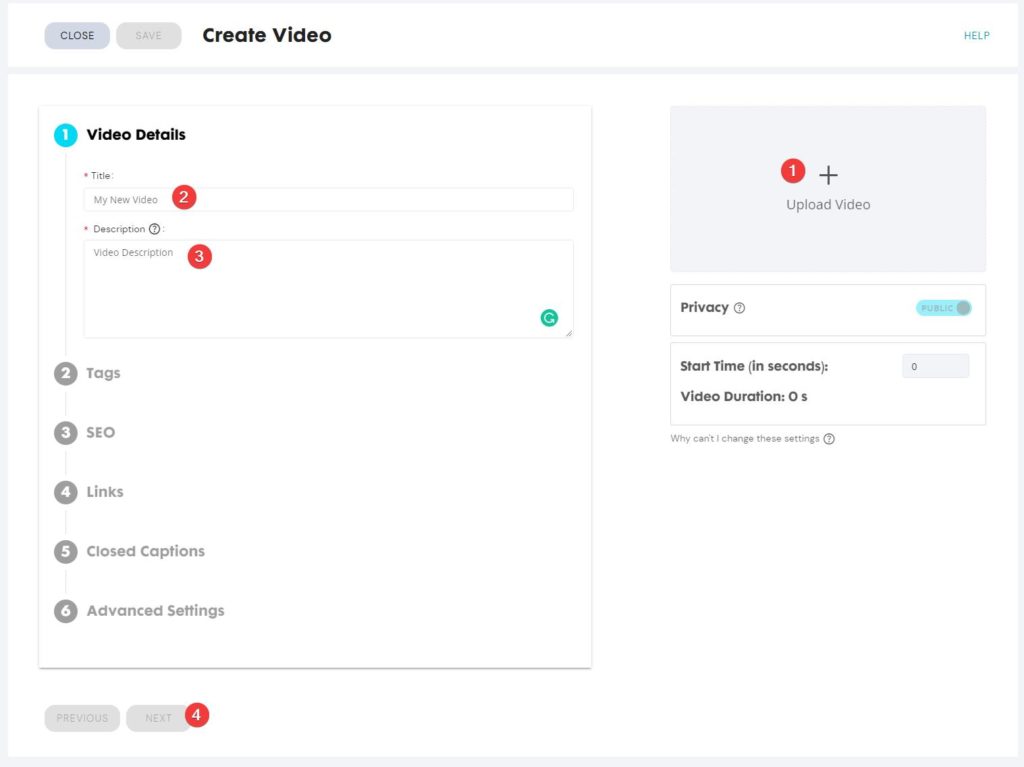
Now that we have a video placeholder in place, we can go ahead and upload our first video. Navigate to the Humix dashboard.
- Click on Upload Video.
- Enter a Title.
- Enter a Description.
- Click Next.
Once the video is finished uploading, you can also add a different thumbnail.
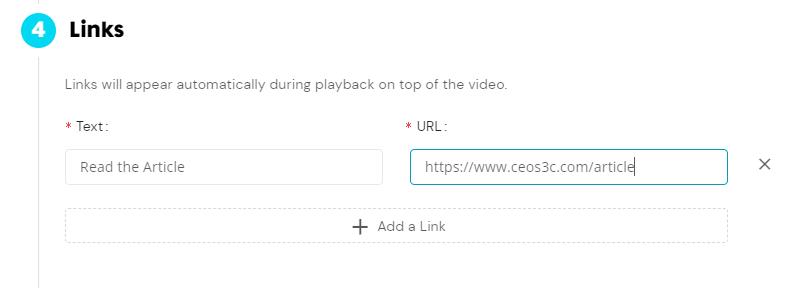
Click on Next and add some SEO keywords. We also recommend always adding a link to your article in the Links section, since if you share your videos on the Humix network, viewers will be able to find your blog:
Embedding a Video
Once you are done with all of this, click on Save at the top. When you click on Save, a popup shows up that asks you where you want to embed your video.
Paste the URL of the article where you want to embed your video.
Once you paste the URL and click on Find Locations, you can choose the video placeholder we have created earlier and click on Add Video Here:
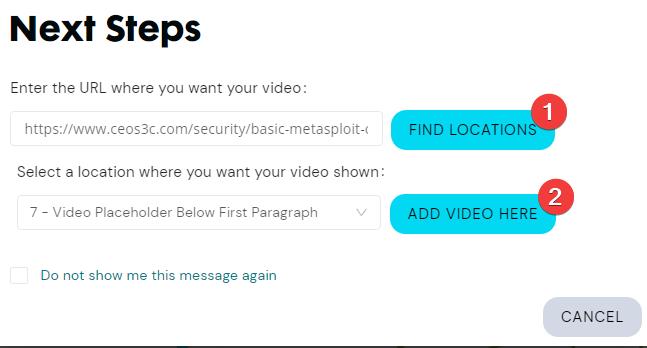
Your video should now be embedded in your article!
Embedding Videos Manually
There is another way of embedding videos manually, which is important to know.
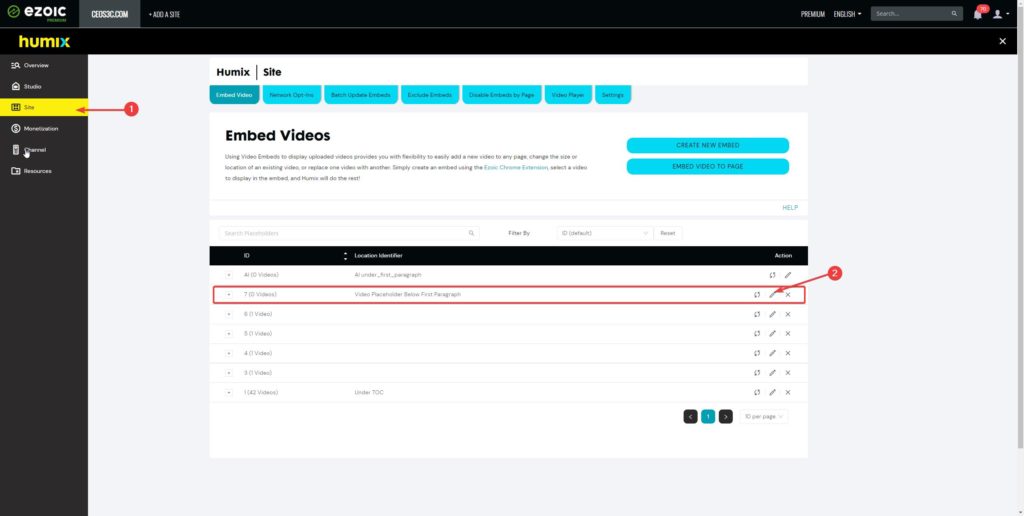
- In your Humix dashboard, navigate to the Site tab.
- Click on the Edit button next to the placeholder you want to embed videos in.
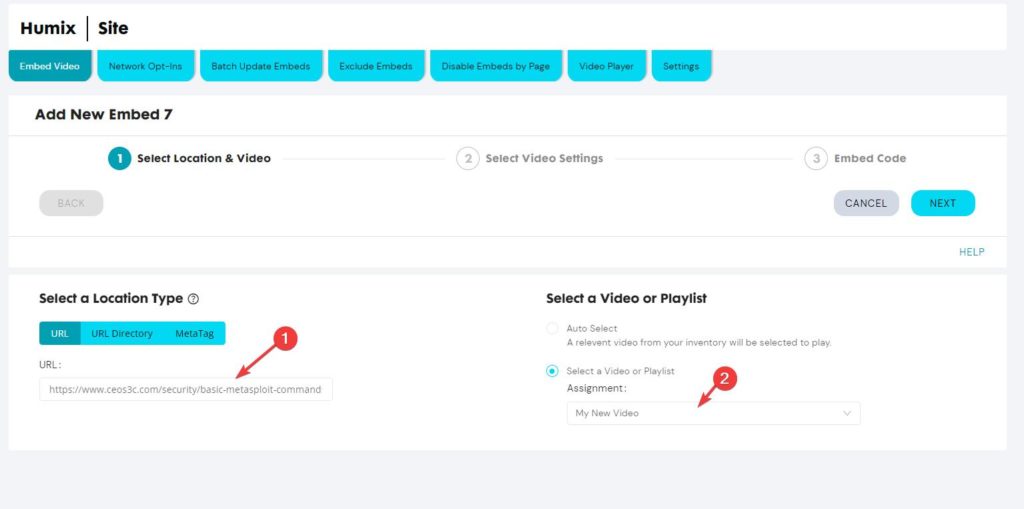
Click on + Add A Video Player Location.
- Enter the URL where you want to embed your video.
- Select your video from the dropdown menu.
- Click on Next until the video is embedded.
That way, you can also adjust specific settings for individual videos, like autoplay, loop, and so on.
This is all you need to do to embed videos on your site.
Importing Videos from YouTube
Importing videos from YouTube is very easy. On your Humix dashboard, click on Studio. Once there, click on Import from YouTube.
You will be prompted to link your YouTube channel with Humix. Follow through with the process. Once your YouTube channel is authorized, you can import every video that you have uploaded to your channel.
After a YouTube import has been finished, you need to follow Manually Embed Videos step above to embed that video into your blog post. That is all there is to it. The video title, description, keywords, and so on will all be imported from YouTube, which makes it very quick to import a video.
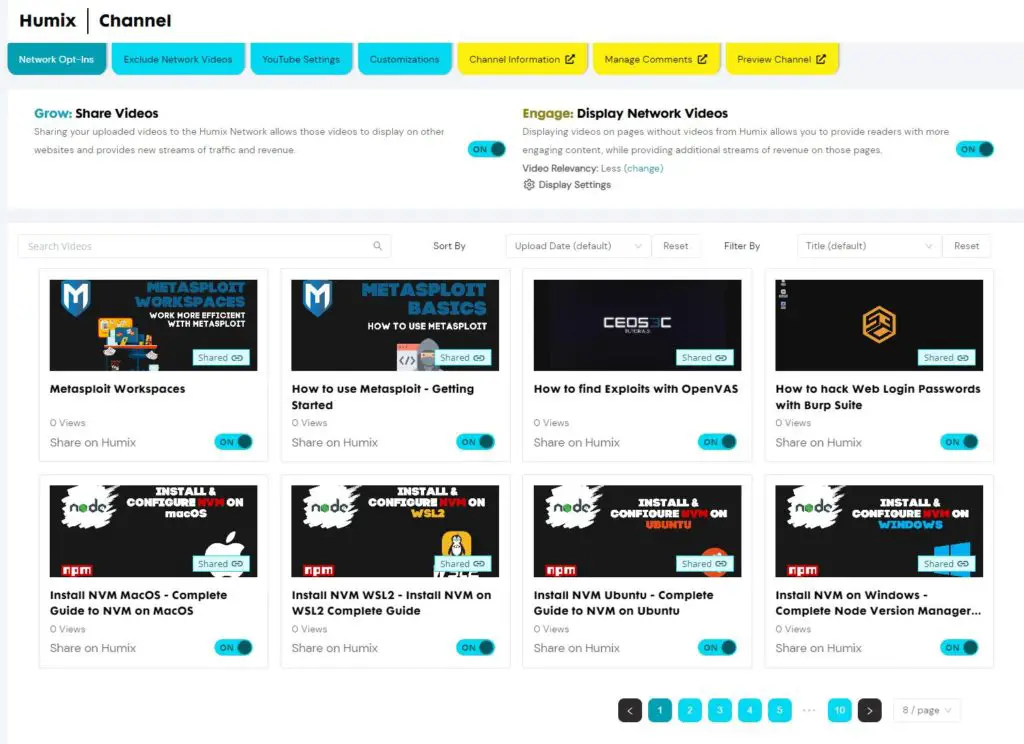
Sharing Videos on the Humix Network
As we have mentioned above, we highly recommend opting in for both, the Grow and Engage features of Ezoic Humix to unlock its full potential.
- Grow: Share Videos – Allows Humix to share your videos on other publishers’ sites.
- Engage: Display Network Videos – Displays videos from other publishers on your blog articles where none of your own videos are displayed.
To enable these features, navigate to your Humix dashboard and click on Site. Here you can enable both of these features:

Conclusion
For us, implementing Humix on our blog has been a thorough success. We really enjoy working with the platform and appreciate its ease of use. We think that the idea behind Humix is great. We have been looking for an alternative to YouTube for a long time, and this seems to be the best way to utilize video content as a digital publisher or blogger.
The concept of sharing your videos automatically across thousands of other websites and blogs is very promising, and we see a bright future for Humix. If you want to read our verdict after using Humix for 30 days, we invite you to read it here.