
Redux toolkit provides a simple way of maintaining the state in your React app. This has always been the purpose of Redux. Managing the state of your React app, especially when handling many components can become difficult real fast and this is where Redux Toolkit comes in. To better understand how it works, let’s first look at Redux.
Table of Contents
Prerequisites
- Familiarity with React concepts like state and components
- Understanding of ES6 syntax
What is Redux?
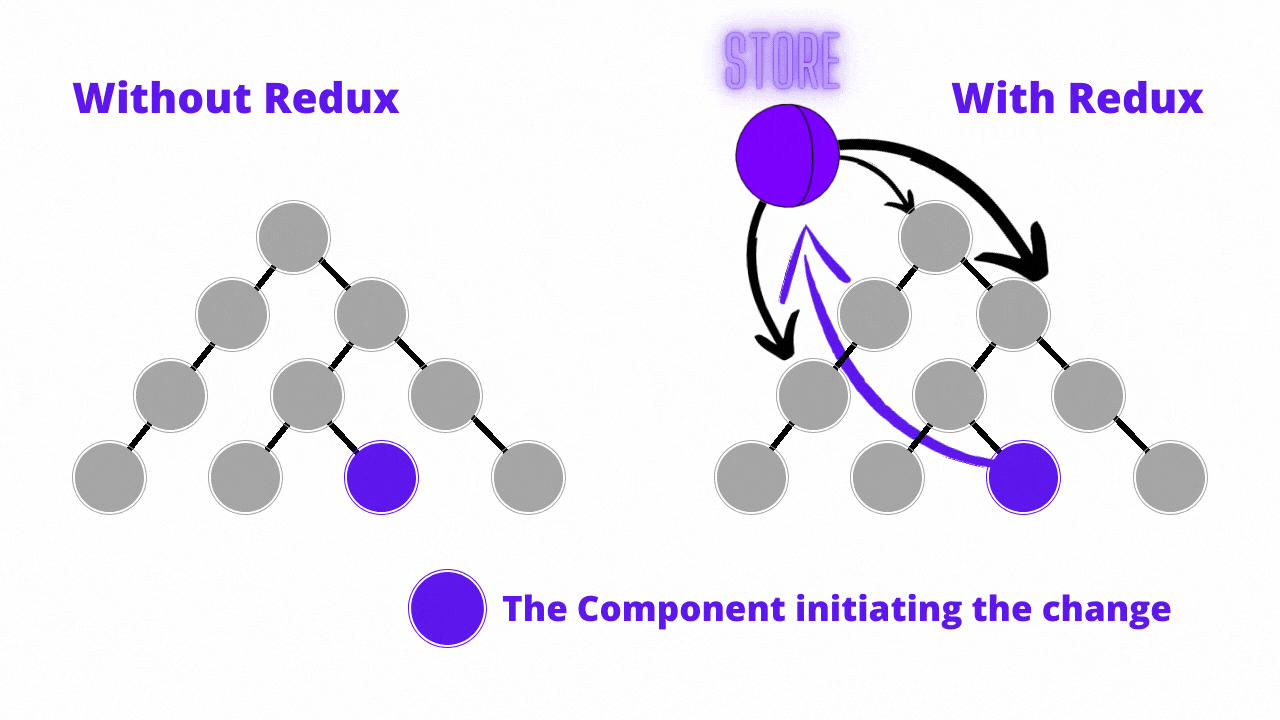
According to the official Redux documentation, “Redux is a predictable state container for JavaScript apps”. Put simply, Redux helps developers build apps that have consistent behaviors across different environments such as client, server, and native environments. With Redux, the state of your app is stored in one location. In this instance, the state refers to the current information about your component. Sometimes, components share this information amongst each other.
One way of accomplishing this is by passing down the state from the parent to the child component through props. In a case where the child is further down the component tree, you will have to pass the state to every one of the components in the middle until you get to the component you want. This is called props drilling and can lead to messy and complex code. Redux solves this problem by providing a global store that manages all the states in your app. All components can then access the states in this store without individually passing down props.
To implement Redux, start by initializing your state.
const { createStore } = require("redux")
const initialState = {
  value: 0
}Code language: JavaScript (javascript)
This is then followed by defining the reducer function. This is the function that takes the initial state, and the action object containing instructions on what to do to the state as arguments.
// reducer function
const reducer = (state = { value: 0 }, action) => {
 switch (action.type) {
   case 'increment':
     return { ...state, value: state.value + 1 }
   case 'decrement':
     return {...state, value: state.value - 1 }
   default:
     return state
 }
}Code language: JavaScript (javascript)
Finally, you need to create the store that holds the state.
// create redux store
const store = createStore(reducer)
Below is the final code for setting up the store.
const { createStore } = require("redux")

// reducer function
const reducer = (state = { value: 0 }, action) => {
 switch (action.type) {
   case 'increment':
     return { ...state, value: state.value + 1 }
   case 'decrement':
     return {...state, value: state.value - 1 }
   default:
     return state
 }
}

// create redux store
const store = createStore(reducer)

export default storeCode language: JavaScript (javascript)
Now to use this functionality on your app, you will need to dispatch actions that will update the state and finally subscribe to the store. This lets you know each time state updates so you can also update your UI accordingly. Below is how you do it.
In your Counter component file, add the following code.
import React from "react";
import { useSelector, useDispatch } from "react-redux";

function Counter() {
 const dispatch = useDispatch();

 const counter = useSelector((state) => state.value);

 const handleIncrement = () => {
   console.log("m");
   dispatch({ type: "increment" });
 };
 const handleDecrement = () => {
   dispatch({ type: "decrement" });
 };

 return (
   <div>
     <p>counter: {counter}</p>
     <button onClick={handleIncrement}>Add</button>
     <button onClick={handleDecrement}>Subtract</button>
   </div>
 );
}

export default Counter;Code language: JavaScript (javascript)
The Purpose of Redux Toolkit
Redux is a no doubt popular tool for state management. The predictability of how data flow makes it easy to trace where your updates are coming from or why your app is behaving the way it is. However, Redux has some shortcomings including:
- It is difficult to configure.
- You have to install a lot of packages for it to work.
- You need a lot of boilerplate code which can get complex. Redux toolkit was created to solve some of these problems. It does this by abstracting some of the packages and configurations required to work with Redux.
Setting Up Redux Toolkit
Installation
You can install the Redux Toolkit using create react app or a package manager like npm or yarn.
Using create react app
npx create-react-app my-app --template reduxCode language: JavaScript (javascript)Using npm
npm install react-reduxCode language: JavaScript (javascript)Using yarn
yarn add react-reduxCode language: JavaScript (javascript)Creating the store
In you ./app/store file, create the store by importing the configureStore API.
import { configureStore } from ‘@reduxjs/toolkit’
	export const store = configureStore({
	reducer: {}
})Code language: JavaScript (javascript)
The configureStore API wraps the Redux’s createStore object and provides a simple way of initializing your store. One main difference between the two is that it accepts your reducer functions as arguments and enables Redux DevTools Extension.
Providing Store to React
In your index.js file, import store from ./app/store and Provider from react-redux.
import { store } from ‘./app/store’
import { provider } from ‘react-redux’Code language: JavaScript (javascript)
Follow this with wrapping you App component with the Provider, like below.
ReactDOM.render(
<Provider store={store}>
<App />
</Provider>,
  document.getElementById('root')
)Code language: JavaScript (javascript)
Creating a Slice in Redux Toolkit
Action and reducers are replaced by slices. Instead of having separate action and reducer functions, the Redux Toolkit combines them. To create a slice, import the createSlice API first from the Redux Toolkit. This API accepts a slice name, the initial state value, and reducer functions. To create countSlice, add the following code to counterSlice.js.
import { createSlice } from "@reduxjs/toolkit";
const initialState = {
 value: 0,
};

export const countSlice = createSlice({
 name: "counter",
 initialState,
 reducers: {
   increment: (state) => {
     state.value += 1;
   },
   decrement: (state) => {
     state.value += 1;
   },
 },
});
export const { increment, decrement } = countSlice.actions;

export default countSlice.reducer;Code language: JavaScript (javascript)
The code above is much cleaner. There is no need for switch cases, and the actions are automatically generated for each item under reducers. If you are familiar with the state, you might have noticed the way it is being modified in the Slice. Take for instance the increment action, it is updated with state.value +=1 which seems to be violating the immutability property of the state.
However, this is not the case. The createSlice API uses the immer library which first compares the existing state and the updated one then reconstructs a new object that reflects the changes made. Immer makes sure that we don’t violate the immutability property and makes it easier to update the state.
Add Slice to Store
The next step is to import the Slice reducer function to your store. This in turn tells the store to use the reducer function to handle state updates. Your store.js should now look like this.
import { configureStore } from "@reduxjs/toolkit";
import countReducer from "../countSlice";

export default configureStore({
 reducer: {
   counter: countReducer,
 },
});Code language: JavaScript (javascript)
Integrating State in Components
To use and update state in your React components, you will use React-Redux tools and to read data, you will use the useSelector hook and the useDispatch to dispatch actions. In the Counter.js file, add the following code
import { useSelector, useDispatch } from "react-redux";
import { decrement, increment } from "./countSlice";

export function Counter() {
 const count = useSelector((state) => state.counter.value);
 const dispatch = useDispatch();

 return (
   <div>
     <p>counter: {count}</p>
     <button onClick={() => dispatch(increment())}>Add</button>
     <button onClick={() => dispatch(decrement())}>Subtract</button>
   </div>
 );
}Code language: JavaScript (javascript)
Remember to import your Counter component to your App component. To summarize, when you click on either of the buttons,
- An action, either increment or decrement, will be dispatched.
- The
countSlicereducer function will update the state according to the action. - The Counter component will re-render to reflect the newly updated state.
Multiple Slices
To add slices for other states, simply repeat the above method. For instance to create an authentication slice that monitors the login status of a user, create another file called userSlice.js and add the code below.
import { createSlice } from "@reduxjs/toolkit";
const initialState = {
 loggedIn: false,
};
const authSlice = createSlice({
 name: "User",
 initialState,
 reducers: {
   login: (state) => {
     state.loggedIn = true;
   },
   logout: (state) => {
     state.loggedIn = false;
   },
 },
});

export const { loggedIn, loggedOut } = userSlice.actions;

export default userSlice.reducer;Code language: JavaScript (javascript)
A React store can only have one reducer. Therefore, to use both of these slices, you will need to combine them. This is done using the configureStore object. In your store.js file, import userSlice and include it in the reducer object passed in as the argument.
import { configureStore } from "@reduxjs/toolkit";
import countReducer from "../countSlice";
import userReducer from "../userSlice";

export default configureStore({
 reducer: {
   counter: countReducer,
   user: userReducer,
 },
});Code language: JavaScript (javascript)
Another thing worth discussing is how to handle asynchronous actions. The dilemma arises when the actions being dispatched are asynchronous but the reducer function is pure, synchronous, and with no side effects. Redux toolkit provides a solution, the createAsyncThunk API.
This API accepts an action type string and a function and returns another function in which we can run asynchronous code. This is the function that accepts the asynchronous action. Later, Redux Toolkit invokes it. This API is further explained in the documentation.
Conclusion
Redux Toolkit provides a great alternative to developers who want to reduce the complexity that Redux can introduce in an app. It allows you to write all the actions and reducers in the same place leading to cleaner and more readable code. If you want to learn more about React and Web Development in general, definitely check out our Web Development section!
In this article, you have learned how to :
- Set up a Redux store
- Data flows in Redux.
- Install Redux toolkit
- Create a store using
configureStore.object - Integrate the
createSliceAPI in your app. - Consume store data using react-redux hooks.
I hope you enjoyed this tutorial and you find it helpful in your Redux journey. Learn more from the Redux Toolkit documentation.
Happy coding!