Chatbots have become increasingly popular over the years, and for a good reason. They offer businesses and individuals an easy way to communicate with their audience and customers, 24/7. With the advancements in Natural Language Processing (NLP) technology, building a chatbot that can hold human-like conversations has become easier than ever. In this ChatGPT API tutorial, we will guide you through building your own chatbot using ChatGPT API, NextJS, TailwindCSS, and DaisyUI. Not only that, but we also have a video tutorial that accompanies this article, providing a step-by-step guide for those who prefer visual aids.
Let’s get started!
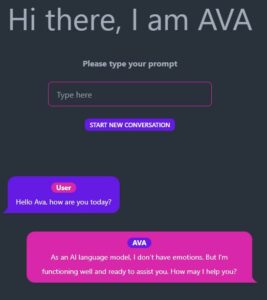
Table of Contents
- Create Project & Install Dependencies
- Setup TailwindCSS and DaisyUI
- Setting up OpenAI
- OpenAI API Endpoint
- Chatbot Logic
- Conclusion
Note: The finished project can be cloned from GitHub.
Create Project & Install Dependencies
First, we create a new project using TypeScript. Leave everything during the setup process on default. You can call your application what you like; we call it openai-chatgpt.
npx create-next-app@latest --typescript
cd openai-chatgpt
Code language: Bash (bash)
Then we need to install all of the dependencies:
npm install openai
npm install -D tailwindcss postcss autoprefixer
npx tailwindcss init -p
npm install daisyui
Code language: Bash (bash)
Setup TailwindCSS and DaisyUI
Open tailwind.config.js and paste the code below:
/** @type {import('tailwindcss').Config} */
module.exports = {
  content: [
    "./app/**/*.{js,ts,jsx,tsx}",
    "./pages/**/*.{js,ts,jsx,tsx}",
    "./components/**/*.{js,ts,jsx,tsx}",

    // Or if using `src` directory:
    "./src/**/*.{js,ts,jsx,tsx}",
  ],
  theme: {
    extend: {},
  },
  plugins: [require("daisyui")],
}
Code language: JavaScript (javascript)
Open /styles/global.css and paste the code below, overwriting everything in it:
@tailwind base;
@tailwind components;
@tailwind utilities;

html,
body {
  padding: 0;
  margin: 0;
  width: 100%;
}

a {

  text-decoration: none;
}

* {
  box-sizing: border-box;
}
Code language: CSS (css)
You can delete all other files inside of the /styles/ folder so that only global.css remains.
Setting up OpenAI
First, you need to create a OpenAI account. They offer a free trial so you can start testing right away. Once your account is created, navigate to API Keys and create a new secret key.
Note: Never share this key or secret with anyone.
Once the key is created, make sure to copy it.
Environment Variables
Create a new file in your root folder called .env.local and add a variable called OPENAI_API_KEY to it. Paste your OpenAI API key in quotes next to it like so:
OPENAI_API_KEY="sk-ZbuaBakBei3mfngn3n12BlbkFJCHAxmG3c************"
Code language: JavaScript (javascript)
OpenAI API Endpoint
Create a file called /pages/api/openAIChat.ts and paste the following code:
import type { NextApiRequest, NextApiResponse } from "next"
import { Configuration, OpenAIApi } from "openai"

const configuration = new Configuration({
  apiKey: process.env.OPENAI_API_KEY,
})
const openai = new OpenAIApi(configuration)

export default async function handler(
  req: NextApiRequest,
  res: NextApiResponse
) {
  console.log("req.body", req.body.messages)
  const completion = await openai.createChatCompletion({
    model: "gpt-3.5-turbo",
    messages: req.body.messages,
  })

  res.status(200).json({ result: completion.data })
}
Code language: TypeScript (typescript)
This is an API endpoint function that can be used with Next.js to create a chatbot. It uses the OpenAI API to generate responses to user messages in a chat interface.
The import statements at the beginning of the code import necessary libraries for the code to work.
const configuration creates a new OpenAI API configuration object that includes an API key, which is stored in the process.env.OPENAI_API_KEY environment variable.
const openai creates a new instance of the OpenAIApi class, which is used to interact with the OpenAI API.
The export default async function handler is the actual API endpoint function that receives incoming requests and sends back responses. It takes in a NextApiRequest object, which contains the request data, and a NextApiResponse object, which is used to send the response back to the client.
Inside the function, console.log("req.body", req.body.messages) logs the messages received in the request body.
const completion is a variable that stores the result of the openai.createChatCompletion() function, which sends the user’s message to the OpenAI API and generates a response. The model parameter specifies the language model to use, in this case, “gpt-3.5-turbo”. The messages parameter contains an array of messages in the chat interface.
Finally, res.status(200).json({ result: completion.data }) sends a JSON response to the client with the generated response from the OpenAI API. The completion.data property contains the actual response text.
In summary, this API endpoint function uses the OpenAI API to generate responses to user messages in a chat interface and then sends those responses back to the client.
Chatbot Logic
Next, we are writing our chatbot logic. Open the index.tsx file and delete everything in it. Paste the code below, so we start with a clean slate:
import React, { useRef } from "react"

export default function Home() {

return (
<div className='w-full'>
  <div className='flex flex-col items-center justify-center mt-40 text-center'>
    <h1 className='text-6xl'>Hi there, I am AVA</h1>
	</div>
</div>
  )
}
Code language: TypeScript (typescript)
This is a React component that returns a simple HTML layout with a title, using the TailwindCSS library for styling.
The import statement imports React and the useRef hook from the react library.
The export default function Home() function defines the React component.
The function returns a div with two nested divs. The outermost div has a w-full class, which sets the width of the div to 100% of the parent container.
The innermost div has flex, flex-col, items-center, justify-center, mt-40, and text-center classes. These classes use the TailwindCSS utility classes to create a flexbox container that is vertically and horizontally centered on the page, with 40px of margin from the top.
The h1 element inside the innermost div has a text-6xl class, which sets the font size to 6 times the default font size. The text inside the h1 element is “Hi there, I am AVA”, which is the title of the chatbot.
In summary, this code creates a simple React component that displays a title for the chatbot using TailwindCSS for styling.
States
Next, we need to create some states that we will use for our Chatbot:
...
export default function Home() {
  // States
  const [value, setValue] = React.useState<string>("")
  const [conversation, setConversation] = React.useState<Conversation[]>([])
  const inputRef = useRef<HTMLInputElement>(null)
...
Code language: TypeScript (typescript)
Input Handler
Next, we need to add a way to enter a prompt and handle the input:
import React, { useRef } from "react"

export default function Home() {
  // States
  const [value, setValue] = React.useState<string>("")
  const [conversation, setConversation] = React.useState<Conversation[]>([])
  const inputRef = useRef<HTMLInputElement>(null)

  const handleInput = React.useCallback(
    (e: React.ChangeEvent<HTMLInputElement>) => {
      setValue(e.target.value)
    },
    []
  )

return (
    <div className='w-full'>
      <div className='flex flex-col items-center justify-center mt-40 text-center'>
        <h1 className='text-6xl'>Hi there, I am AVA</h1>
        <div className='my-12'>
          <p className='mb-6 font-bold'>Please type your prompt</p>
          <input
            placeholder='Type here'
            className='w-full max-w-xs input input-bordered input-secondary'
            value={value}
            onChange={handleInput}
            onKeyDown={handleKeyDown}
          />
        </div>
)
}
Code language: TypeScript (typescript)value: This state is defined using theuseStatehook to keep track of the current value of the input field. The initial value is an empty string. ThesetValuefunction is used to update the value state when the input field changes.conversation: This state is also defined using theuseStatehook to keep track of the conversation history. It is an array of conversation objects, where each object contains a user message and the chatbot’s response. ThesetConversationfunction is used to update the conversation state.inputRef: This state is defined using theuseRefhook to create a reference to the input field. This is useful for focusing the input field programmatically later on in the code.handleInput: This function is defined using theuseCallbackhook to handle changes to the input field. It takes in an event parameter that represents the change event, and updates thevaluestate with the new value of the input field. This function is passed as theonChangehandler for the input field.- The
inputfield: This field is defined with several properties, includingplaceholder,className,value,onChange, andonKeyDown. Theplaceholderproperty sets the text to display when the input field is empty. TheclassNameproperty sets the styling for the input field using TailwindCSS classes. Thevalueproperty is set to the current value of the input field stored in thevaluestate. TheonChangeproperty is set to thehandleInputfunction, which is called when the input field changes. TheonKeyDownproperty is not defined yet, but it will be added later to handle submitting the user’s message to the chatbot.
In summary, the newly added code defines states for value and conversation, creates a reference to the input field using inputRef, defines a handleInput function to handle changes to the input field, and adds an input field with several properties to capture the user’s prompt.
Chatbot Logic
Now we need to implement the chatbot logic:
import React, { useRef } from "react"

interface Conversation {
  role: string
  content: string
}

export default function Home() {
  // States
  const [value, setValue] = React.useState<string>("")
  const [conversation, setConversation] = React.useState<Conversation[]>([])
  const inputRef = useRef<HTMLInputElement>(null)

  const handleInput = React.useCallback(
    (e: React.ChangeEvent<HTMLInputElement>) => {
      setValue(e.target.value)
    },
    []
  )

  const handleKeyDown = async (e: React.KeyboardEvent<HTMLInputElement>) => {
    if (e.key === "Enter") {
      const chatHistory = [...conversation, { role: "user", content: value }]
      const response = await fetch("/api/openAIChat", {
        method: "POST",
        headers: {
          "Content-Type": "application/json",
        },
        body: JSON.stringify({ messages: chatHistory }),
      })

      const data = await response.json()
      setValue("")
      setConversation([
        ...chatHistory,
        { role: "assistant", content: data.result.choices[0].message.content },
      ])
    }
  }
  return (
    <div className='w-full'>
      <div className='flex flex-col items-center justify-center mt-40 text-center'>
        <h1 className='text-6xl'>Hi there, I am AVA</h1>
        <div className='my-12'>
          <p className='mb-6 font-bold'>Please type your prompt</p>
          <input
            placeholder='Type here'
            className='w-full max-w-xs input input-bordered input-secondary'
            value={value}
            onChange={handleInput}
            onKeyDown={handleKeyDown}
          />
        </div>
        <div className='textarea'>
          {conversation.map((item, index) => (
            <React.Fragment key={index}>
              <br />
              {item.role === "assistant" ? (
                <div className='chat chat-end'>
                  <div className='chat-bubble chat-bubble-secondary'>
                    <strong className='badge badge-primary'>AVA</strong>
                    <br />
                    {item.content}
                  </div>
                </div>
              ) : (
                <div className='chat chat-start'>
                  <div className='chat-bubble chat-bubble-primary'>
                    <strong className='badge badge-secondary'>User</strong>
                    <br />
                    {item.content}
                  </div>
                </div>
              )}
            </React.Fragment>
          ))}
        </div>
      </div>
    </div>
  )
}
Code language: TypeScript (typescript)
This newly added code is responsible for submitting the user’s prompt to the chatbot API, receiving a response, and updating the conversation history with the new message. Here’s an explanation of the new code:
interface Conversation: This interface defines the shape of each conversation item in theconversationstate. It includes two properties:role, which is a string that indicates whether the message is from the user or the chatbot, andcontent, which is the text content of the message.handleKeyDown: This function is called when the user presses a key while focused on the input field. It takes in an event parameter that represents the keyboard event. If the key pressed is “Enter”, the function sends a POST request to the/api/openAIChatendpoint with the current chat history and the user’s message. The function then parses the response JSON data, resets the input field’s value, and updates theconversationstate with the chat history and the chatbot’s response.- The
textareadiv: This div contains the chat history, which is an array of conversation objects. Theconversation.mapfunction is used to iterate over each item in the conversation and render it as a chat bubble. Each bubble is either from the user or the chatbot, depending on theroleproperty of the conversation object. The chat bubbles are styled using TailwindCSS classes.
In summary, this code handles submitting the user’s prompt to the chatbot API, receiving a response, and updating the conversation history with the new message. The conversation history is displayed in the chat interface as a series of chat bubbles styled using TailwindCSS.
Reset Conversations
Finally, we want to be able to reset our dialogue and implement a button, therefore:
import React, { useRef } from "react"

interface Conversation {
  role: string
  content: string
}

export default function Home() {
  // States
  const [value, setValue] = React.useState<string>("")
  const [conversation, setConversation] = React.useState<Conversation[]>([])
  const inputRef = useRef<HTMLInputElement>(null)

  const handleInput = React.useCallback(
    (e: React.ChangeEvent<HTMLInputElement>) => {
      setValue(e.target.value)
    },
    []
  )

  const handleKeyDown = async (e: React.KeyboardEvent<HTMLInputElement>) => {
    if (e.key === "Enter") {
      const chatHistory = [...conversation, { role: "user", content: value }]
      const response = await fetch("/api/openAIChat", {
        method: "POST",
        headers: {
          "Content-Type": "application/json",
        },
        body: JSON.stringify({ messages: chatHistory }),
      })

      const data = await response.json()
      setValue("")
      setConversation([
        ...chatHistory,
        { role: "assistant", content: data.result.choices[0].message.content },
      ])
    }
  }

  const handleRefresh = () => {
    inputRef.current?.focus()
    setValue("")
    setConversation([])
  }

  return (
    <div className='w-full'>
      <div className='flex flex-col items-center justify-center mt-40 text-center'>
        <h1 className='text-6xl'>Hi there, I am AVA</h1>
        <div className='my-12'>
          <p className='mb-6 font-bold'>Please type your prompt</p>
          <input
            placeholder='Type here'
            className='w-full max-w-xs input input-bordered input-secondary'
            value={value}
            onChange={handleInput}
            onKeyDown={handleKeyDown}
          />
          <button
            className='btn btn-primary btn-xs mt-6'
            onClick={handleRefresh}
          >
            Start New Conversation
          </button>
        </div>
        <div className='textarea'>
          {conversation.map((item, index) => (
            <React.Fragment key={index}>
              <br />
              {item.role === "assistant" ? (
                <div className='chat chat-end'>
                  <div className='chat-bubble chat-bubble-secondary'>
                    <strong className='badge badge-primary'>AVA</strong>
                    <br />
                    {item.content}
                  </div>
                </div>
              ) : (
                <div className='chat chat-start'>
                  <div className='chat-bubble chat-bubble-primary'>
                    <strong className='badge badge-secondary'>User</strong>
                    <br />
                    {item.content}
                  </div>
                </div>
              )}
            </React.Fragment>
          ))}
        </div>
      </div>
    </div>
  )
}
Code language: TypeScript (typescript)
This final addition adds a “Start New Conversation” button to the chat interface. When the button is clicked, the chat history and input field are reset to their initial values. Here’s an explanation of the new code:
handleRefresh: This function is called when the “Start New Conversation” button is clicked. It uses theinputRefreference to focus on the input field, sets thevaluestate to an empty string, and sets theconversationstate to an empty array.- The
button: This button is added to the bottom of the input field using TailwindCSS classes. It has a “btn-primary” style and calls thehandleRefreshfunction when clicked.
In summary, this final addition adds a “Start New Conversation” button to the chat interface, allowing the user to reset the chat history and input field to their initial values. The button is styled using TailwindCSS classes and calls the handleRefresh function when clicked.
Conclusion
The article is a tutorial on how to build a chatbot using ChatGPT API, NextJS, TailwindCSS, and DaisyUI. It walks through the steps of setting up the NextJS app, configuring the ChatGPT API endpoint, creating a conversation history, styling the chat interface with TailwindCSS and DaisyUI, handling user input and sending it to the ChatGPT API, and displaying the chatbot’s response.
The tutorial also shows how to add a “Start New Conversation” button to the chat interface to allow the user to reset the conversation history and input field. Overall, the tutorial provides a comprehensive guide on how to build a functional chatbot using modern web development tools.