In this Axiom tutorial series, we take a look at Axiom, a tool written by Ben Bidmead (@pry0cc) and Octavian(@0xtavian). Axiom is a dynamic infrastructure framework for ethical hacking and bug bounties. Axiom allows you to distribute the workload of different tools like Nmap, Ffuf, Nuclei, and a lot more.
Summary: In this tutorial, we will learn how to install Axiom on Ubuntu (using WSL2) and how to connect Axiom to DigitalOcean so that we are able to launch instances from our local terminal. These steps will also work on Kali Linux.
Table of Contents
- Why Axiom?
- Step 1 – Create a DigitalOcean Account
- Step 2 – Install Axiom
- Step 3 – Testing Axiom Connection
- Axiom Commands
- Conclusion
Why Axiom?
A lot of people use Axiom because of its distributed scanning abilities. You can easily spin up 150 VPS instances at the same time and run all kinds of scans to save some time. Of course, this is way over the top for most of us, but it is possible.
I know that a lot of our readers are still a bit scared about running VPS instances because of the potential cost, but with DigitalOcean and Axiom, everything is under your control. So why is Axiom useful? Let me give you an example:
If we create a Droplet (DigitalOcean’s term for a VPS) on DigitalOcean, we can start as low as 5$/Month. This 5$/Month will not be surpassed by anything that you do on that VPS, so that is completely safe to use. While having one low-cost VPS is not a problem for most of us, renting a higher-powered VPS mostly is.
With Axiom, we do not have to rent anything for long periods of time, because once you set up your initial VPS image, we can just create an instance on the fly, even a higher-powered one, and after the scan is finished, we just destroy the instance. So we could easily create a high-powered VPS instance, that would normally cost us around 96$ or more per month, use it for an hour, and destroy it.
That means we only pay for that one hour, nothing more. This usually boils down to a few cents. Of course, if we scale that up and do a distributed scan, we have to be careful, 150* 1$ is still 150$.
Step 1 – Create a DigitalOcean Account
To be able to use Axiom, we first need to set up a DigitalOcean account. DigitalOcean has provided me with a special voucher for my readers, so if you sign-up using this link, you get 100$ worth of credits on me. That means you can run a 5$ VPS for 20 months for free.
After you signed up for DigitalOcean, you need to create an access token, so that Axiom is able to create instances for you.
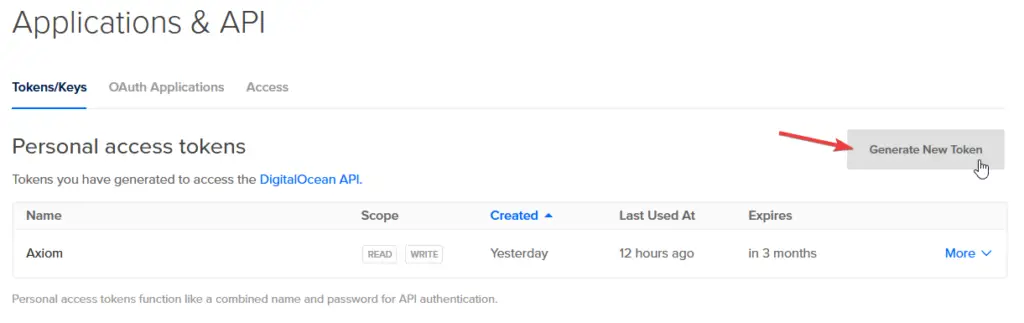
When logged in, navigate to API on the left navbar, or click here. Now click on Generate New Token to create a new access token.
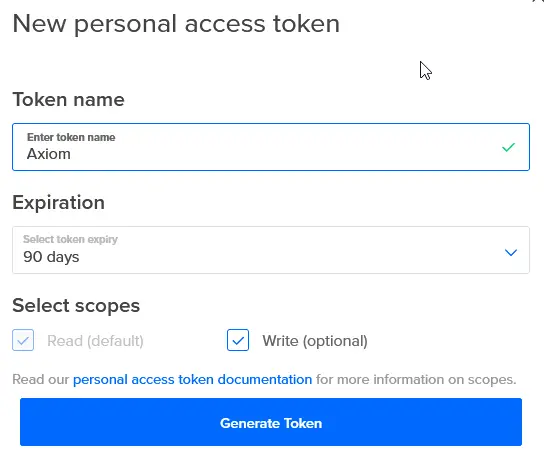
Now choose a name and leave the permissions on Read + Write. Then click on Generate Token and copy your access token. Make sure to store that token somewhere safe, as you won’t be able to see it again.
Everything on the DigitalOcean side is now set up and we can continue with the next step.
Step 2 – Install Axiom
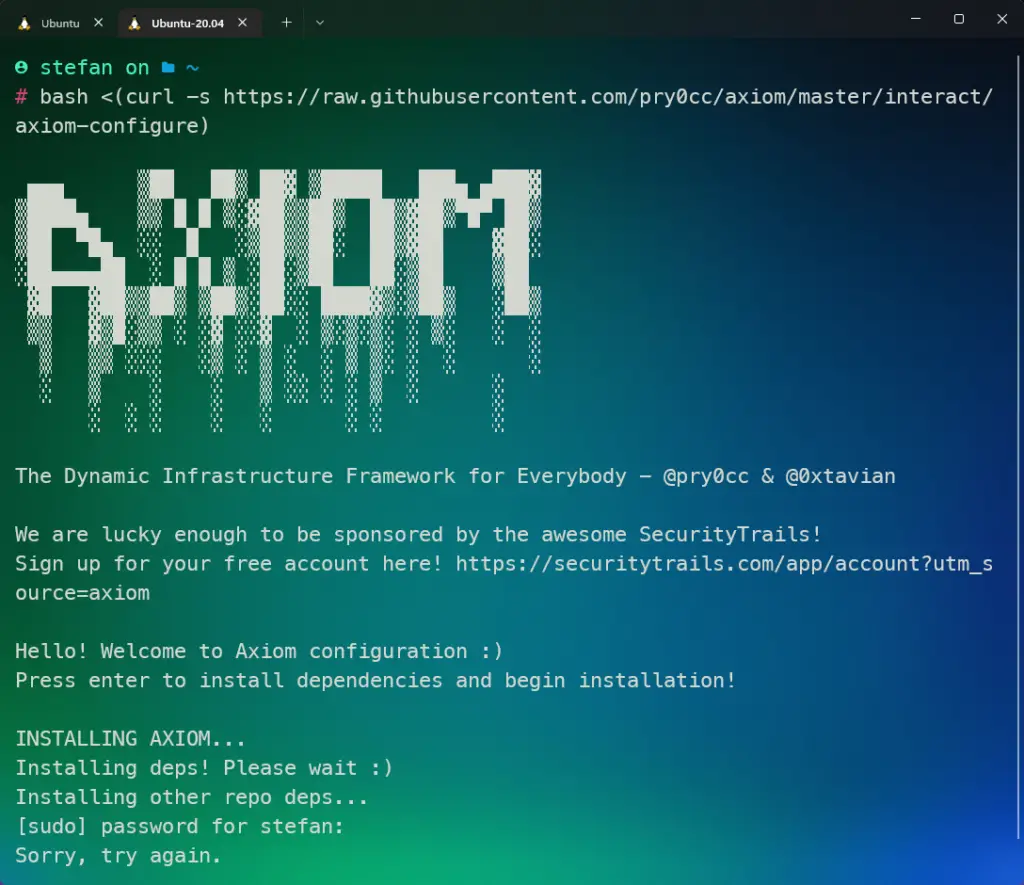
We use the easy install way of installing Axiom. There is also an option to use Docker, but we won’t be covering this here. To install Axiom open a terminal and enter:
bash <(curl -s https://raw.githubusercontent.com/pry0cc/axiom/master/interact/axiom-configure)Code language: Bash (bash)As soon as we press enter, the Axiom installer will start.
TIP: I am using WSL2 for this tutorial. If you want to get your terminal looking like mine, here is a free tutorial series on WSL2, and here is my complete WSL2 course. Make sure to check it out.
Axiom will now install all of the dependencies it needs. Once you reach the part where you are asked to choose between which shell you want to configure:
1)Bash
2)ZSH
3)Oh My ZSH
Select the option according to the shell you are using. If you don’t know what that means, choose 1. If you use ZSH, choose 2. If you want to install and configure Oh My ZSH, choose 3.
Let’s walk through the rest of the configuration together:
- Would you like to generate a custom amass config? -> n
- Please enter your provider -> do
- Do you already have a DigitalOcean account? -> y
- Enter your token -> Paste your DigitalOcean access token that we have created earlier
- Choosing a Region -> Either leave it as default or choose another region
- Please enter your default size -> Either leave it as default (it’s the smallest available instance) or adjust
- Enter your GPG Recipient Email -> Press enter
- Would you like to configure a connection to an Axiom Pro Instance -> n
Check if the final information is correct and then press enter to continue. Enter a profile name and press enter again. You can choose any name you like here. To the question as to which Axiom provisioner you would like to use, just press enter.
Now Axiom will start to create its image. This is a template image that Axiom is going to use for any further instances we will deploy. We can think of this as a Snapshot. This will take anywhere between 25 – 40 minutes.
Step 3 – Testing Axiom Connection
As soon as the build is completed, restart your terminal.
To test if everything was set up correctly and the connection to DigitalOcean has been established, run this command to create your first instance:
axiom-initCode language: Backus–Naur Form (bnf)This produces a countdown that indicates how long it takes until the instance is available:
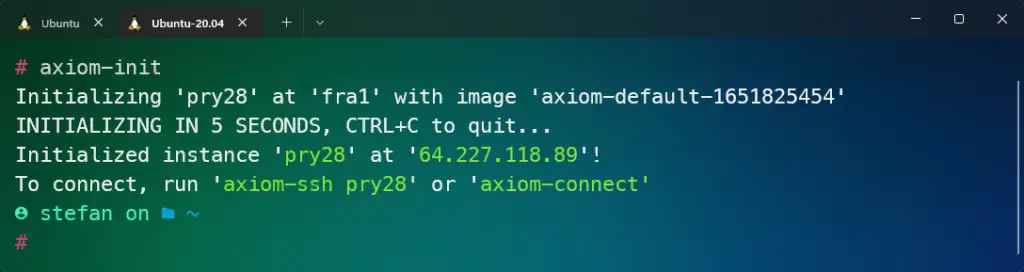
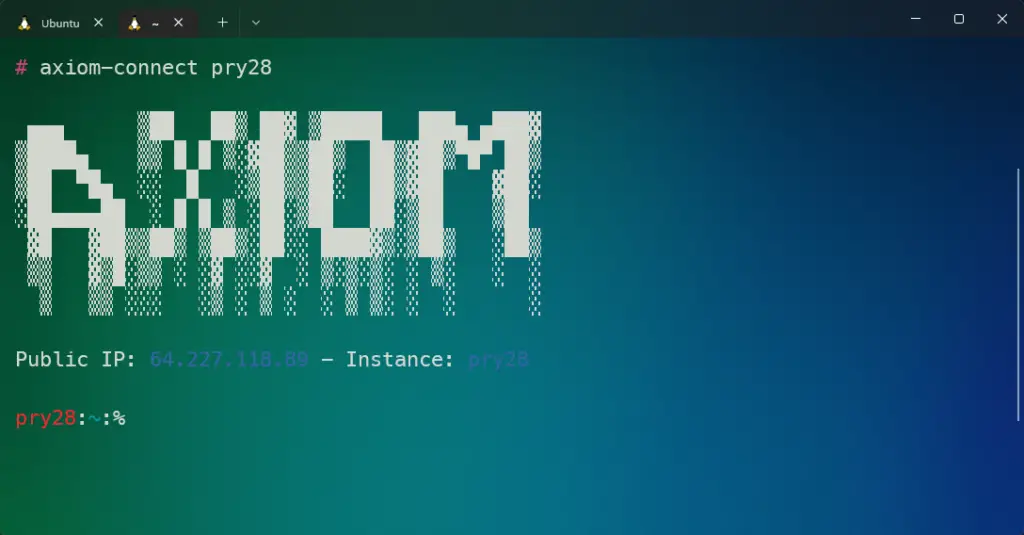
Now we can see the name of our Axiom instance pry28 and we can now connect to it. To connect, type:
axiom-connect pry28Code language: Bash (bash)And just like this, we are logged into our Axiom instance at DigitalOcean:
You can now either use Axiom just like this or, you can check out some of the most-used commands below.
Axiom Commands
Now that we have everything set up, let’s look at some of the basic commands:
Initiate (create) Axiom Instance
axiom-initCode language: Bash (bash)Connecting to Axiom Instance
axiom-connect instanceNameCode language: Bash (bash)Disconnecting from Axiom Instance
exitCode language: Bash (bash)Listing Axiom Instances
axiom-lsCode language: Bash (bash)Destroying Axiom Instance
axiom-rm instanceNameCode language: Bash (bash)Executing Remote Axiom Command from Local Terminal
axiom-exec -i instanceName whoamiCode language: Bash (bash)Connecting to Axiom Instance using TMUX
axiom-ssh instanceName --tmuxCode language: Bash (bash)Syncing Instance Home Folder to Local Machine
axiom-sync instanceNameCode language: Bash (bash)The content of the backup/sync can be found in ~/.axiom/boxes/instanceName
Conclusion
This first Axiom Tutorial should just give you a starting point for your journey with Axiom. In the next Axiom tutorial, we will look at more advanced commands, like distributing scans and managing fleets. Let us know in the comments below how you use Axiom in your own workflow!