
Today I show you how to install Snipe-IT on Ubuntu using Amazon Web Services Free Tier EC2 instance.
After struggling through at least 5 or 6 incomplete “tutorials” on how to install Snipe-IT on Ubuntu, I gave up and scrapped the official documentation for you, bringing together the most complete Snipe-IT tutorial out there.
Alright, without further ado, let’s get to work.
Table of Contents
- Step 1 – Install LAMP
- Step 2 – Updating Ubuntu and installing prerequisites
- Step 3 – Configuring the MySQL Database
- Step 4 – Editing the .env file
- Step 5 – Adjusting permissions
- Step 6 – Installing PHP dependencies
- Step 7 – Installing Composer & generating our App Key
- Step 8 – Editing configuration files and wrapping up
- Step 9 – Setup with the Web Browser
Step 1 – Install LAMP
First, we need to install LAMP, that is, Linux, Apache2, MySQL, and PHP.
Go ahead and install LAMP following my guide.
Make sure to write down your MySQL root credentials while running through the MySQL installation.
Step 2 – Updating Ubuntu and installing prerequisites
We start with assuming you have a freshly installed Ubuntu Server in front of you or you followed the video above and created a fresh Ubuntu instance on AWS EC2.
Updates first:
sudo apt-get update
sudo apt-get upgrade -yCode language: JavaScript (javascript)
Then we are going to log in with root by typing:
sudo -iNext, we are going to download the composer:
curl -sS https://getcomposer.org/installer | phpCode language: JavaScript (javascript)
Then we are going to move the composer to another folder:
mv composer.phar /usr/local/bin/composer
cd /var/www/
Code language: JavaScript (javascript)
Alright, time to download snipe-it:
git clone https://github.com/snipe/snipe-it snipeit
cd snipeit/
Code language: PHP (php)
Finally, we replace .env.example with .env:
cp .env.example .envCode language: CSS (css)More on that later.
Step 3 – Configuring the MySQL Database
Time to create our MySQL Database:
mysql -u root -pNow you need to run a couple of commands, make sure to use the EXACT commands like in the box below, replace “your username” and “yourpw” with your own username and password:
    mysql> create database snipeit;
    mysql> CREATE USER 'yourusername'@'localhost' IDENTIFIED BY 'yourpw';
    mysql> GRANT ALL PRIVILEGES ON snipeit.* TO 'yourusername'@'localhost';
    mysql> flush privileges;
    mysql> exit
Code language: PHP (php)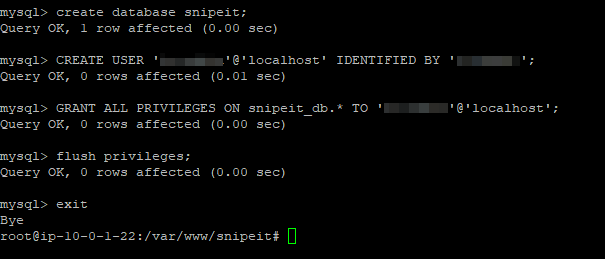
Of course, remember your credentials.
Step 4 – Editing the .env file
Now we are going to edit the .env config file.
nano .envCode language: CSS (css)You need to adjust the values according to your server and the database we created earlier. Remember to enter your username and password that you set in step 3.
Don’t worry about the APP_KEY either, we are going to generate that later.
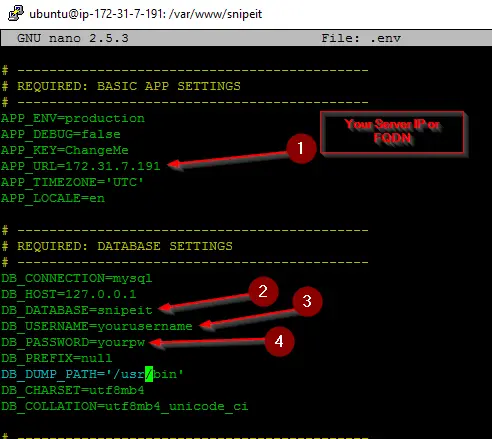
Hit CTRL+O to write and CTRL+X to exit.
Step 5 – Adjusting permissions
Now we got to adjust a couple of permissions:
chown -R www-data:www-data storage public/uploads
chmod -R 775 storage
chmod -R 755 public/uploads
Code language: PHP (php)
Step 6 – Installing PHP dependencies
Installing PHP dependencies:
apt-get install -y git unzip php php-mcrypt php-curl php-mysql php-gd php-ldap php-zip php-mbstring php-xml
apt-get install php7.0-bcmathCode language: JavaScript (javascript)
Step 7 – Installing Composer & generating our App Key
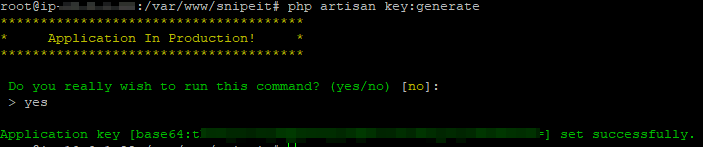
Installing Composer, go get yourself a nice cup of coffee as this will take a while.
composer install --no-dev --prefer-sourceAnd generating our APP Key:
php artisan key:generateCode language: CSS (css)Type yes when you get asked if you really want to run that command. Copy the Key and save it somewhere. The Key will automatically get pasted into your .env file.
Step 8 – Editing configuration files and wrapping up
Almost done guys, hold tight.
Now we are going to enable our Virtual Host:
sudo nano /etc/apache2/sites-available/snipeit.example.com.confAnd paste the text into the box below:
<VirtualHost *:80>
ServerAdmin webmaster@localhost
<Directory /var/www/snipeit/public>
        Require all granted
        AllowOverride All
   </Directory>
    DocumentRoot /var/www/snipeit/public
    ServerName YOURSERVERIP
   #Redirect permanent / https://snipeit.your-server-fqdn.com/
        ErrorLog /var/log/apache2/snipeIT.error.log
        CustomLog /var/log/apache2/access.log combined
</VirtualHost>Code language: PHP (php)
Make sure to replace YOURSERVERIP with, well, your server IP.
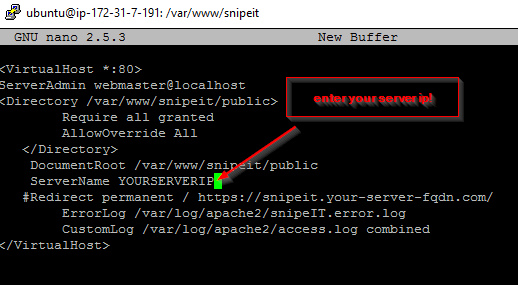
Press CTRL+O to save and CTRL+X to exit.
Now we are going to run a couple apache commands:
sudo a2ensite snipeit.example.com.conf
sudo a2enmod rewrite
sudo systemctl restart apache2
Code language: CSS (css)
And we are going to disable the default.conf
sudo a2dissite 000-default.conf
sudo service apache2 restart
Code language: JavaScript (javascript)
Change directory
cd /etc/apache2/sites-availableAnd we are going to rename the default.conf to keep it as a backup:
sudo cp 000-default.conf 000-default.confTEMPCode language: JavaScript (javascript)And finally, remove it:
sudo rm 000-default.confCode language: JavaScript (javascript)Already and finally wrapping it up with:
sudo phpenmod mcrypt
sudo phpenmod mbstring
sudo a2enmod rewrite
sudo service apache2 restart
Step 9 – Setup with the Web Browser
Now you are as good as done. Open a Web Browser and enter your server IP. You should end up here:
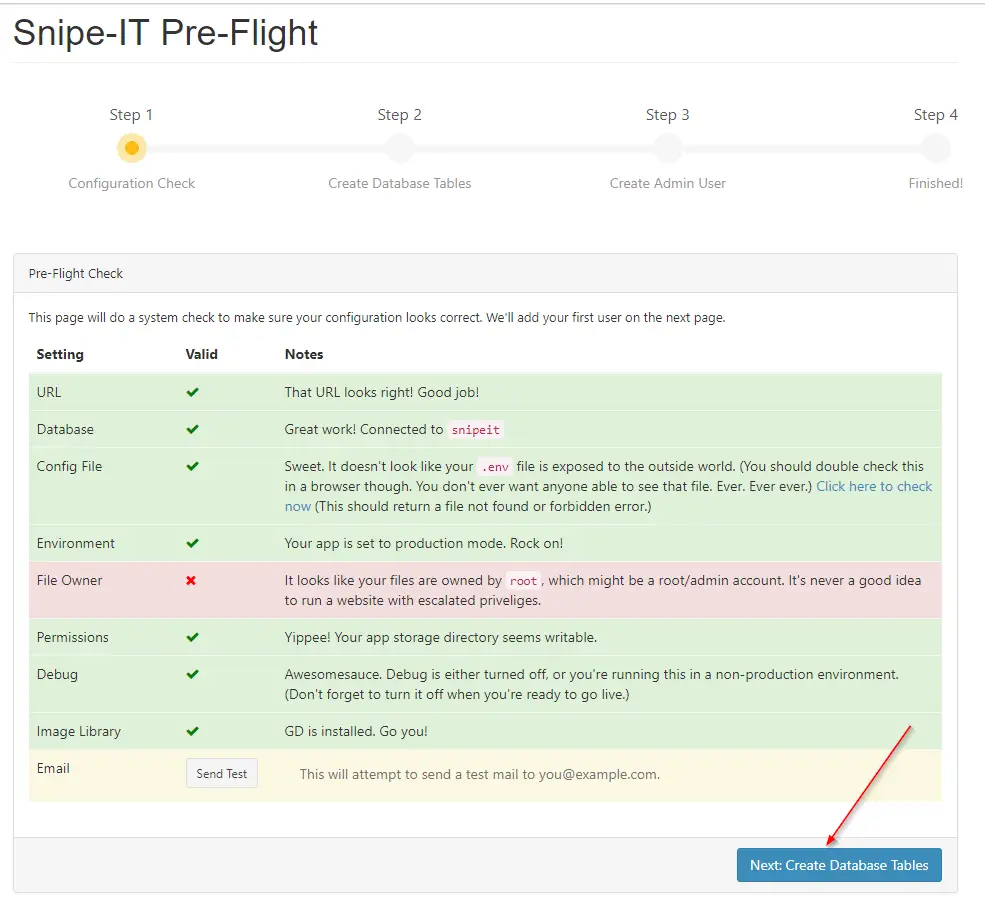
Ignore the File Owner warning, this seems to be a bug and will probably be fixed in an update. Click on Next: Create Database Tables.
You will likely get an error:

Don’t panic; just refresh the page by hitting F5.
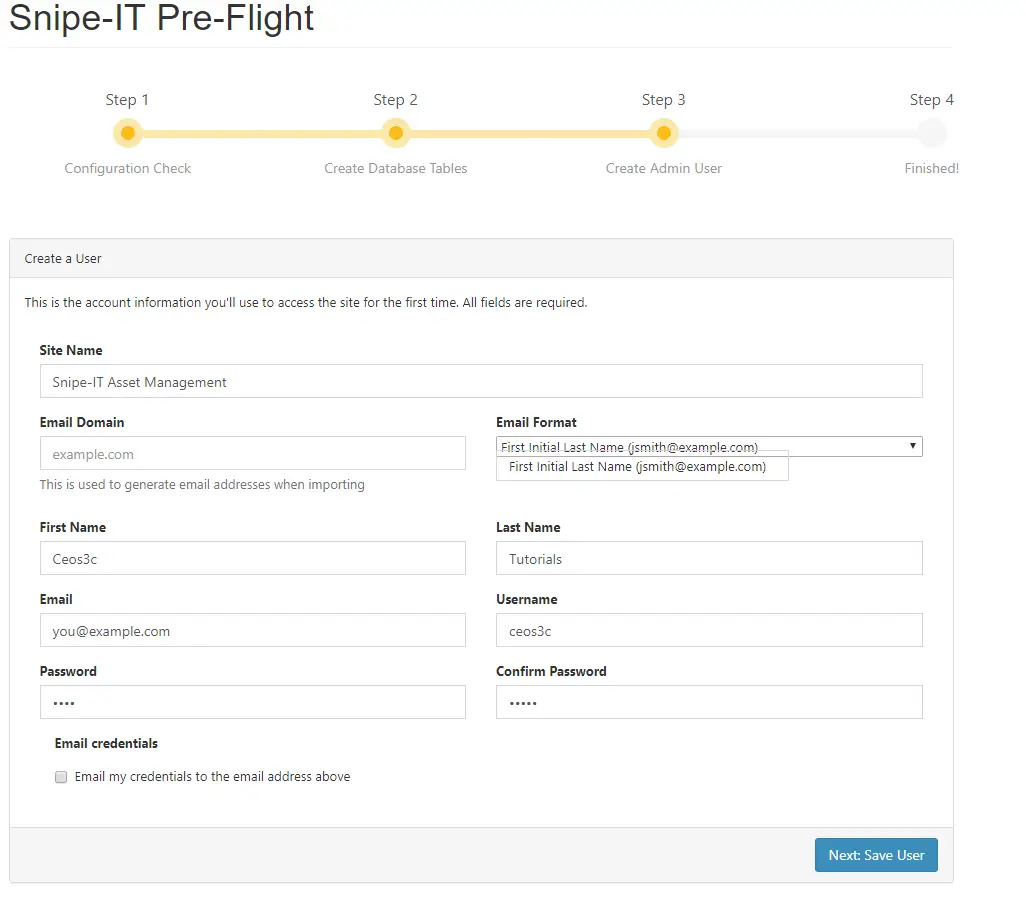
Click on Next: Create User
Finalize everything to your liking, click F5 if you get the error again.
And congratulations, you are now running a powerful, completely free cloud-based instance of the Snipe IT Asset Management Software on your free tier Amazon EC2 instance.
After completing all of the steps, I am getting 500 | SERVER ERROR page when i access the IP of my ec2 instance. I am using ubuntu 22.04 LTE with php 8.1.2. Can you help?
Hi,
Getting this error in snipeIT.error.log . any idea?
PHP Parse error: syntax error, unexpected ‘?’, expecting variable (T_VARIABLE) in /var/www/snipeit/vendor/doctrine/dbal/lib/Doctrine/DBAL/Driver/PDOConnection.php on line 24
after go throw with all steps, when try to open url using my public ip „The connection was reset“ i can’t open it , no page appears ? so please advice
Actually never mind I figured it out. Small mistake, I didn’t put the full username with @localhost for the database credentials ha
Hey ceos3c,
Great guides, love them so far. But currently I’m running into an issue at about step 9. I follow everything precisely with a fresh 16.04 linux install, up to here. But when I attempt to start up the web page with my ip address, instead of sending me to the pre-flight checkoff page, it sends me to the, „Whoops, looks like something went wrong“ page. Any suggestions?
great step y step guide thanks
Thanks, Ron! Glad it could help you.
I appreciate your detailed information here, but want to add some really helpful information on the topic that can be useful to the developers and users.
For Installing Snipe-IT on AWS instance, you do not need to learn all the technical stuffs, you can host PostgreSQL on AWS using one click ready-to-run Snipe-IT AMI (Amazon Machine Image).
To launch this stack on Amazon EC2 in just 3 simple steps explained below:
https://aws.amazon.com/marketplace/pp/B06Y151QS9?ref_=_ptnr_intuz_ami_snipeit
https://cloud.intuz.com/applications/snipeit/aws/how-to-use?utm_source=Bl-cmt&utm_medium=snipe-IT&utm_campaign=snipe-IT-Bl-cmt