
Welcome to this beginner-friendly guide on implementing Authentication with NextJS! In this tutorial, we’ll demonstrate how to create a simple sample application with NextJS 13 and next-auth. By the end of this article, you’ll have a better understanding of how to set up authentication in your own NextJS applications using GitHub OAuth.
Table of Contents
- Step 1: Set up your NextJS 13 project
- Step 2: Install the next-auth package
- Step 3: Create an authentication provider
- Step 4: Create a local environment file
- Step 5: Configure next-auth
- Step 6: Testing Authentication
- Final Verdict
Step 1: Set up your NextJS 13 project
To begin, create a new NextJS 13 project by running the following command in your terminal:
npx create-next-app@latest nextjs-auth-app
Code language: CSS (css)
Just press Enter on all of the upcoming prompts.
Step 2: Install the next-auth package
Next, install the next-auth package, which provides an easy-to-implement authentication solution:
cd nextjs-auth-app
npm install next-auth
Step 3: Create an authentication provider
For this tutorial, we’ll use GitHub as our authentication provider. You’ll need to create a new OAuth application on your GitHub Developer Settings and obtain your client ID and client secret. You can follow the instructions from the official next-auth documentation to set up your provider.
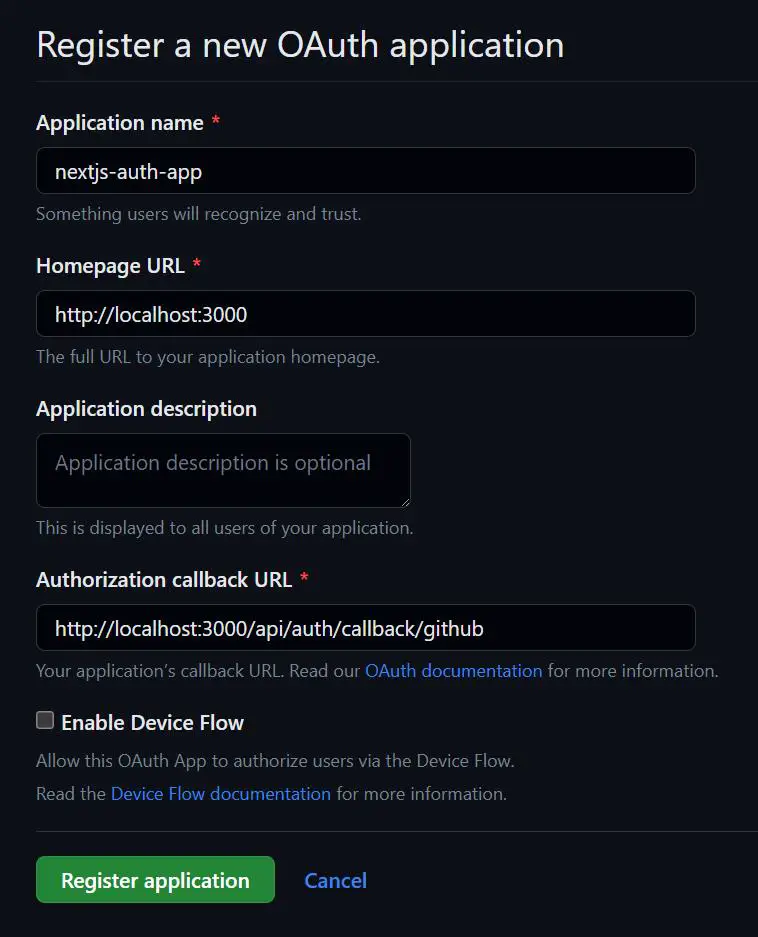
Fill in the following fields:
- Application name: nextjs-auth-app
- Homepage URL: http://localhost:3000 (Change this to your live website URL later)
- Authorization callback URL: http://localhost:3000/api/auth/callback/github (Change this to your live website URL later)
When finished, click on Register application. Then, click on Generate new client secret and copy both, the Client ID as well as your client secret inside of your .env.local file that we create in the next step.
Step 4: Create a local environment file
Create a file called .env.local in your project root and add the following lines:
GITHUB_ID=your_client_id_here
GITHUB_SECRET=your_client_secret_here
NEXTAUTH_URL=http://localhost:3000
Code language: JavaScript (javascript)
Replace your_client_id_here and your_client_secret_here with your actual GitHub OAuth client ID and client secret, respectively. The NEXTAUTH_URL is the URL of your local environment, or later, of your production environment, so make sure to adjust it accordingly.
NEXTAUTH_SECRET
Finally, we need to create another variable in the .env.local file that holds our NEXTAUTH_SECRET. You can read more about this here. First, we create a random value using the following command:
openssl rand -base64 32Copy the value that results from this and paste it next to the NEXTAUTH_SECRET variable:
GITHUB_ID=your_client_id_here
GITHUB_SECRET=your_client_secret_here
NEXTAUTH_URL=http://localhost:3000
NEXTAUTH_SECRET=your_nextauth_secret_hereCode language: JavaScript (javascript)
ℹ️
The $ openssl rand -base64 32 command generates a random string using the OpenSSL command-line utility. Here’s a breakdown of the command:
openssl: The command-line tool for the OpenSSL library, which provides various cryptographic operations and features.rand: A sub-command of the OpenSSL tool that generates random data.-base64: An option that specifies the output format. In this case, it tells the command to output the random data in Base64 encoding.32: The number of random bytes to generate before encoding them in Base64.
The command generates 32 random bytes of data, encodes them in Base64, and outputs the result. This can be useful for generating secure tokens, keys, or passwords.
Step 5: Configure next-auth
Now, open the file next.config.js in your project root and add the following configuration:
/** @type {import('next').NextConfig} */
const nextConfig = {
  reactStrictMode: true,
}

module.exports = {
  ...nextConfig, // Add the nextConfig object to the exported configuration
  env: {
    GITHUB_CLIENT_ID: process.env.GITHUB_CLIENT_ID,
    GITHUB_CLIENT_SECRET: process.env.GITHUB_CLIENT_SECRET,
  },
}
Code language: JavaScript (javascript)
Next Auth API Endpoint
Next, inside of the pages/api folder create a new folder called auth and a file called [...nextauth].js inside of it. So the full path is pages/api/auth/[…nextauth].js. Add the following code to set up next-auth with GitHub OAuth:
import NextAuth from "next-auth"
import GithubProvider from "next-auth/providers/github"

export const authOptions = {
  // Configure one or more authentication providers
  providers: [
    GithubProvider({
      clientId: process.env.GITHUB_ID,
      clientSecret: process.env.GITHUB_SECRET,
    }),
    // ...add more providers here
  ],
}

export default NextAuth(authOptions)
Code language: JavaScript (javascript)
Session Provider
Finally, we need to wrap our application in next-auth’s SessionProvider function. Open the pages/_app.js file and add the following code to it:
import { SessionProvider } from "next-auth/react"

export default function App({
  Component,
  pageProps: { session, ...pageProps },
}) {
  return (
    <SessionProvider session={session}>
      <Component {...pageProps} />
    </SessionProvider>
  )
}
Code language: JavaScript (javascript)
Step 6: Testing Authentication
Edit your pages/index.js file and add the following code:
import Link from "next/link"

export default function Home() {
  return (
    <div>
      <h1>Home</h1>
      <p>This is the home page. You can view it without being logged in.</p>
      <Link href='/protected'>Go to protected page</Link>
    </div>
  )
}
Code language: JavaScript (javascript)
Next, create a new page called pages/protected.js and add the following code to it:
import { useSession, signIn, signOut } from "next-auth/react"

export default function Protected() {
  const { data: session } = useSession()
  console.log(session)
  if (session) {
    return (
      <div>
        <h1>Protected Content</h1>
        <p>
          Congratulations, {session.user.name}, you are successfully logged in!
        </p>
        <button onClick={() => signOut()}>Sign Out</button>
      </div>
    )
  }

  return (
    <div>
      <h1>Protected Content</h1>
      <p>Please log in to view.</p>
      <button onClick={() => signIn()}>Sign in</button>
    </div>
  )
}
Code language: JavaScript (javascript)
This code is a React component that renders protected content only accessible to logged-in users. It uses the Next.js authentication library next-auth/react to manage user sessions.
- Import necessary functions:
useSession,signIn, andsignOutare imported from thenext-auth/reactlibrary. - Define
Protectedcomponent: This is a functional React component that will be used to display the protected content. - Get the user session:
const { data: session } = useSession()fetches the user session and assigns it to thesessionconstant. - Log the session to the console:
console.log(session)logs the session object to the console. - Check if the user is logged in:
- If
sessionexists (the user is logged in), render the protected content:- Display a header “Protected Content”.
- Show a message with the user’s name, indicating they are logged in.
- Provide a “Sign Out” button that calls the
signOutfunction when clicked.
- If
sessiondoes not exist (the user is not logged in), render a prompt to log in:- Display a header “Protected Content”.
- Show a message asking the user to log in to view the content.
- Provide a “Sign in” button that calls the
signInfunction when clicked.
- If
You can use this way of protecting content on any page or component you like.
Final Verdict
With NextJS 13 and next-auth, implementing authentication in your NextJS applications is now easier than ever. By following these simple steps, you can have your users sign in with their GitHub accounts, making your application more user-friendly and secure. NextJS and next-auth provide seamless integration, allowing you to focus on building your application without worrying about authentication complexities.
To further enhance your NextJS application, consider exploring other features such as server-side rendering and static site generation. Check out our tutorial on implementing Google AdSense in a NextJS application for tips on monetizing your project. Additionally, you can learn about utilizing AI-powered language models in our ChatGPT API tutorial.
For more information on NextJS, visit the official NextJS website. And remember, practice makes perfect – so keep experimenting with different authentication providers and techniques to find the best solution for your specific application.
Happy coding!