
To install VS Code on macOS, download it from code.visualstudio.com, drag Visual Studio Code into your Applications folder, and run the “Shell Command: Install ‘code’ command in PATH” command once. If you use Homebrew, it’s a single line: brew install --cask visual-studio-code. Both routes are free, and both work on Apple Silicon and Intel Macs.
Below is which download to pick, the Homebrew route I use on my own MacBook, how to get the code command working in Terminal, and the fixes for the few things that go wrong.
The Short Version
- Check your chip: Apple menu, then About This Mac. “Chip Apple M…” means Apple Silicon, “Processor Intel…” means Intel.
- Download the matching build from code.visualstudio.com/download, or run
brew install --cask visual-studio-code. - Drag Visual Studio Code into Applications. Don’t run it from Downloads.
- Open VS Code, press Cmd+Shift+P and run “Shell Command: Install ‘code’ command in PATH”.
- Restart Terminal and type
code .in any project folder.
Which VS Code Download for Mac Do You Need?
The download page offers three macOS builds. This is the part an AI summary usually skips, and it’s the part people get wrong.
| Build | Pick it if | Notes |
|---|---|---|
| Apple Silicon | Your Mac has an M1, M2, M3, M4 or newer chip | Smallest download, runs natively |
| Intel Chip | Your Mac has an Intel processor | Only for Intel Macs |
| Universal | You’re not sure, or you copy the app between Macs | Contains both, so it’s a bigger download |
Not sure which one you have? Grab Universal. It runs natively on both chip types, it’s just a bigger download than it needs to be.
One thing worth knowing: VS Code supports the macOS versions Apple still ships security updates for, which is usually the current release and the two before it. If your Mac is stuck on something older, the newest VS Code may not install.
Install VS Code on macOS (Download Method)
- Go to code.visualstudio.com/download and download the build that matches your chip.
- Open the downloaded file.
- Drag Visual Studio Code.app into your Applications folder.
- Open it from Applications. macOS asks if you’re sure because it was downloaded from the internet. Click Open.
- To keep it in your Dock, Control-click the icon and pick Options, then Keep in Dock.
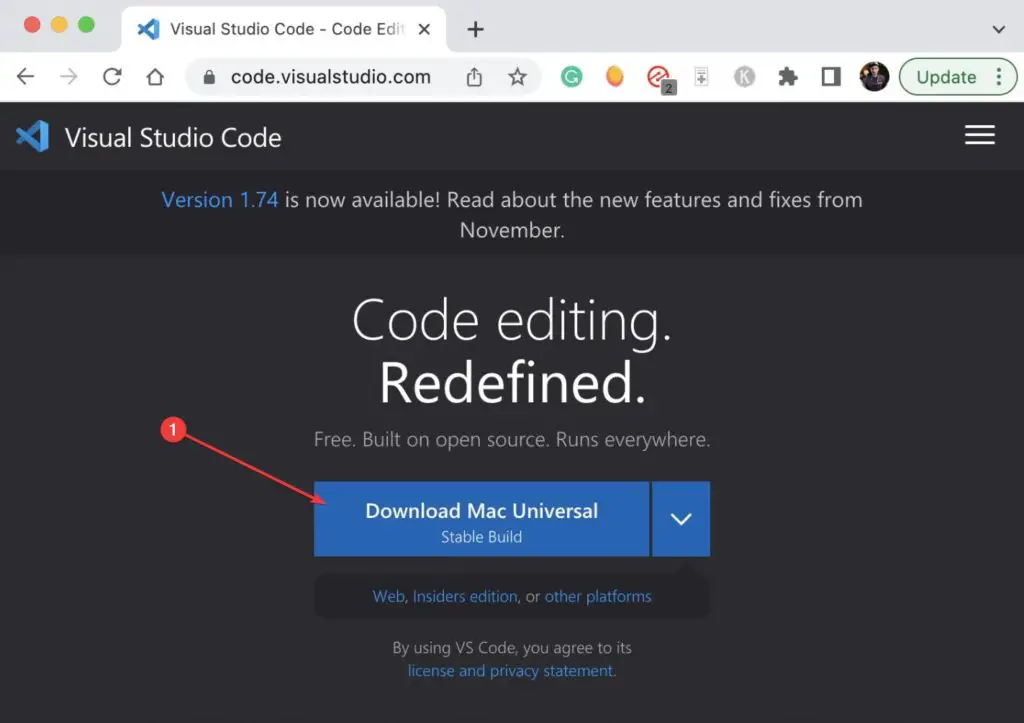
Moving it into Applications matters. If you launch VS Code straight from Downloads, macOS runs it from a temporary, read-only location and auto-updates fail.
Install VS Code on Mac with Homebrew
This is how I install it. One command, no dragging, and the code command lands in your PATH automatically.
brew install --cask visual-studio-codeDon’t have Homebrew yet? The install command is on brew.sh. VS Code still updates itself after a Homebrew install, so you don’t need to run brew upgrade for it.
To remove it later:
brew uninstall --cask visual-studio-codeAdd the code Command to Your PATH
The code command lets you open any folder from Terminal with code .. You’ll use it constantly. If you installed with Homebrew, it already works. If you used the download:
- Open VS Code.
- Press Cmd+Shift+P to open the Command Palette.
- Type “shell command” and run Shell Command: Install ‘code’ command in PATH.
- Close and reopen Terminal.
If that command doesn’t stick, add the path yourself. For zsh, which is the default shell on macOS, append this to ~/.zprofile:
export PATH="$PATH:/Applications/Visual Studio Code.app/Contents/Resources/app/bin"Code language: JavaScript (javascript)Then run source ~/.zprofile or open a new Terminal window, and check it with:
code --versionWhat to Do Right After Installing
A fresh install is pretty bare. These are the first things worth doing:
- Turn on Settings Sync (the account icon, bottom left) if you use VS Code on more than one machine. It syncs settings, keybindings and extensions through your GitHub or Microsoft account.
- Install the extension for your language. VS Code usually suggests it the first time you open a matching file. For Python, see my VS Code for Python setup. For Go, there’s a VS Code for Go guide.
- Add a formatter. Prettier for JavaScript and TypeScript, then enable Format On Save in Settings.
- Pick a theme you can stare at for hours. Cmd+K, then Cmd+T opens the theme picker.
Troubleshooting VS Code on macOS
“code: command not found”
The PATH step didn’t run, or Terminal was open while you ran it. Run the Shell Command again, then open a fresh Terminal window. Still nothing? Use the manual ~/.zprofile line above.
Updates keep failing
Almost always the app is running from Downloads, or macOS still has it quarantined. Quit VS Code, move it into Applications, and open it from there.
macOS asks for access to Contacts or Calendar
You’ll sometimes see these privacy prompts while VS Code or its terminal is running. You can safely click Don’t Allow.
FAQ
Can you install VS Code on a Mac M1 or newer?
Yes. Download the Apple Silicon build, or the Universal one, and it runs natively on M1, M2, M3, M4 and later chips. Homebrew picks the right build for you.
Is VS Code free on Mac?
Yes, completely. No trial, no paid tier for the editor itself.
Is VS Code in the Mac App Store?
No. Anything called “VS Code” in the App Store isn’t the official Microsoft app. Use the website or Homebrew.
How do I update VS Code on Mac?
It updates itself. Microsoft ships new releases regularly, and VS Code installs them on restart. To check manually, open the Code menu and choose Check for Updates.
Summary
Pick the build that matches your chip, keep the app in Applications, and get the code command into your PATH. Or skip all of it with Homebrew. A good next step is building something, like a static site with the Astro web framework and VS Code. On another machine? Here’s how to install VS Code on Windows and on Ubuntu.
