

You typed sudo mount -a, you got mount error(13): Permission denied, and now you are here. This tutorial fixes the mount CIFS permission denied error on Linux, and it covers every cause I have run into over the years, not just the one that happened to work for me.
Start with the short version below. If your share mounts after that, great, you are done in two minutes. If it does not, work down the page. Each section is a separate cause with the exact commands to test it.
Table of Contents
- The Short Version
- Mount CIFS Permission Denied Error
- Step 1 – Installing CIFS Utils
- Step 2 – Creating a Mount Point
- Step 3 – Editing the fstab file
- Step 4 – Creating the .smbcredentials file
- Step 5 – Mounting the Share
- Mount It Manually to See the Real Error
- Still Getting Mount CIFS Permission Denied? Work Through These
- fstab or Manual Mount? Use Both
- Turn On CIFS Debug Logging
- FAQ
- Wrapping up
⚠️Related Articles
Part 1 – How to install WSL 2 with Windows Terminal – Complete Guide
Part 2 – Windows Terminal Customization for WSL 2
Part 3 – In-Depth Windows Terminal Customization for WSL2
The Short Version
Nine times out of ten it is one of these. Try them in order.
- Add
domain=to your credentials file. Missing domain is the most common cause and almost no tutorial mentions it. - Force an SMB version with
vers=3.0. If that fails, tryvers=2.1, thenvers=1.0for old NAS boxes. - Add
sec=ntlmsspto your mount options. - Install
cifs-utils. Without it the mount silently does the wrong thing. - Use an absolute path to the credentials file in fstab.
~/.smbcredentialsdoes not work there. - Set
uid=,gid=,file_mode=anddir_mode=if the share mounts but you cannot write to it. - Mount manually first and read
dmesg. The kernel tells you the real reason, fstab does not.
Here is the one command that covers most of the list at once. Adjust the server, share, path and user, then run it.
sudo mount -t cifs //192.168.1.50/Photos /media/share/Photos \
  -o credentials=/etc/samba/credentials/nas,vers=3.0,sec=ntlmssp,uid=1000,gid=1000,file_mode=0664,dir_mode=0775,iocharset=utf8Code language: JavaScript (javascript)
Mount CIFS Permission Denied Error
The error occurs mostly because you don’t provide sufficient credential information, specifically which Domain you are in. Most tutorials out there only mention username and password when editing the .smbcredentials file. That is the fix that solved it for me on a Synology NAS, and it is still the single most common cause.
It helps to know what the number in the error actually means. mount error(13) is not a Linux file permission problem. It is the server saying “I do not accept these credentials”. The other codes you might see:
| Error | Message | What it usually means |
|---|---|---|
| 13 | Permission denied | Auth rejected. Wrong user, wrong password, missing domain, or a blocked security mode. |
| 2 | No such file or directory | The share name is wrong, or the local mount point does not exist. |
| 112 | Host is down | Almost never a dead host. It is an SMB version mismatch. |
| 22 | Invalid argument | A typo in your option string, or an option your kernel does not know. |
| 115 | Operation now in progress | Port 445 is blocked or the server is not answering. |
Everything below needs root. If you are shaky on that, read my complete guide to Linux sudo and superuser permissions first.
Step 1 – Installing CIFS Utils
To mount a CIFS share on Linux, we first need to install cifs-utils. Without it, mount -t cifs falls back to a generic helper and gives you confusing errors instead of useful ones.
sudo apt install cifs-utils -yOn other distros:
# Fedora / RHEL / Rocky / Alma
sudo dnf install cifs-utils -y

# Arch / Manjaro
sudo pacman -S cifs-utils

# openSUSE
sudo zypper install cifs-utilsCode language: PHP (php)
It is pre-installed on a lot of desktop distros, but do not assume. Server and minimal images usually ship without it.
Step 2 – Creating a Mount Point
Next, we need to create the directory where we want to mount our share. You can later find the share in this directory. For this example, we will mount the imaginary “Photos” share.
sudo mkdir -p /media/share/PhotosLeave the directory empty. If you put files in it before mounting, they disappear from view while the share is mounted and reappear when you unmount. That confuses people into thinking the mount ate their data.
Step 3 – Editing the fstab file
So we don’t have to mount our share again after each reboot, we edit the fstab file to make the share mount automatically. But first, we make a backup of this file in case something goes wrong.
sudo cp /etc/fstab /etc/fstab.oldThat done, we edit our fstab file. Use whatever editor you have. gedit only exists on GNOME desktops, nano works everywhere.
sudo nano /etc/fstabAnd paste this line at the end of the file (all on one line):
//YourServer/Photos /media/share/Photos cifs vers=3.0,sec=ntlmssp,credentials=/etc/samba/credentials/nas,iocharset=utf8,uid=1000,gid=1000,file_mode=0664,dir_mode=0775,_netdev,nofail 0 0Code language: JSON / JSON with Comments (json)Adjust it to your own server and share name. We will create the credentials file in the next step.
Note that I changed a few things from the version that has been in this article for years. vers=2.0 still works for older NAS boxes, but 3.0 is the sane default now. And _netdev,nofail is the important addition: without it, a share that is unreachable at boot can hang your machine on a black screen. With it, the boot continues and the mount just fails quietly.
What each option does
vers=pins the SMB dialect. Valid values are 1.0, 2.0, 2.1, 3.0, 3.02, 3.1.1 anddefault.sec=picks the authentication method.ntlmsspis the kernel default since 3.8 and is what you want in most cases.credentials=points at the file holding your username, password and domain. Absolute path only.uid=andgid=decide which local user owns the mounted files. Without these, everything is owned by root.file_mode=anddir_mode=set the permission bits shown for files and directories._netdevtells systemd to wait for the network before mounting.nofailstops a failed mount from blocking your boot.iocharset=utf8handles umlauts and accents in file names correctly. Useful if you are German like me.
By default you will have uid=1000 and gid=1000. That’s your user and group ID, but to make sure those values match your system, check with:
id
If all is correct, save the fstab file and close it.
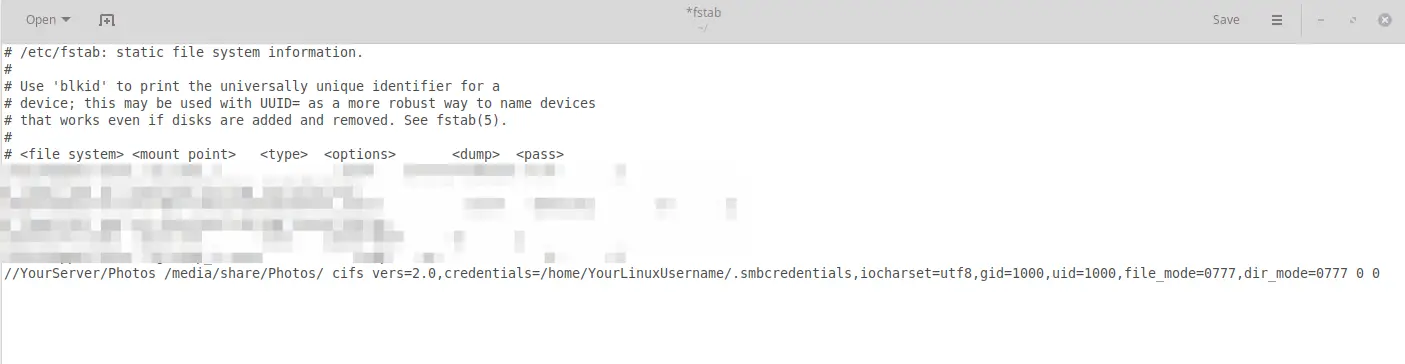
One more fstab gotcha: if your share name contains a space, escape it as \040. So //NAS/My Photos becomes //NAS/My\040Photos. An unescaped space silently breaks the whole line.
Step 4 – Creating the .smbcredentials file
We could enter our username and password directly into fstab, but that file is world-readable, so anyone on the machine could read your password. Instead we put them in a separate file that only root can read.
I now recommend /etc/samba/credentials/ over your home directory. If your home is encrypted, it is not decrypted yet when fstab mounts run at boot, so root cannot read the file and you get permission denied for a reason that has nothing to do with SMB.
sudo mkdir -p /etc/samba/credentials
sudo nano /etc/samba/credentials/nas
And here is the key point to fixing the mount CIFS permission denied error. Most guides simply state to enter username and password into this file, but you also have to enter your domain.
So paste this into the file:
username=yourusername
password=yourpassword
domain=yourdomain
Not in a domain? You still need the line. For a standalone Windows PC or a NAS with local accounts, use domain=WORKGROUP. For a Windows machine with a local account, the computer name also works.
Now lock the file down so only root can read it.
sudo chown root:root /etc/samba/credentials/nas
sudo chmod 600 /etc/samba/credentials/nas
Credentials file mistakes that cause permission denied
- Quotes around the password. Don’t.
password="hunter2"sends the quotes as part of the password. - Spaces around the equals sign.
username = stefanfails. Writeusername=stefan. - Trailing whitespace. A stray space at the end of the password line is invisible and breaks auth. Delete to end of line and retype.
- Windows line endings. If you edited the file on Windows, run
dos2unixon it. - A comma in your password when passing it inline with
-o. The comma ends the option. Use a credentials file instead. - A Microsoft account. Use the full email address as the username, not the display name.
Step 5 – Mounting the Share
Now that everything is in place, mount it:
sudo mount -aYour share should now be mounted at /media/share/Photos. Confirm it:
mount | grep cifs
df -h /media/share/Photos
Still getting mount CIFS permission denied? Keep reading. The rest of this article is the stuff that took me the longest to figure out.
Mount It Manually to See the Real Error
This is the step most people skip, and it is the one that saves the most time. mount -a hides detail. A manual mount with -v shows you what the client is actually trying.
sudo mount -t cifs //192.168.1.50/Photos /media/share/Photos -v \
  -o username=stefan,domain=WORKGROUP,vers=3.0,sec=ntlmssp,uid=1000,gid=1000Code language: JavaScript (javascript)
Leave the password out and it will prompt you. That rules out the credentials file as the problem in one shot.
Then read what the kernel logged:
sudo dmesg | grep -i cifs | tail -20You will usually see something like CIFS: VFS: cifs_mount failed w/return code = -13 along with a line naming the actual failure. That line is worth more than an hour of guessing.
It is also worth checking whether the server even offers the share you think it does:
smbclient -L //192.168.1.50 -U stefanCode language: JavaScript (javascript)If smbclient lists the shares but mount refuses, the problem is your mount options. If smbclient also fails, the problem is credentials or the server config.
Still Getting Mount CIFS Permission Denied? Work Through These
SMB version mismatch (vers=)
Since kernel 4.13.5, the CIFS client negotiates the highest SMB2 or newer dialect that both sides support. SMB1 is no longer requested by default. That is good for security and bad for anyone with a NAS from 2014.
Work down the list until one sticks:
vers=3.1.1   # Windows 10/11, Server 2016+, modern NAS
vers=3.0     # Windows 8/Server 2012, most NAS boxes
vers=2.1     # Windows 7 / Server 2008 R2
vers=2.0     # older Synology and QNAP firmware
vers=1.0     # last resort, ancient devices and printersCode language: PHP (php)
A version mismatch often shows up as mount error(112): Host is down rather than error 13, which sends people chasing network problems that do not exist. If you see 112 and the server pings fine, it is vers=.
If you truly need vers=1.0, know that most distros still support it on the client but many servers no longer offer it. Samba 4.11 and later default server min protocol and client min protocol to SMB2_02, so SMB1 is off unless someone turned it back on. On the Samba server side that means adding this to /etc/samba/smb.conf:
[global]
server min protocol = NT1
ntlm auth = yesCode language: PHP (php)
Do that only if you have no other option. SMB1 is unauthenticated at the protocol level and is how WannaCry spread. Upgrading the NAS firmware is the better answer.
Security mode mismatch (sec=)
The kernel default has been sec=ntlmssp since version 3.8. Before that it was sec=ntlm. Some servers, especially older Samba installs and NAS firmware, want something else.
| Value | Use it when |
|---|---|
ntlmssp | Default. Try this first for Windows and modern Samba. |
ntlmsspi | Same, with packet signing forced on. |
ntlmv2 | Older Samba servers that reject NTLMSSP. |
ntlmv2i | Same, with signing. |
krb5 | Active Directory with Kerberos. Needs a valid ticket from kinit. |
none | Guest or anonymous access. Often blocked, see below. |
Skip sec=ntlm and sec=lanman. They are ancient, weak, and current servers refuse them anyway.
Guest access is blocked on modern Windows
This one bites a lot of people. Since Windows 10 version 1709, Windows disables insecure guest authentication by default. So a share you set up as “Everyone, no password” simply refuses your sec=none or guest mount with error 13, and nothing on the Windows side tells you why.
The right fix is to create a real user account on the Windows machine and mount with those credentials. Turning guest fallback back on means your traffic is unsigned and unauthenticated on your LAN, so I would not do it on anything you care about.
The share mounts but you cannot write to it
Different problem, same frustration. The mount succeeded, so authentication is fine. What you are hitting is ownership.
When the server does not send Unix ownership information, uid and gid default to 0, which is root. Your normal user then cannot write. Set them explicitly:
uid=1000,gid=1000,file_mode=0664,dir_mode=0775If the server does send ownership and you want to override it anyway, add forceuid and forcegid. That tells the client to ignore what the server says and use your values.
There is also noperm, which turns off client-side permission checks entirely. It works, and it is a blunt instrument. Any user on your machine can then reach those files, so keep it for a single-user laptop and nowhere else.
One more thing to rule out: the share might be read-only on the server. Check the export settings before blaming Linux.
The kernel module is not loaded
Rare, but it happens on minimal installs and custom kernels.
lsmod | grep cifs
sudo modprobe cifs
If modprobe says the module does not exist, your kernel was built without CIFS support. On Debian and Ubuntu that usually means you are missing linux-modules-extra-$(uname -r).
SELinux
On Fedora, RHEL, Rocky and Alma, SELinux almost never blocks the mount itself. What it blocks is a service reading files on the mounted share. So if you mount fine from a shell but Apache, a container or a VM gets permission denied, this is your section.
First confirm SELinux is actually the culprit:
getenforce
sudo ausearch -m avc -ts recent
If you see AVC denials mentioning cifs, flip the matching boolean:
getsebool -a | grep -E 'cifs|samba'

sudo setsebool -P httpd_use_cifs on        # web server reading the share
sudo setsebool -P virt_use_samba on        # VMs reading the share
sudo setsebool -P use_samba_home_dirs on   # home directories on a remote shareCode language: PHP (php)
You can also label the whole mount at mount time with the context= option, which is handy when no boolean fits:
-o context=system_u:object_r:httpd_sys_content_t:s0Testing with sudo setenforce 0 is fine to narrow things down. Turning it off permanently is not a fix, it is giving up. Set it back with sudo setenforce 1 when you are done.
AppArmor, containers and snaps
On Ubuntu and Debian, AppArmor ships no profile for mount.cifs, so it is rarely your problem. Check anyway:
sudo aa-status
sudo dmesg | grep -i apparmor
What does bite people on Ubuntu is confinement in other forms:
- Snap apps are confined to your home directory by default. A snap-installed VS Code or media player cannot see a mount under
/mediaor/mnt. Install the deb version, or mount inside your home directory instead. - Docker and LXC containers cannot mount CIFS without
CAP_SYS_ADMIN. The cleaner answer is to mount on the host and bind-mount the directory into the container. - Flatpak apps need the filesystem permission granted, either with Flatseal or
flatpak override.
Firewall and port 445
If the server is not reachable on port 445, you get error 115 or a long hang rather than error 13. Test it directly:
nc -zv 192.168.1.50 445Code language: CSS (css)No nc on the box? timeout 3 bash -c '</dev/tcp/192.168.1.50/445' && echo open does the same job. If the port is closed, look at the Windows Firewall on the server or the NAS firewall settings. My Linux networking basics guide walks through the tools for this if you want the longer version.
Mounting inside WSL2
WSL2 ships a kernel with CIFS support, so mount -t cifs works. The catch is networking. WSL2 sits behind a NAT by default, so a share on your LAN may not resolve by hostname even though it works fine from Windows.
Use the IP address rather than the hostname, and if you need proper LAN visibility, switch to mirrored networking mode. I covered that setup in my WSL2 network settings and configuration guide.
Also worth knowing: if the share is already mapped in Windows, you can reach it through /mnt/ with drvfs instead and skip CIFS entirely.
fstab or Manual Mount? Use Both
They are not competing options, they are two stages of the same job.
| Manual mount | fstab | |
|---|---|---|
| Best for | Testing and debugging | Permanent mounts |
| Error output | Printed right at you | Buried in the journal |
| Survives reboot | No | Yes |
| Risk | None | Can hang boot without nofail |
Get it working manually first. Only then put it in fstab. Then test the fstab line without rebooting:
sudo umount /media/share/Photos
sudo systemctl daemon-reload
sudo mount -a
The daemon-reload matters. systemd generates mount units from fstab, and it will keep using the old version until you tell it to re-read the file.
If you would rather not mount at boot at all, use an automount. The share then mounts the first time something touches the directory and unmounts again when idle:
//YourServer/Photos /media/share/Photos cifs credentials=/etc/samba/credentials/nas,vers=3.0,uid=1000,gid=1000,_netdev,noauto,x-systemd.automount,x-systemd.idle-timeout=60 0 0Code language: JSON / JSON with Comments (json)This is my default on laptops. No boot delay when I am away from the network, and the share is just there when I am home.
Turn On CIFS Debug Logging
If you are down here, nothing obvious worked. Time to make the kernel talk.
echo 7 | sudo tee /proc/fs/cifs/cifsFYI
sudo mount -a
sudo dmesg | tail -60
echo 0 | sudo tee /proc/fs/cifs/cifsFYICode language: PHP (php)
Note the tee. Writing sudo echo 7 > /proc/... fails because the redirect happens as your user, not as root. Classic trap.
The value is a bit mask: 1 adds informational messages, 2 logs non-zero SMB return codes, 4 logs requests taking longer than a second. 7 turns on all three.
You can also inspect active sessions and mounted shares:
cat /proc/fs/cifs/DebugDataTurn the logging back off when you are done. At level 7 it fills your log fast.
FAQ
What does mount error(13): Permission denied actually mean?
The SMB server rejected your credentials. It is not a Linux file permission issue. In practice it means a missing domain=, a wrong username or password, a security mode the server will not accept, or an unreadable credentials file.
Why do I get “Host is down” when the server is clearly up?
That is mount error(112) and it is nearly always an SMB dialect mismatch, not a network problem. Add vers=3.0 and work down to vers=1.0 until one connects.
Do I still need vers=1.0 in 2026?
Only for hardware old enough to vote. Since kernel 4.13.5 the client negotiates SMB2 or newer automatically, and Samba has defaulted to SMB2_02 as its minimum since 4.11. If a device only speaks SMB1, treat that as a reason to replace or update the device rather than a setting to keep.
Where should the .smbcredentials file live?
/etc/samba/credentials/, owned by root with mode 600. Home directories work for manual mounts but break at boot if your home is encrypted. Whatever you choose, fstab needs the full absolute path. A tilde does not expand there.
The share mounts but everything is owned by root. How do I fix that?
Add uid=1000,gid=1000,file_mode=0664,dir_mode=0775 to your options. Run id to confirm your actual numbers. If the server sends its own ownership data and you want to override it, add forceuid,forcegid as well.
Is CIFS the same thing as SMB?
Not quite. CIFS is the old name for SMB1. The Linux kernel module is still called cifs and you still mount with -t cifs, but it speaks SMB2 and SMB3 fine. The name stuck around, the protocol moved on.
Wrapping up
It took me a while to figure out this error the first time. I use a Synology NAS and the missing domain= line was what fixed it, with vers=2.0 pinned in fstab. These days I run vers=3.0 with an automount and it has not given me trouble since.
If you take one habit from this article, make it this one: mount manually with -v before you touch fstab, and read dmesg. The kernel usually tells you exactly what is wrong. We just do not ask it often enough.
Let me know in the comments which one it was for you. I keep updating this post based on what people report.
Lets face it doing some simple things on a Linux box is a total pain.
Its way past time to fix all this bull*h1t
J
mount.cifs: permission denied: no match for /home/pi/video found in /etc/fstab
//192.168.50.150/Downloads /home/pi/video/ cifs vers=2.0,credentials=/home/pi/.smbcredentials,iocharset=utf8,gid=1000,uid=1000,file_mode=0777,dir_mode=0777 0 0
why does this not work?
Thanks so much for this Stefan, it was the clearest article I could find!
Unfortunately I cannot get it to work on boot – strangely it mounts absolutely fine using
sudo mount -a otherwise I get a mount.cifs permission denied error. Have you ever seen this?
Thanks Luca for your great work, your guide is the best ever and it works on my Debian Bookworm+KDE connected to the directory hosted on our Windows 2019 server with AD DC!
I have just one issue, I have a share on the Windows server with a space something like IT Office, I’m in the IT crew so I could solve it to rename it without space (LOL!) but I remember in Windows years and years ago with W95 I used the “%” to manage space in MS environment but I don’t remember how could I solve from linux side!
Gabriele
Hello.
Thanks for this tuto !
I try to mount an old rnd2000 V1 on my raspberry.
I get mount error(13): Permission denied when I use sbmcredetials:
mount.cifs kernel mount options: ip=192.168.0.10,unc=\\192.168.0.10\Photos,iocharset=utf8,vers=1.0,sec=ntlmv2,uid=1000,gid=100,user=root,domain=WORKGROUP,pass=********
mount error(13): Permission denied
I’m not sure for the domain name…
But when I use -o user=yann, and enter my password at the prompt it works fine.
(Connecting the NAS with ssh as root is ok).
Has any body got an idea?
Finely smbcredentials works with admin user.
So it’s OK now.
Worked great, thanks for figuring this out, it was the domain name that I was missing too.
Great tutorial. I am new to Linux and while this works great when running the “sudo mount -a” command. Every time I reboot Ubuntu, it loses the mount and does not automatically mount. Any suggestions?
Stefan, great tutorial. I followed it closely as prescribed… and then modified fstab as follows to have “receiving” folders under user “Pi”. Either way, still get “mount.cifs permission denied”! Is access denial my Buffalo 4TB NAS (with SMB turned ON) or the Pi 3 on LAN?
My fstab: //192.168.0.100/LS210xxnn/pub_music /home/pi/myNAS/pub_music cifs vers=2.0,credentials=/home/pi/.smbcredentials,iocharset=utf8,gid=1000,uid=1000,file_mode=0777,dir_mode=0777 0 0
Plan to add to fstab for pub_photos, pub_video, once “pub_music” working!
Should fstab have Buffalo’s LS210xxnn name as well as its domain and the desired share?
Thanks for help!
P.S. For the NAS, using logonid=guest; password= (written this way representing “blank”; in Lenix should password=” ” instead?
Thank you Sir you are an absolute HERO!
Aww thanks!
thank you for your help. I got my share drive mounted. now, what if I have more than one share drive on the same domain?
When I try to mount with sudo mount I get the error:
mount error(13): Permission denied
It is evident that you lie!!!
According to the other comments, it would almost appear you do something wrong. But since it is almost evident that I lie, I am not going to help you :p
Great article, I’m able to successfully create the mount and see files in the share, however; I am unable to create or write to the directory. Is there something else not included in the article which I need to configure?
Thank you very much. this was solved my issue “mount error(13): permission denied” while running mount.cifs.
Good start/thinking about writing this. However 2 things: 1. when editing .smbcredidentials you should specify that it’s under ~ and 2. when mounting it asks for a root password. So even though your tutorial is nice it doesn’t work.
Hi I am new to Ubuntu how do I find what mydomain is? Thanks
try domain=WORKGROUP
Deve entrar no /etc/samba/smb.conf e verificar ou adicionar domain=WORKGROUP, pois é o padrão do windows.