Alright, since we now know how to Install WSL2 on Windows and How to Customize Windows Terminal for WSL2, it’s time to take a deep dive into Terminal Customization for WSL2.
Initially, I wanted to go with showing you how to install ZSH, Oh My ZSH, and an Oh My ZSH Theme called PowerLevel10k.
But last minute, I changed my mind. A reader, Nir Adler, has pointed me to Oh My Posh in the comment section of the WSL 2 customization article. I just had a look at it and tried it out and I’m hooked. I decided to write this article for Oh My Posh instead of Oh My ZSH, but you’ll see why in just a second.
Let’s dive right into it: Terminal Customization for WSL2!
Side-note: I am doing this tutorial on Windows 11, it will work on Windows 10 just the same.
⚠️This is a Tutorial Series⚠️
Part 1 – How to install WSL 2 with Windows Terminal – Complete Guide
Part 2 – Windows Terminal Customization for WSL 2
Part 3 – In-Depth Windows Terminal Customization for WSL2
Table of Contents
- Requirements
- Part 1 – Install ZSH on WSL2
- Part 2 – Installing Oh My Posh
- Part 3 – Installing Nerd Fonts
- Part 4 – Activating Oh My Posh
- Part 5 – Changing the Theme
- Part 6 – Installing more Themes for Oh My Posh
- Part 7 – Install ZSH Autosuggestions on WSL2
- Conclusion
Requirements
I assume that you have followed Part 1 and Part 2 of the tutorial series, this is where we will pick up. However, if you haven’t followed that, it does not really matter, this tutorial will work for you regardless, your terminal will just look a bit different than mine at the end!
Part 1 – Install ZSH on WSL2
First things first – installing ZSH on WSL2 and making ZSH the default shell.
sudo apt update
sudo apt install zsh -y
And make ZSH the default shell.
chsh -s $(which zsh)Code language: JavaScript (javascript)Now restart Windows Terminal, you’ll be greeted by ugly ZSH config text.
In here, select option 2 (press 2 on your keyboard) for the default settings.
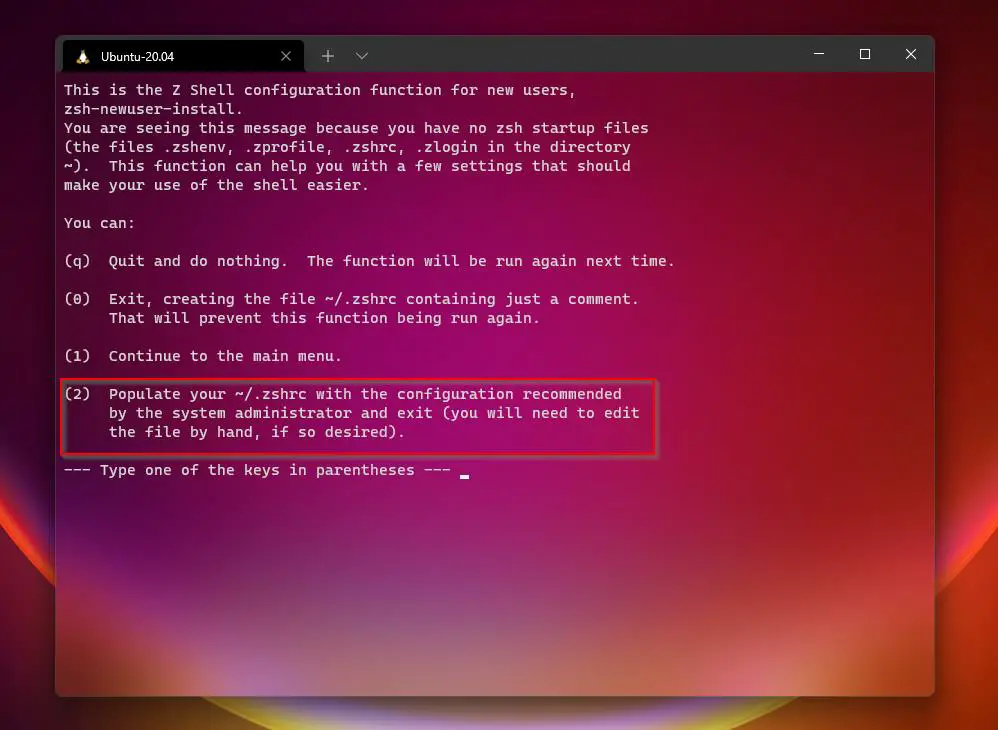
Congratulations! You now have set ZSH as your (still very ugly) default shell! Let’s move on.
Part 2 – Installing Oh My Posh
Now we can go ahead with our terminal customization and install Oh My Posh.
First, we need to install Oh My Posh and “unzip” so we are able to unzip the files in a second.
sudo wget https://github.com/JanDeDobbeleer/oh-my-posh/releases/latest/download/posh-linux-amd64 -O /usr/local/bin/oh-my-posh
sudo chmod +x /usr/local/bin/oh-my-posh
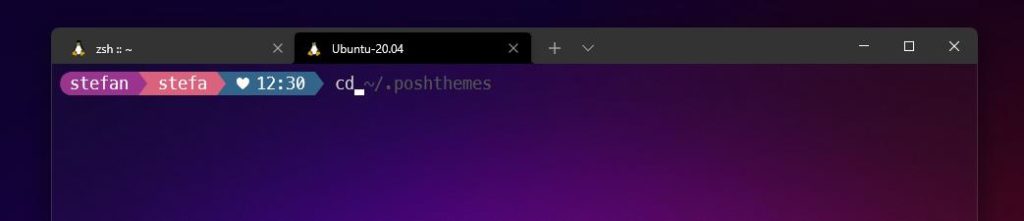
sudo apt install unzipCode language: plaintext (plaintext)Next up, we download the themes.
mkdir ~/.poshthemes
wget https://github.com/JanDeDobbeleer/oh-my-posh/releases/latest/download/themes.zip -O ~/.poshthemes/themes.zip
unzip ~/.poshthemes/themes.zip -d ~/.poshthemes
chmod u+rw ~/.poshthemes/*.json
rm ~/.poshthemes/themes.zipCode language: plaintext (plaintext)
Part 3 – Installing Nerd Fonts
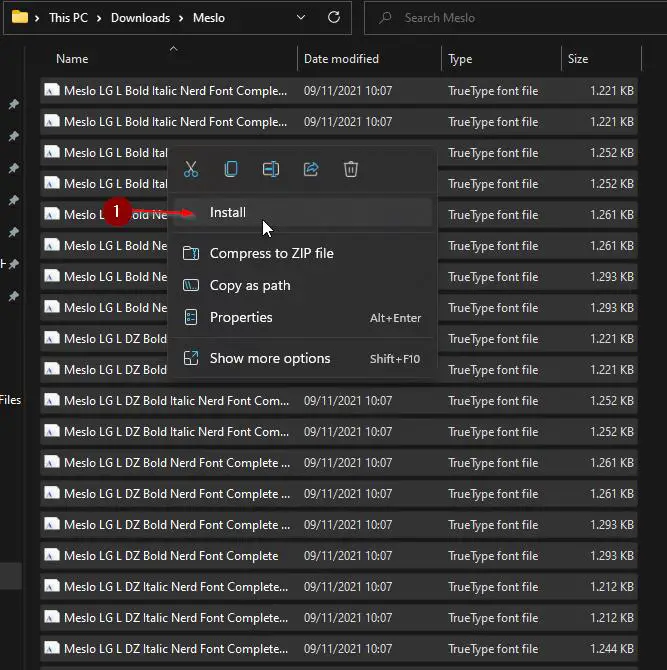
To be able to display all those nice custom icons, we are going to use Nerd Fonts. Or more specifically, the MESLO LGM Nerd Fonts, which are recommended by Oh My Posh.
You can download them directly here. Just save them on your computer, unzip them and install all of them at once by selecting all of them and right-clicking them, selecting Install.
Good, now we are almost finished!
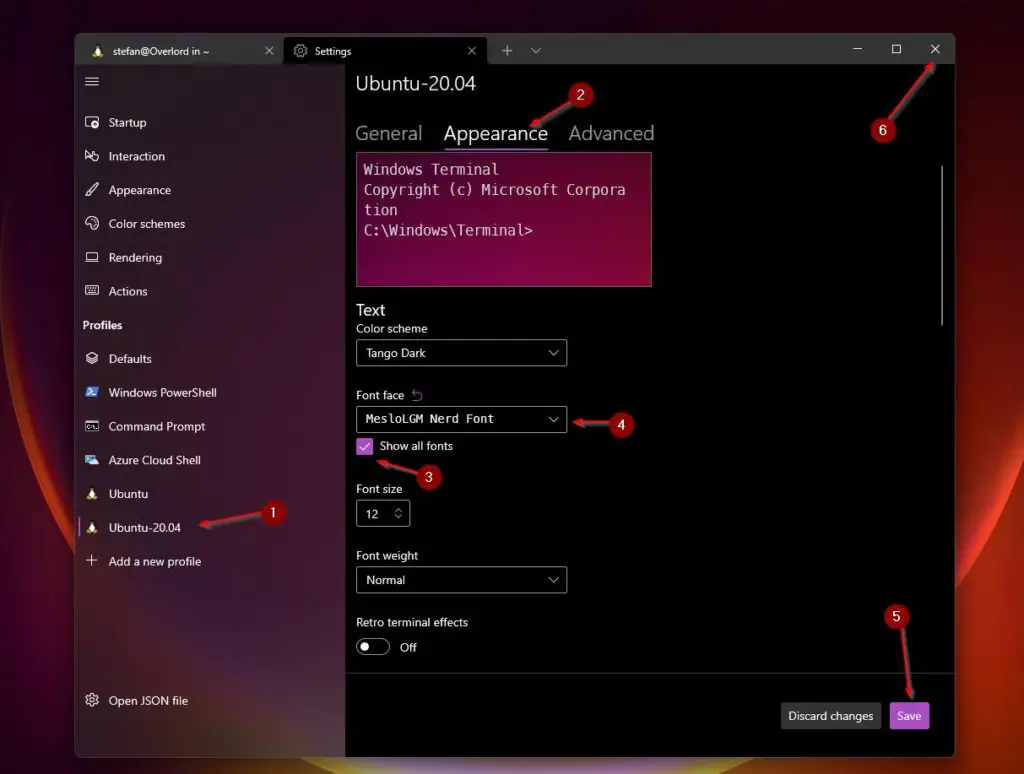
Open up the settings of Windows Terminal, navigate to your instance, click on Appearance, select Show all fonts and then choose MesloLGM Nerd Font. Click on Save and restart your Windows Terminal for good measure.
Part 4 – Activating Oh My Posh
Alright, now we need to add some code to our zshrc file, specifically which theme Oh My Posh should use. That’s a necessary step for terminal customization.
Open your .zshrc file and add the following two lines at the bottom of it.
Opening the file
nano ~/.zshrcCode language: plaintext (plaintext)Adding the code at the bottom
# Oh My Posh Theme Config
eval "$(oh-my-posh --init --shell zsh --config ~/.poshthemes/jandedobbeleer.omp.json)"Code language: plaintext (plaintext)Tip: Should you follow this tutorial on macOS, the path to the themes folder is a bit different since we need to use homebrew to install stuff on Mac. So if you are on mac use the code below.
# Oh My Posh Theme Config on macOS
eval "$(oh-my-posh --init --shell zsh --config $(brew --prefix oh-my-posh)/themes/bubblesline.omp.json)"Code language: plaintext (plaintext)
Press CTRL + O and then Enter to save your file and CTRL + X to close the file.
Finally, activate the new theme.
source ~/.zshrcCode language: plaintext (plaintext)And you should be looking at something like this.
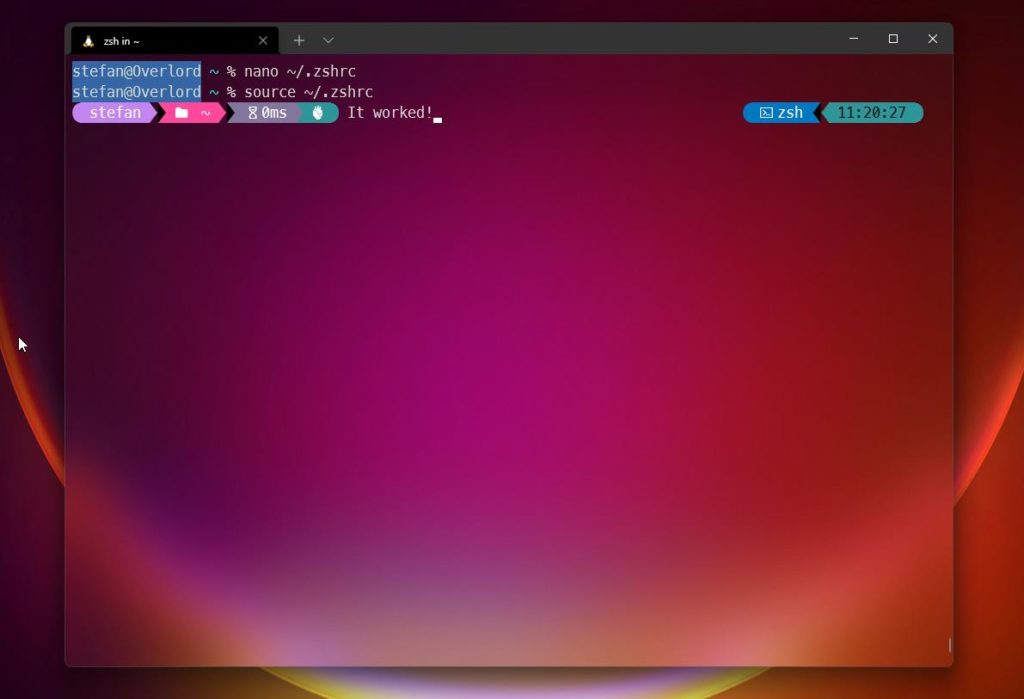
Woohooo! You made it.
Part 5 – Changing the Theme
This is probably what interests you most since you want to check out all the shiny themes!
Gladly, it’s very easy to change the theme. For a list of themes, check here or run the command below.
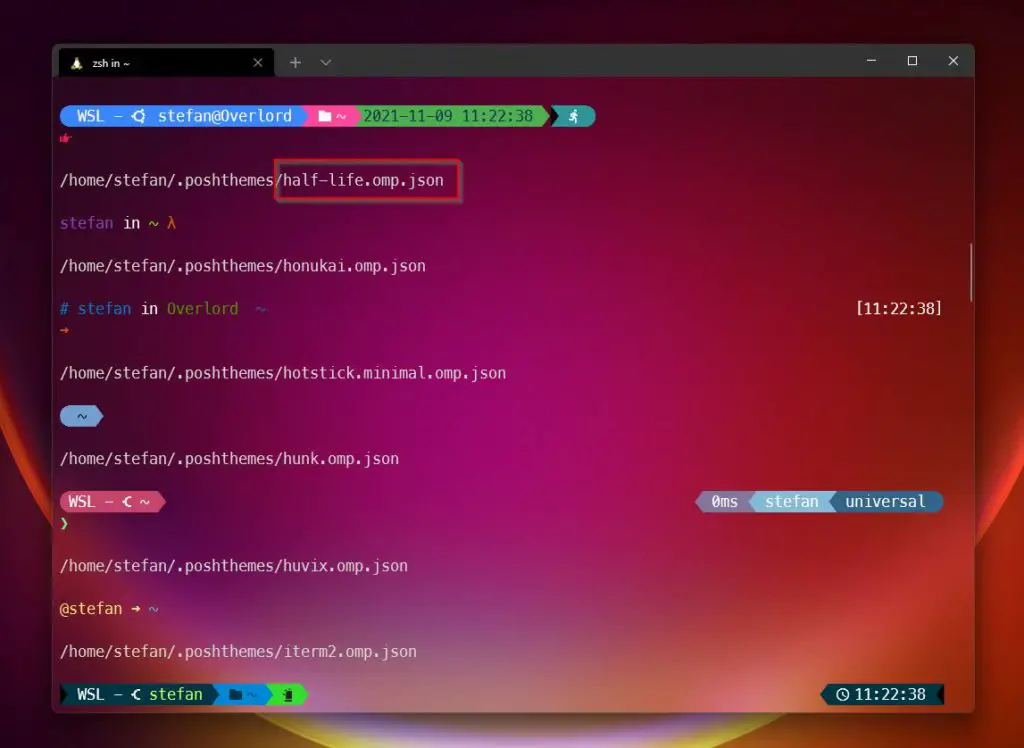
for file in ~/.poshthemes/*.omp.json; do echo "$file\n"; oh-my-posh --config $file --shell universal; echo "\n"; done;Code language: plaintext (plaintext)When you have found a theme that you like, you find its name right above it. Let’s say we want to use the half-life theme. That means we need to copy the half-life.omp.json name and replace it inside of our .zshrc file.
nano ~/.zshrcCode language: plaintext (plaintext)Simply scroll down where you added your # Oh My Posh Theme Config and replace the old jandedobbeleer.omp.json with the new half-life.omp.json name.

CTRL + O and Enter and CTRL + X your way out of nano and restart your Windows Terminal (source ~/.zshrc doesn’t work for me on Windows 11).
Voila! You made it.
Part 6 – Installing more Themes for Oh My Posh
Let’s say you find a theme somewhere else that isn’t included with Oh My Posh. It’s very easy to install it, granted the file is coming in the .omp.json format.
All we have to do is clone the file into our themes folder. Let’s assume the M365 Princess Theme was not included. To download it we would simply need to clone it into our themes folder.
cd ~/.postthemes
git clone https://github.com/JanDeDobbeleer/oh-my-posh/blob/main/themes/M365Princess.omp.jsonCode language: plaintext (plaintext)
And then repeat Part 5 to set the theme. That’s it.
Part 7 – Install ZSH Autosuggestions on WSL2
One elemental tool in my repertoire is ZSH-Autosuggestions. This tool basically learns from you while you are working and automatically suggests things to you.
For instance, if you regularly navigate to your projects folder with cd projects, zsh-autosuggestions will automatically suggest you the command when you start typing cd. If you then simply hit the right-arrow key, the command will be written.
I love this and it is an essential tool for me.
First, we clone zsh-autosuggestions.
git clone https://github.com/zsh-users/zsh-autosuggestions ~/.zsh/zsh-autosuggestionsCode language: plaintext (plaintext)And then we add the following line, once again, to our .zshrc file.
nano ~/.zshrcCode language: plaintext (plaintext)And add the following code at the bottom like before with Oh My Posh.
# ZSH Autosuggestions
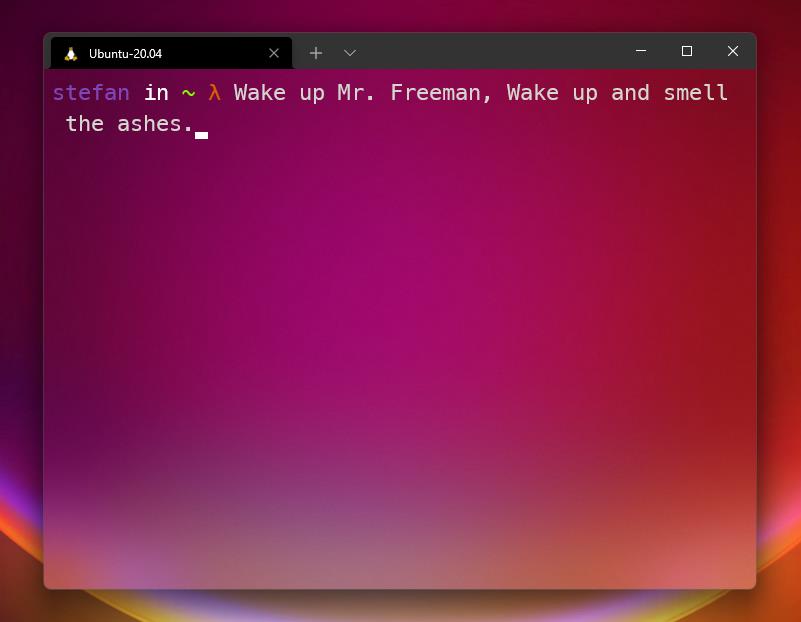
source ~/.zsh/zsh-autosuggestions/zsh-autosuggestions.zshCode language: plaintext (plaintext)CTRL + O and Enter and CTRL + X your way out of there like the Nano champ you already are and finally restart Windows Terminal once again.
And as promised, it works!
Conclusion
Oof, that was a trip! After following this terminal customization series, you should now be able to understand how to produce a beautiful terminal!
There are a myriad ways how to tweak and customize things even further, which of some I will keep adding to this article (so make sure to bookmark it!).
As for now, make sure to also check out Oh My ZSH and then simply pick your poison. It’s all up to personal preference. I will also add an Oh My ZSH section with PowerLevel10k to this guide, later on, so you can compare on the fly!
I would be happy to see how you end up customizing your own terminal, so either tag me on Twitter with @ceos3c or post a screenshot of your terminal in the comment section below!
Happy customizing!
Great tutorial – but I ran into a problem:
I put the following line into my .zshrc (line 40):
eval “$(oh-my-posh –init –shell zsh –config ~/.poshthemes/jandedobbeleer.omp.json)”
Trying to “source .zshrc” I get an error (with long errormessage):
.zshrc:40: command too long: evalexport POSH_THEME=/home ……..
After this error still only default prompt is shown.
No matter which Posh-theme I try, I always get the same error executing “source .zshrc”
Running the eval-command above directly within zsh, everything works fine: the prompt is changed to the selected poshtheme. (as stated before: exactly the same eval-command within my .zshrc-file causes an error “command too long)
Any idea?
Cheers Melmo
Nevermind – found the error. I missed a space ….
I Used:
eval“$(oh-my-posh –init –shell zsh –config ~/.poshthemes/jandedobbeleer.omp.json)”
Instead of:
eval “$(oh-my-posh –init –shell zsh –config ~/.poshthemes/jandedobbeleer.omp.json)”
(space between ‘eval’ and ‘”$( …)’
Mine didn’t work, I have tried twice only the auto-suggesting work
i was wrong, i don’t install the oh-my-posh, now it work
I just finished watching your video. And I saw it here. Thank you very much!
Oh! That’s so cool! Which video did you watch?
These WSL tutorials are phenomenal! Thank you for the hard work. I Installed it in my laptop a few days ago following your lead and had to change a few things for the themes customizing code on “~/.zshrc” file. However, today when installing on a desktop I found that the THEMES portion has been updated and, that particular part in your tutorial is outdated. Specifically the “Part 5”, whoever has trouble should look into the official tutorial on “https://ohmyposh.dev/docs/installation/customize”.
Cheers!
Hello JC,
thank you very much for pointing this out! I will have a look at it as soon as I can and update the tutorial accordingly.
I am happy that you liked the tutorial!
Thanks again
Stefan
Wow, works flawlessly. Thanks!
Thanks!
all work with but somehow, neofetch doesn’t show up automatically now
Hi Mr. Ceos3c
I follow the guide but I am doing something wrong, I got the error (eval):1: parse error near `}’
Also when I follow the guide using Powershell command did not work, I did the manual one.
Just change it to:
eval “$(oh-my-posh –init –shell zsh –config ~/.poshthemes/jandedobbeleer.omp.json)”
Funny enough here in the comments the — works.
I intended to mean two dashes before “init”, “shell zsh”,and “config”. I typed it that way in my first reply, but this site changes it to a single dash. Maybe that is the whole problem.
I received the same error: (eval):1: parse error near `}’.
I solved it by putting two dashes before the words “init”, “shell zsh”, and “config” in the # Oh My Posh Theme Config. I typed this out in an earlier reply and the site
changed my reply to a single dash as is found in the otherwise excellent tutorial. I am therefore awkwardly
wordy here to point this out. sudo pacman -Rns weird glitches…
Thank you for pointing that out in detail John. I have been working on this issue for the past hour, and even by deactivating wptexturize it didn’t solve the issue. I put a note at Part 4 tho for now.
Keep working on it and will try to solve it.
getting
(eval):1: parse error near `}’
in part 4 activating oh-my-posh 🥲
I ran into this issue as well, the problem is the code for the Oh My Posh Theme Config is no longer up to date. . I got the working code directly from the website
Try:
eval “$(oh-my-posh –init –shell zsh –config https://raw.githubusercontent.com/JanDeDobbeleer/oh-my-posh/v$(oh-my-posh –version)/themes/jandedobbeleer.omp.json)”
hope this helps!
See John’s comment above!