Drive Mapping with GPO basically replaced the good old Login-Script on Windows Servers. Drive Mapping with GPO allows you to automatically map Network Drives via Group Policy. This saves you a ton of work in the long run and is the Best Practice on how to Map Network Drives on a Windows Server nowadays.
There is a bit of confusion about what all the Actions you can set for a Drive Map are doing, so I want to shed a little bit of light on that.
Table of Contents
- What You Will Learn Here
- Step 1 – Create a Drive Mapping with GPO
- Step 2 – Edit the GPO
- Step 3 – Linking the GPO
- Actions
- Wrapping Up
What You Will Learn Here
- How to Create a Drive Map on Windows Server 2016 or higher
- How to Update an existing Drive Map on Windows Server 2016 or higher
- What the different Drive Map Actions do
Step 1 – Create a Drive Mapping with GPO
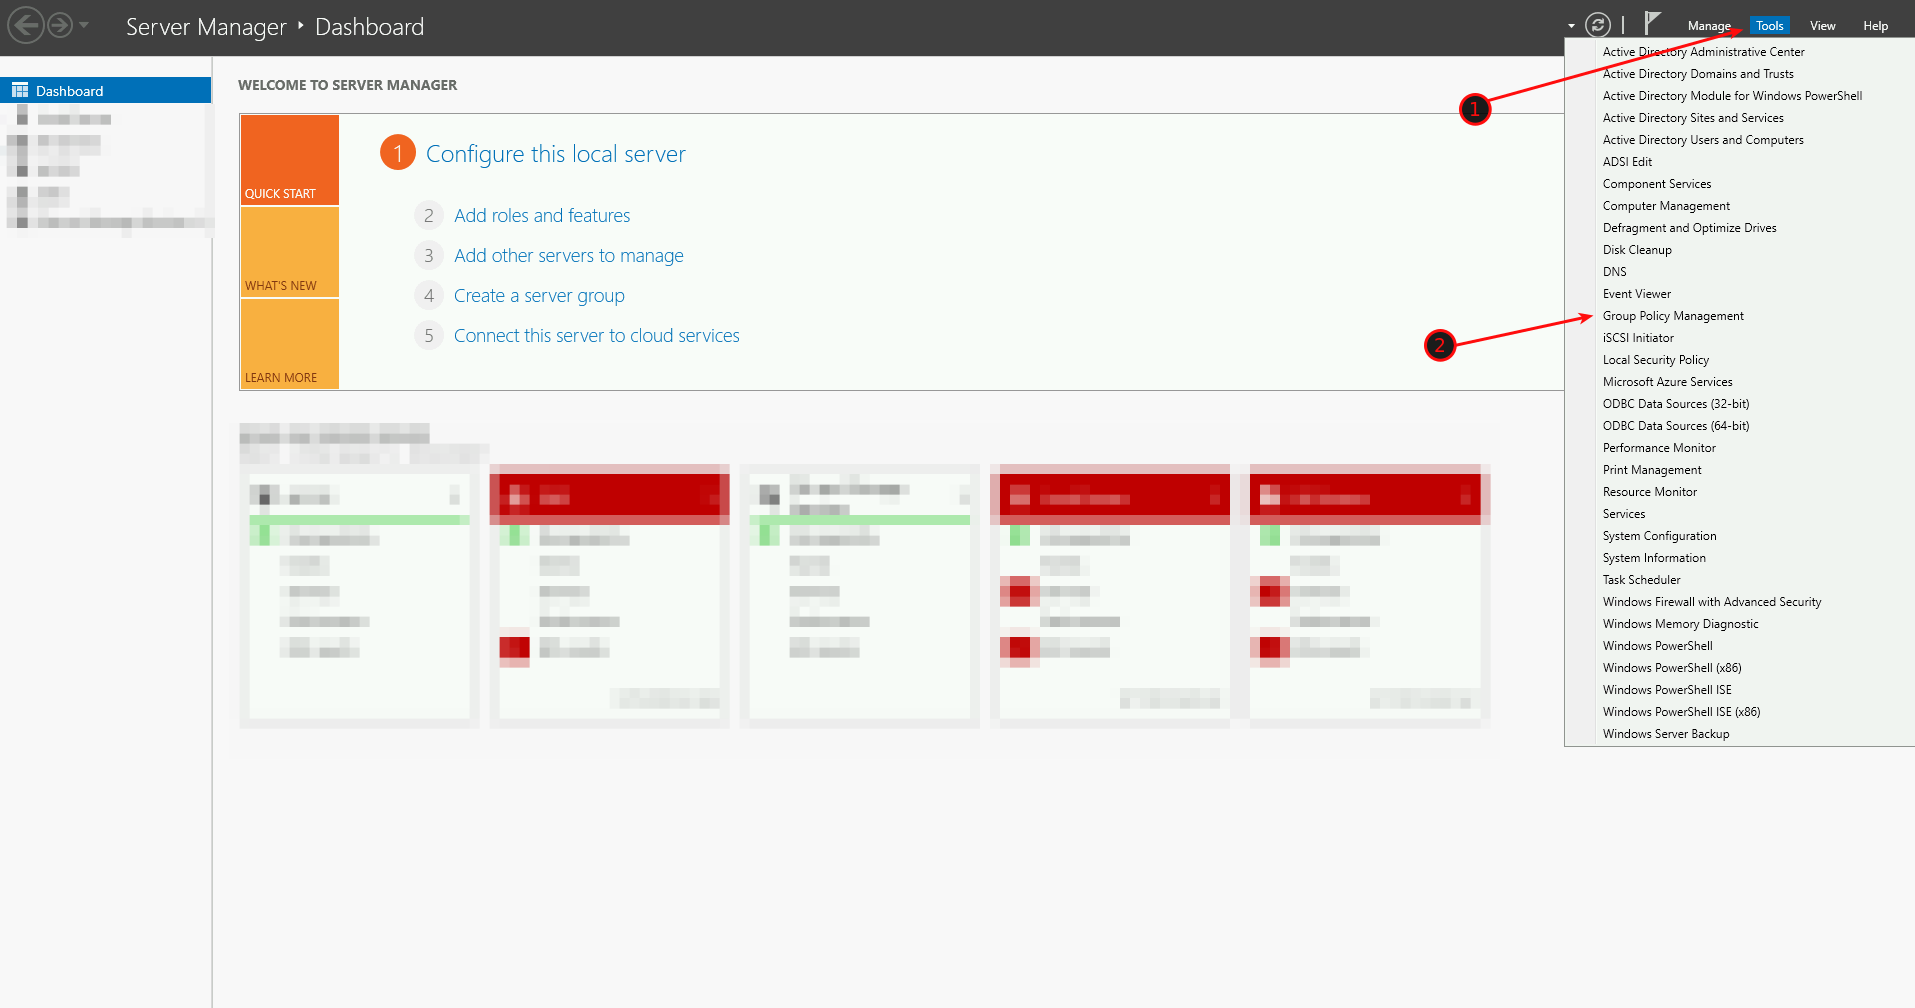
First things first – How to Create a Drive Map with Windows Server 2016. I just assume that you know what a GPO is and how to create one. From your Server Dashboard open the Group Policy Management Application by clicking on Tools -> Group Policy Management.
After that open your Domain Root and select Group Policy Objects. Right-click on an empty space in the right side and select New. Give your GPO a descriptive name. I name it Media Share for that purpose. Right-click the GPO that you have just created and select Edit.

Step 2 – Edit the GPO
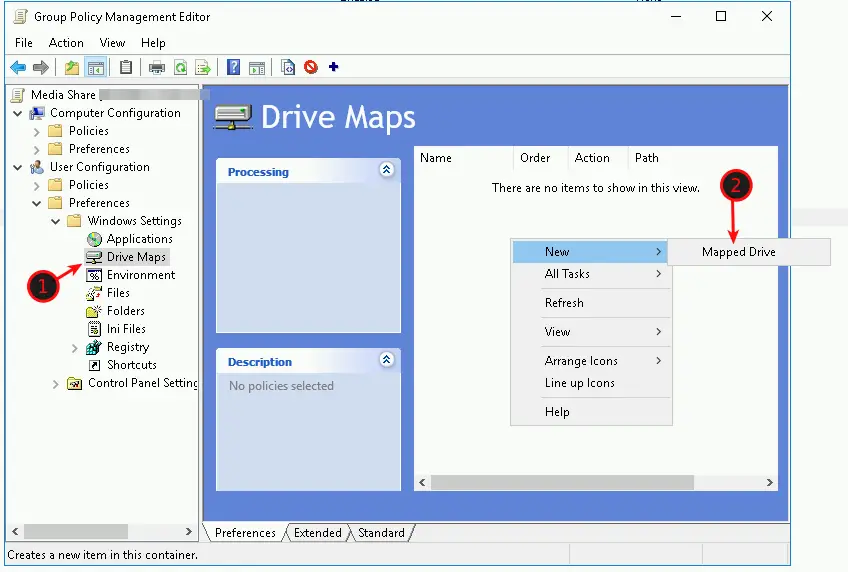
Navigate to User Configuration -> Preferences -> Windows Settings -> Drive Maps. Right-click in the right empty space and select New -> Mapped Drive.
To create a simple share all you have to do is enter everything as in the screenshot below. I will explain to you what everything does.
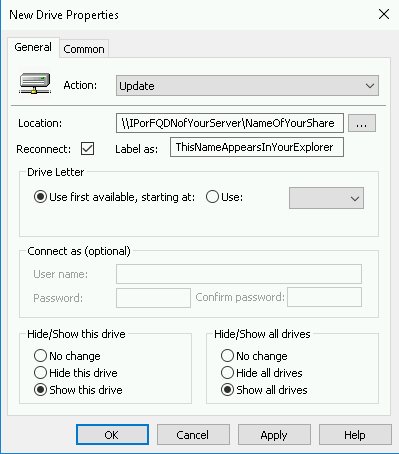
- Action: Actions will be explained separately below
- Location: Your Share location. It can either be connected via IP or the FQDN of your NAS / Server
- Reconnect: You want the drive to be reconnected after each reboot
- Label As: You can choose which name the Drive should be shown in your Explorer
- Drive Letter: You can either leave it on Choose first available or select one by yourself
- Show / Hide Drive: If you want to show this Drive in your Explorer, you have to set this to Show this Drive
Step 3 – Linking the GPO
Now you need to link the GPO to be active. For this, you need to drag it to the appropriate container where your users and computers reside. It is important that the Drive Map is linked to a container where BOTH the user and the computer are included.
After this either restart your computer on which you want the drive connected or open a cmd shell and type:
gpupdate /forceActions
So actions are where you need to pay the most attention. For just creating a new share, it’s perfectly fine to leave it as “Update”. Everything else is explained below and here.
Create
Create a new mapped drive for the users.
Delete
Delete / Remove a mapped drive for the users.
Replace
Delete and recreate a mapped drive for the users. The replace action overwrites all existing settings that are associated with the mapped drive. In case the mapped drive does not exist, the Replace action will create the drive.
Update
This Action modifies the settings of an existing mapped drive. It differs from the Replace action in that it only updates the settings defined within the preference item. All the other settings remain as they are. If a drive mapping does not exist, the Update Action will create the drive.
So you might wonder, why did we choose Update and not Create? Because every change you make to the path or drive letter or any other option will not be updated. You would need to delete the drive and re-map it again. With the Update Action that happens automatically.
What the Update Action doesn’t do is, for example, if you change the location of the share or its name. Therefore you would need to use either the Remove Action to remove the old share and create a completely new share, or, you could use the Replace Action until all the Computers are updated. I recommend the latter.
Wrapping Up
This should give you a good idea of how Drive Mapping with GPO works. It is a fairly easy process that can save you a ton of work in the long run. Those of you out there who still run Login-Scripts to connect network shares are highly encouraged to switch over to this method.
Sure, you can use %username% or other system variable. In the path or in the name of the folder
The references to creating a share “To create a simple share all you have to do is to enter everything as in the screenshot below” are misleading as the GPO Map drives process won’t create a share, only map a drive to an existing share.
yes, you can see a list of VARIABLES if you press F3 in the value area.
Can we use variables like %username% for every user. Since my logon script does map the folder names as user name under a file share (e.g. “\\SomeFileServer\Personal\someUsername”). Is it possible to do it with GPO?
I haven’t tested this, but I saw a site reference using %username%$
Do you know you can do this in AD without using GPO or scripts? If you set up a home folder on the profile tab of the user, you can connect to a share using %username% (and probably other variables) and assign a letter and it will automap it. You should also be able to script the change or bulk update it since you are using variables.