
Time to prioritize our VOIP Traffic on pfSense! Follow this very short step-by-step tutorial for Traffic Shaping for VOIP on pfSense 2.3!It’s time to set some bandwidth aside for our VOIP traffic. Why would you want to do that?
Because let’s assume you have a 50/10 (Up/Down)Mbit Internet connection and you use VOIP.
Now a few clients start downloading some stuff or syncing Cloud Data and at the same time, a few people start to do a call.
If you do not have Traffic Shaping, or Quality of Service as you will, set-up in your pfSense Firewall, you will likely experience a loss of quality or even a complete interruption of your phone connection.
To avoid this we can use pfSense’s own version of QOS: The Traffic Shaper.
In this tutorial, I will show you in just a few steps how to set up Traffic Shaping using pfSense’s Traffic Shaping Wizard.
If you want some background information about the different protocols and how everything works or how to do everything from scratch, go ahead and watch Mark Furneaux’s excellent Video on Traffic Shaper (Also check out his other videos, they are incredible).
On a side-note: Also don’t forget to visit my own YouTube Channel and subscribe to it if you want!
Part 1: Creating a Firewall Alias for your VOIP provider’s Network
Alright, let’s get started.
Log in to your pfSense Firewall and Navigate to: Firewall / Aliases / IP
Click on +Add.
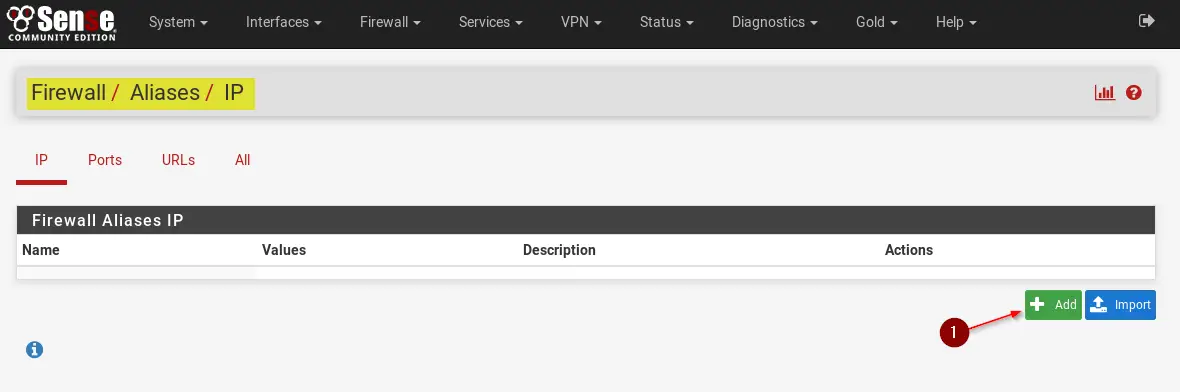
The Name you Enter under Name will be the Name of your Alias. So when we choose an IP Address or Alias later in our Traffic Shaper Wizard, you would enter the Name of the Alias.
Fill everything out accordingly. Find out the Network your VOIP Provider uses and enter it under Network or FQDN.
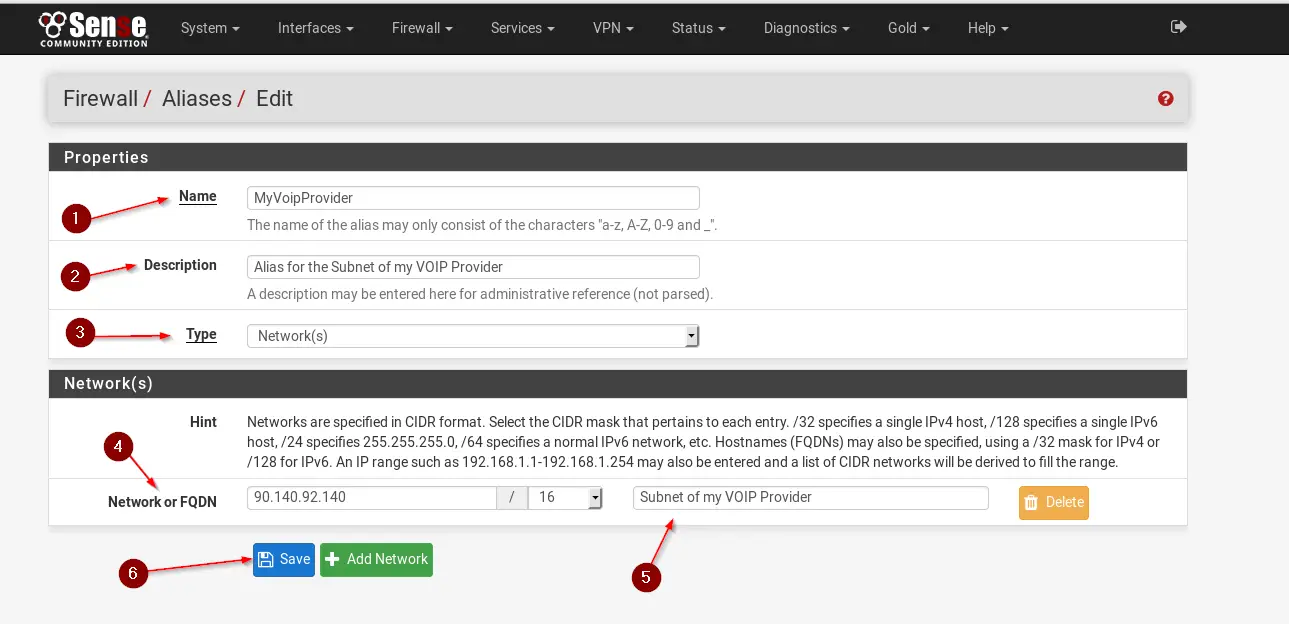
Click on Save and on Apply Changes once you are done.
You should end up with something along those lines:
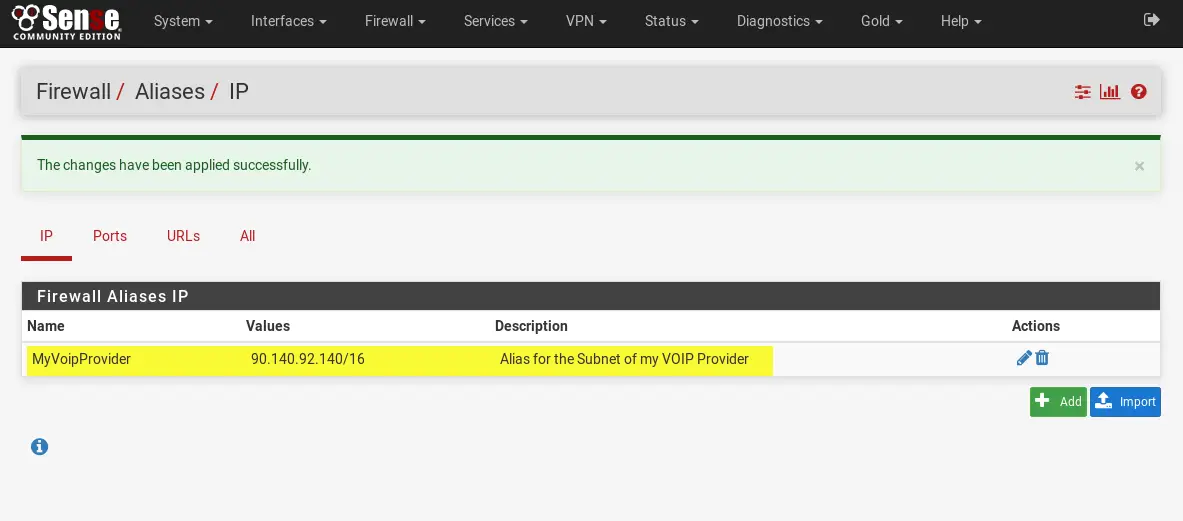
That’s it. Alias creation is done. I encourage you to use Aliases as much as possible for your Firewall Rules. Saves a ton of time. Play around with it a bit, it’s really easy.
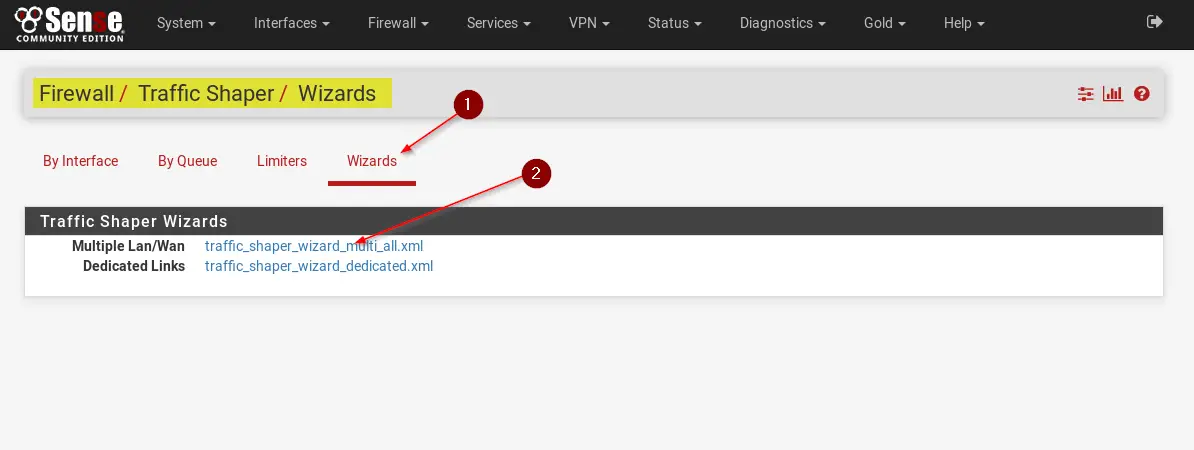
Part 2: Configuring the Traffic Shaper Wizard
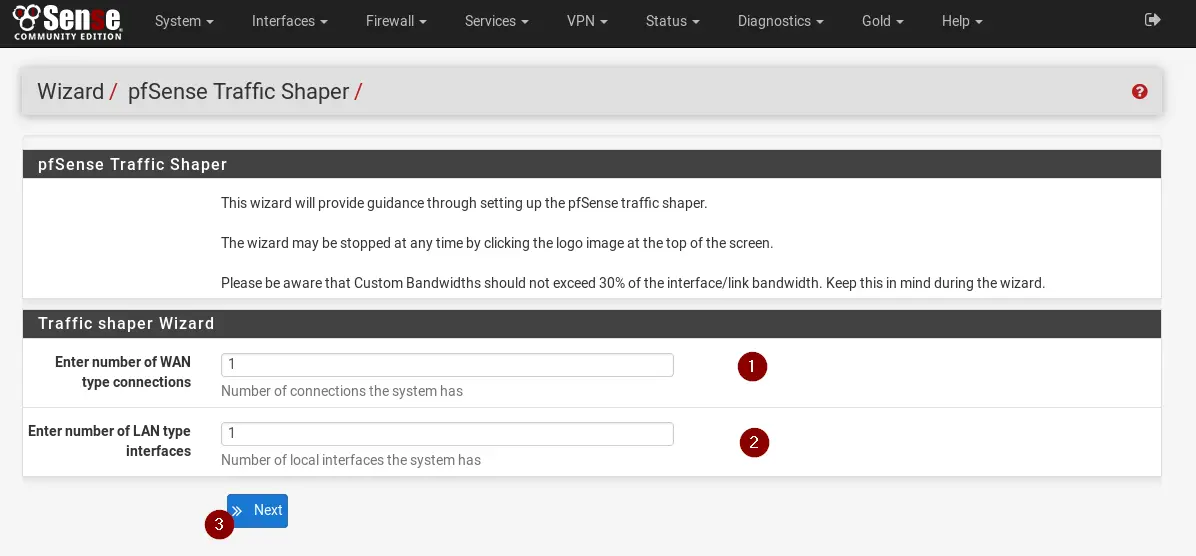
Alright, time for some Wizardry (~_~). Navigate to Firewall / Traffic Shaper / Wizards and click on Multiple Lan/Wan traffic_shaper_wizard_multi_all.xml
If you want to know why we select the Multiple Lan/Wan portion, watch Mark’s video, he explains it very well.
Depending on your setup, adjust this accordingly.
I have just 1 WAN and one LAN interface, so I select 1 and 1, click on Next.
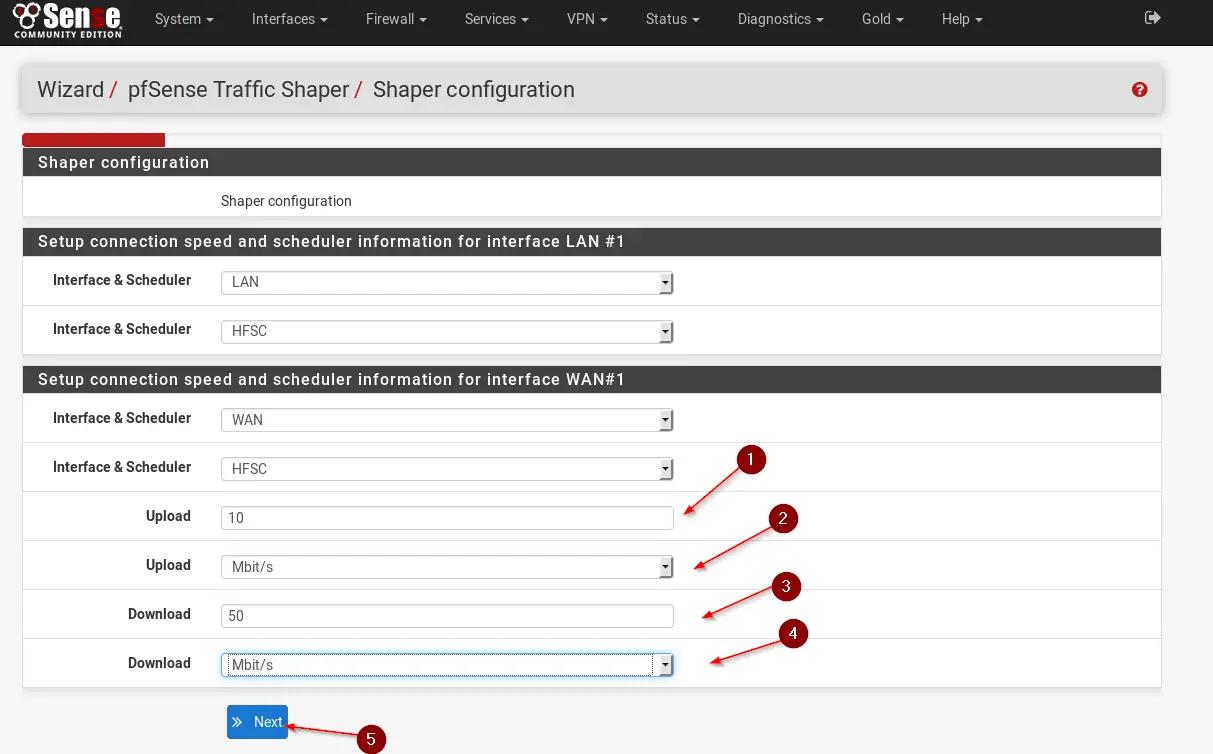
Make sure your Upload and Download speed is set correctly, if you have an internet connection established on your pfSense, it should be set automatically.
The next Step really depends on how many users you have on your network. In my network, it’s highly unlikely that more than 5 people will have a phone call at the same time. So I set the limits to 1Mbit/s Up/Down.
It’s really hard to generalize but by the rule of thumb you can assume the following traffic rules:
| Number of Concurrent Calls | Minimum Required Bandwith | Recommended Speed |
| 1 | 100 Kbps Up and Down | 3 MBps Up and Down |
| 3 | 300 Kbps Up and Down | 3 MBps Up and Down |
| 5 | 500 Kbps Up and Down | 5 MBps Up and Down |
| 10 | 1 MBps Up and Down | 5-10 MBps Up and Down |
Source: phone.com (Although I find the Recommended speeds set way too high, so just take it with a grain of salt.
Next, we gonna set the bandwidth we want to reserve for our VOIP traffic.
For Upstream SIP Server enter the Name of the Alias you created earlier for your VOIP Provider’s Network.
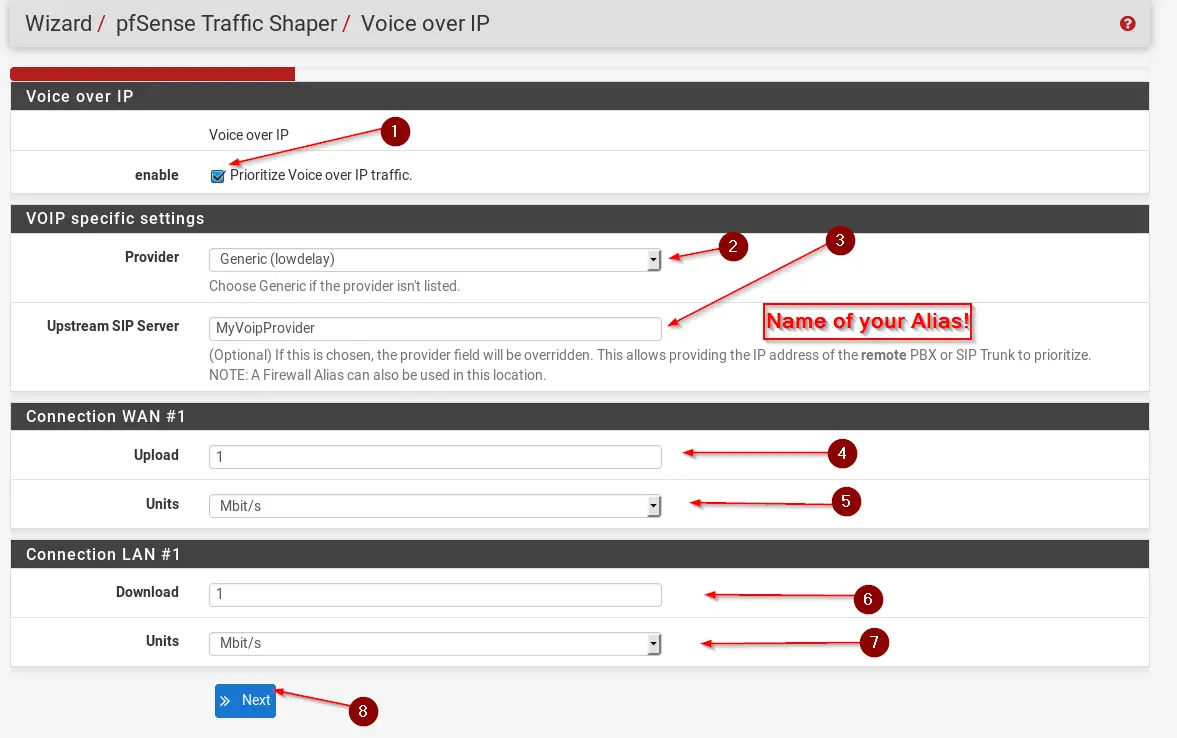
Click Next and Click on Next until you come to the End of the Wizard. All the rest stays on default. Again, for an explanation of each page watch Mark’s Video 😉
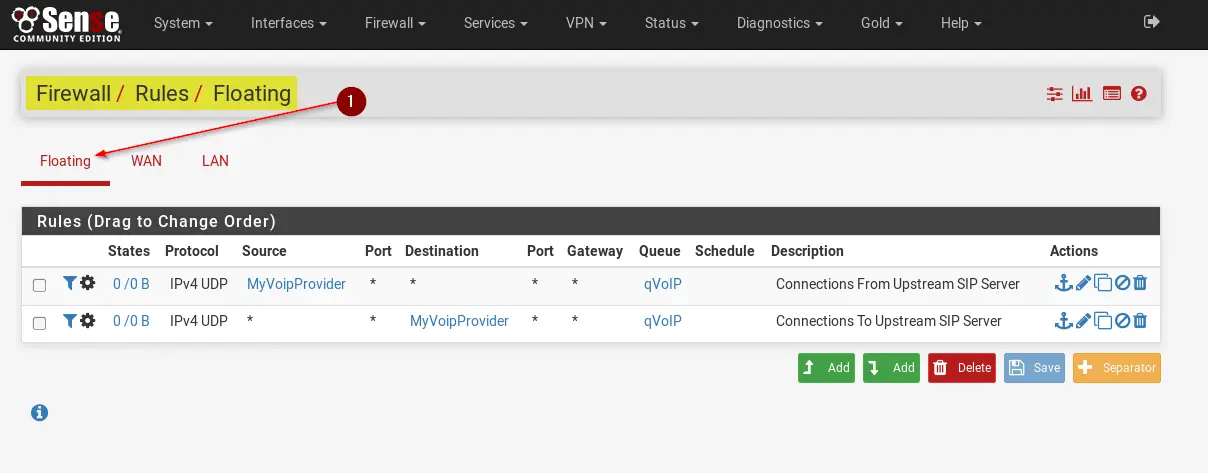
When the Filter was reloaded, Navigate to Firewall / Rules / Floating
You should have 2 rules in here now if all went well.
You can now start a phone call and check if the States Size is going to move. If it does, you are set.
And that’s it! You have now prioritized your VOIP Traffic using Traffic Shaper.
I wanted to keep this tutorial very short and basic. I referred to Mark’s Video several times because there is SO MUCH to learn about VOIP and Traffic Shaping / QOS which he covers perfectly in his Video.
So if you just want to quickly set up Traffic Shaping for your small Network, you are done here.
Thank you! It solved my problem with VoIP packet loss. Since we enlarged optic internet to 100 Mb/s and we have SIP server on LAN side there were occasional packet drops and crackling with VoIP telephony. Now I’ve reserved 5 Mb/s for IP (not subnet, since server is in our subnet) and the problem is gone.
There is a point above that says “if you have an internet connection established on your pfSense, it should be set automatically”. Is there a way to automatically let pfsense figure out the speeds, or any I truly only allow manual speeds using speedtest,net, etc. Also, I have a single WAN (1500 up) and I have 10 LAN interfaces (a total of 13000 kb/s), so how do I separate the download bandwidth between 10 LAN interfaces?
Hey Kim, on the second screenshot of the second step it says: Number of LAN interfaces. I guess that’s how. pfSense, however, will not do the calculation for you as far as I know.
Thank you!!