In this Guide, you will learn how to install Zabbix on Ubuntu 18.04 in a few simple steps. The installation process got significantly easier than in the previous version of Ubuntu Server 16.04. I will lead you through each step.
Zabbix is a very popular monitoring solution that can be used to monitor your on-premise and cloud devices. It integrated very well with Grafana, which will be dealt with in another tutorial on its own. For this tutorial, I install Zabbix 3.4 on an Ubuntu Server 18.04 in Amazon EC2.
Let’s get right started.
Table of Contents
- Step 1 – Adding the Zabbix repository to our Server
- Step 2 – Install Zabbix on Ubuntu 18.04 including MySQL
- Step 3 – Creating the Database
- Step 4[/su_label] – Updating the Zabbix configuration
- Step 5 – Install Zabbix on Ubuntu 18.04 final steps
- Conclusion
Step 1 – Adding the Zabbix repository to our Server
To be able to install Zabbix on ubuntu 18.04, we first need to add the Zabbix repository to our server. Make sure to check for newer versions before pasting the link below. You can check the available versions here. Log in to your server and run:
wget https://repo.zabbix.com/zabbix/3.4/ubuntu/pool/main/z/zabbix-release/zabbix-release_3.4-1+bionic_all.debCode language: JavaScript (javascript)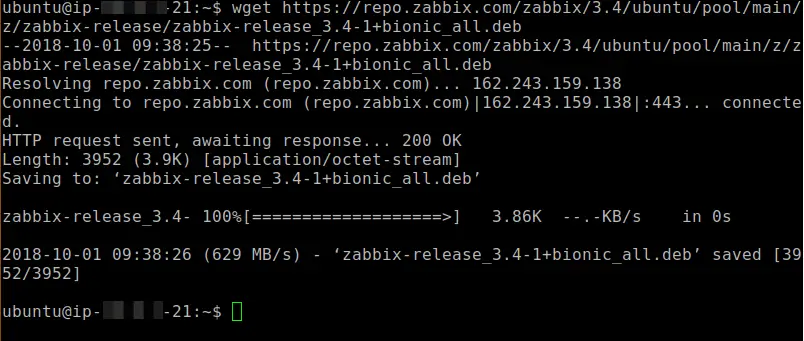
After this we install the Zabbix repository configuration package by running:
sudo dpkg -i zabbix-release_3.4-1+bionic_all.debCode language: CSS (css)
Step 2 – Install Zabbix on Ubuntu 18.04 including MySQL
Now we need to update our system and install the Zabbix Server, Zabbix Agent, and Zabbix Frontend packages. The Zabbix Server packages include MySQL.
sudo apt-get update
sudo apt-get install -y zabbix-server-mysql zabbix-frontend-php zabbix-agentCode language: JavaScript (javascript)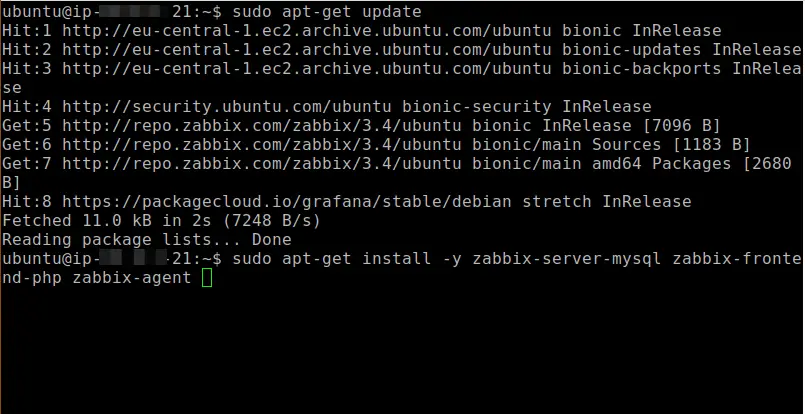
Changing the Timezone
Now we need to change the Timezone in our apache.conf. Adjust this setting to your own Timezone. You can look up PHP Timezones here. Make sure you enter the Timezone exactly like on the website, the input is case sensitive.
sudo nano /etc/zabbix/apache.confAnd find the lines:
php_value date.timezone YourCountry/YourCityMake sure to remove the # before the line to make it active.
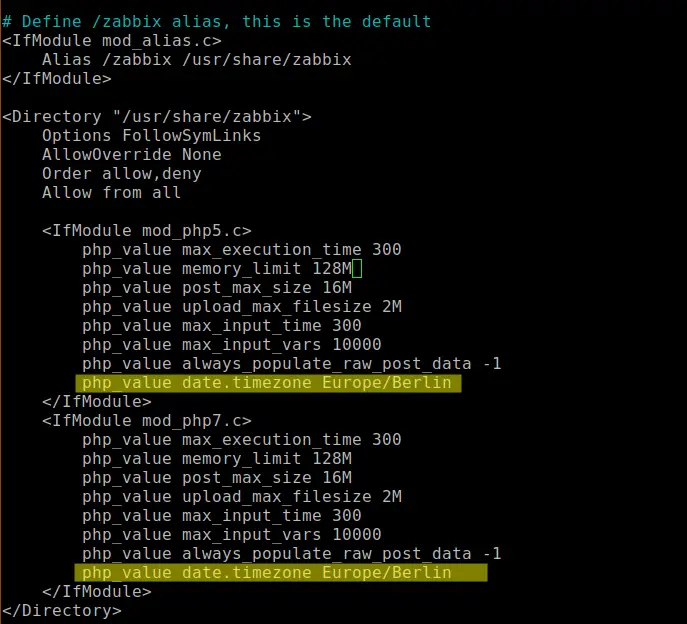
Save the file by pressing CTRL + O and press CTRL + X to quit.
Step 3 – Creating the Database
Now we can create our MySQL Database. For this example, I use the values below:
Zabbix DBName=zabbix
Zabbix DBUser=zabbixuser
Zabbix DBPassword=Whatever You Choose
Of course, you are free to adjust this to your liking.
Run:
sudo mysql -u root -pJust hit Enter when prompted for a password. Then run:
MariaDB> create database zabbix character set utf8 collate utf8_bin;
MariaDB> grant all privileges on zabbix.* to zabbixuser@localhost identified by 'YourPassword';
MariaDB> quit;Code language: CSS (css)
Once you are done with this, we have to import the DB.
cd /usr/share/doc/zabbix-server-mysql
zcat create.sql.gz | mysql -u zabbixuser -p zabbix
When prompted for a password, enter the MySQL password that you have set in the step above.

Step 4[/su_label] – Updating the Zabbix configuration
Now we need to update the Zabbix configuration with our Database details.
sudo nano /etc/zabbix/zabbix_server.confYou have to find and set the following values:
DBHost=localhost
DBName=zabbix
DBUser=zabbixuser
DBPassword=YourPassword
You can use the search function to find them. Make sure DBPassword and all other values have the # removed in front of them.
Now we need to restart all of the services by running:
sudo systemctl restart zabbix-server.service zabbix-agent.service apache2Code language: CSS (css)And adding them to autostart by running:
sudo systemctl enable zabbix-server.service zabbix-agent.service apache2Code language: CSS (css)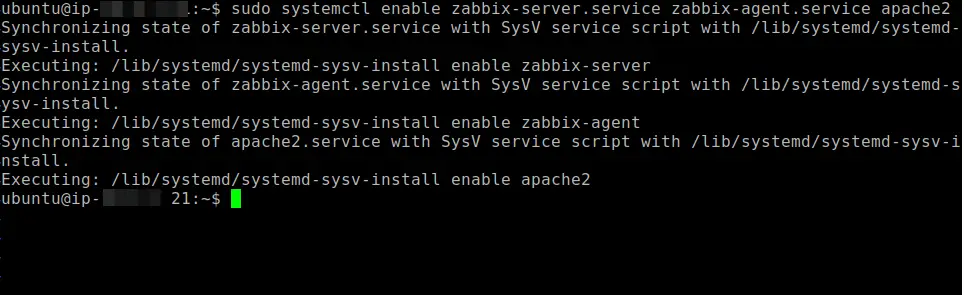
Step 5 – Install Zabbix on Ubuntu 18.04 final steps
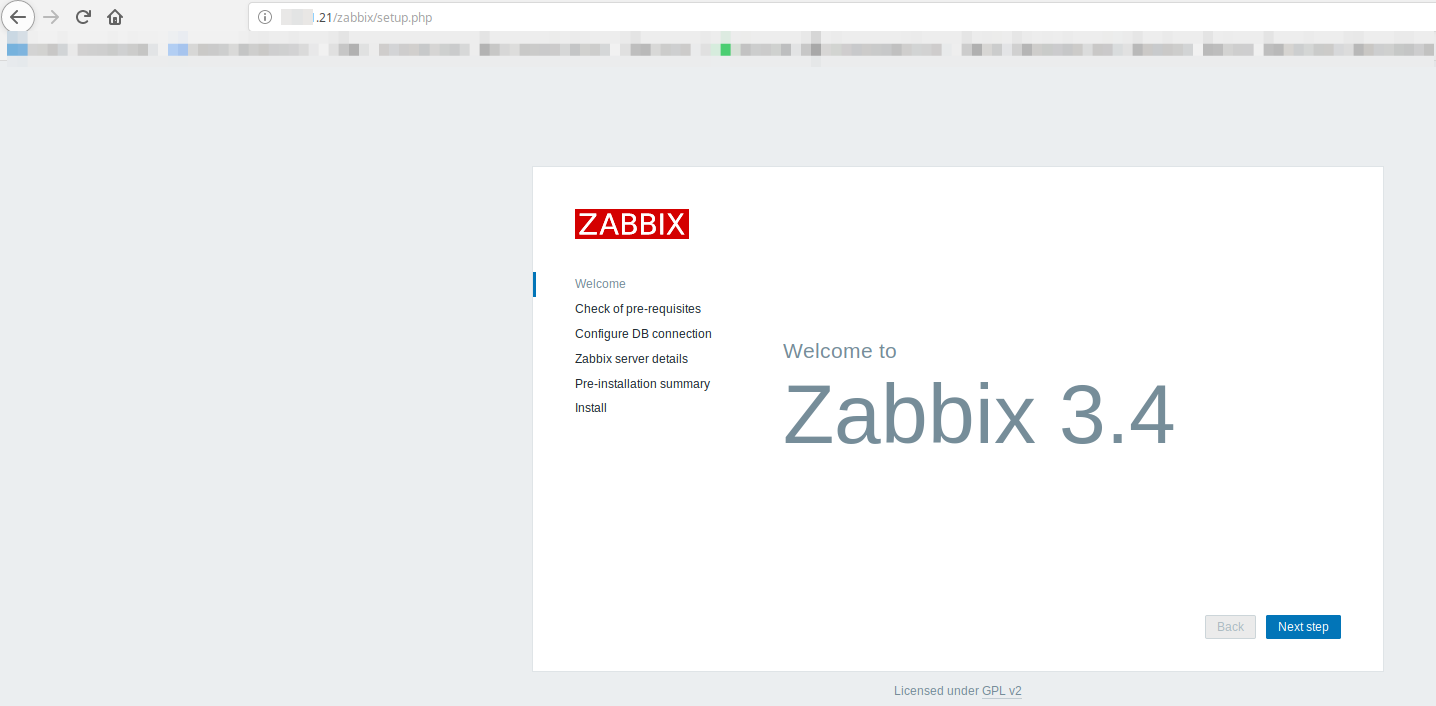
Now we are almost done. Open a Web Browser and enter http://yourserverip/zabbix
You will be greeted by the Zabbix Version and Welcome Screen.
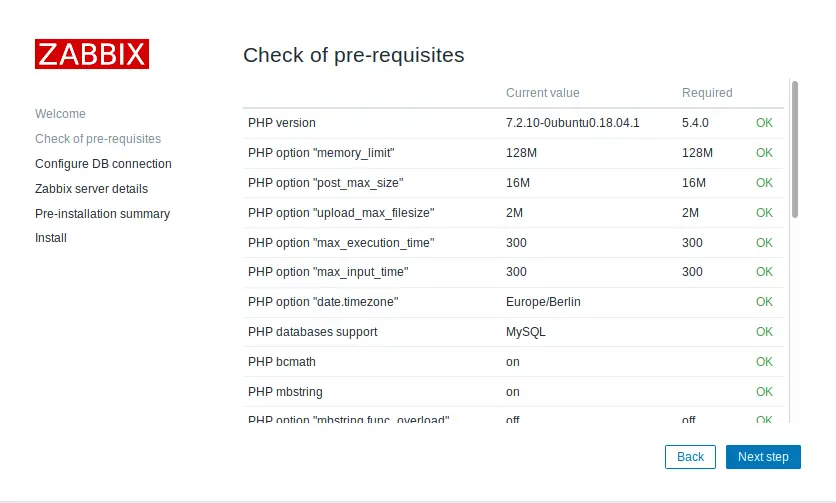
When clicking next, a final checkup will run that evaluates if you meet all the requirements to install Zabbix on Ubuntu 18.04.
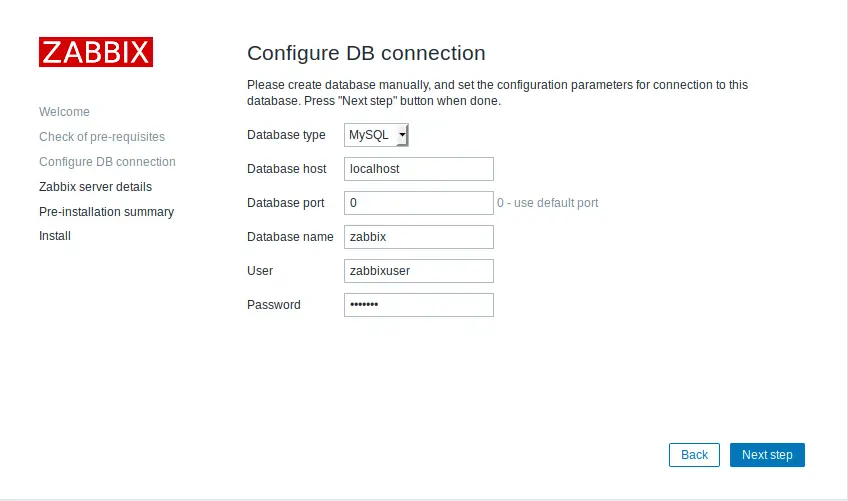
Now we need to enter the Database details that we have created earlier. Click Next step when finished.
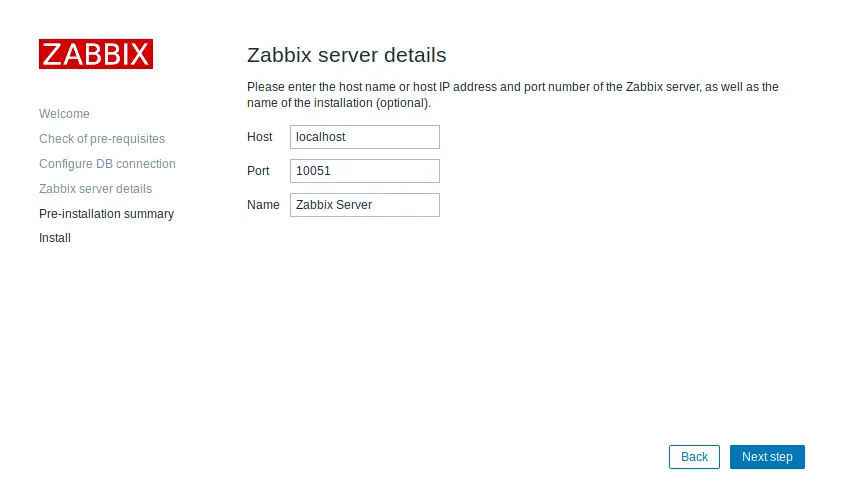
Now you can specify a name for your server. Choose whatever you like.
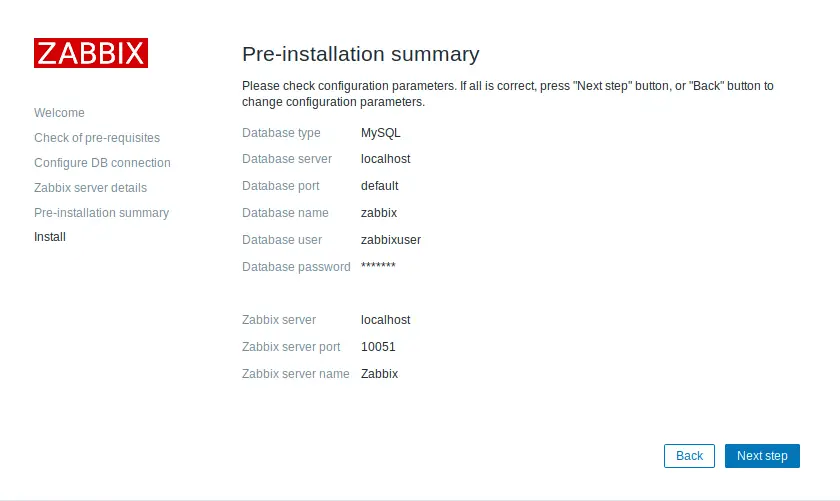
After double checking, if everything is correct on the Pre-installation summary page, click Next step again and click on Finish on the next screen.
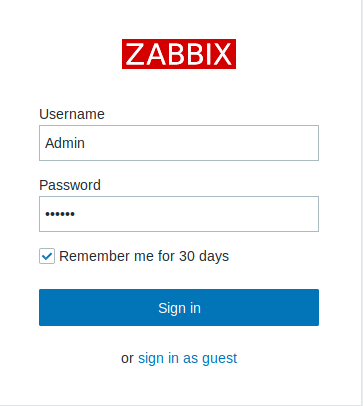
When you have done this, you are greeted with the Login screen. You can log in with Admin / zabbix. The username is case sensitive.
Changing the Default Password
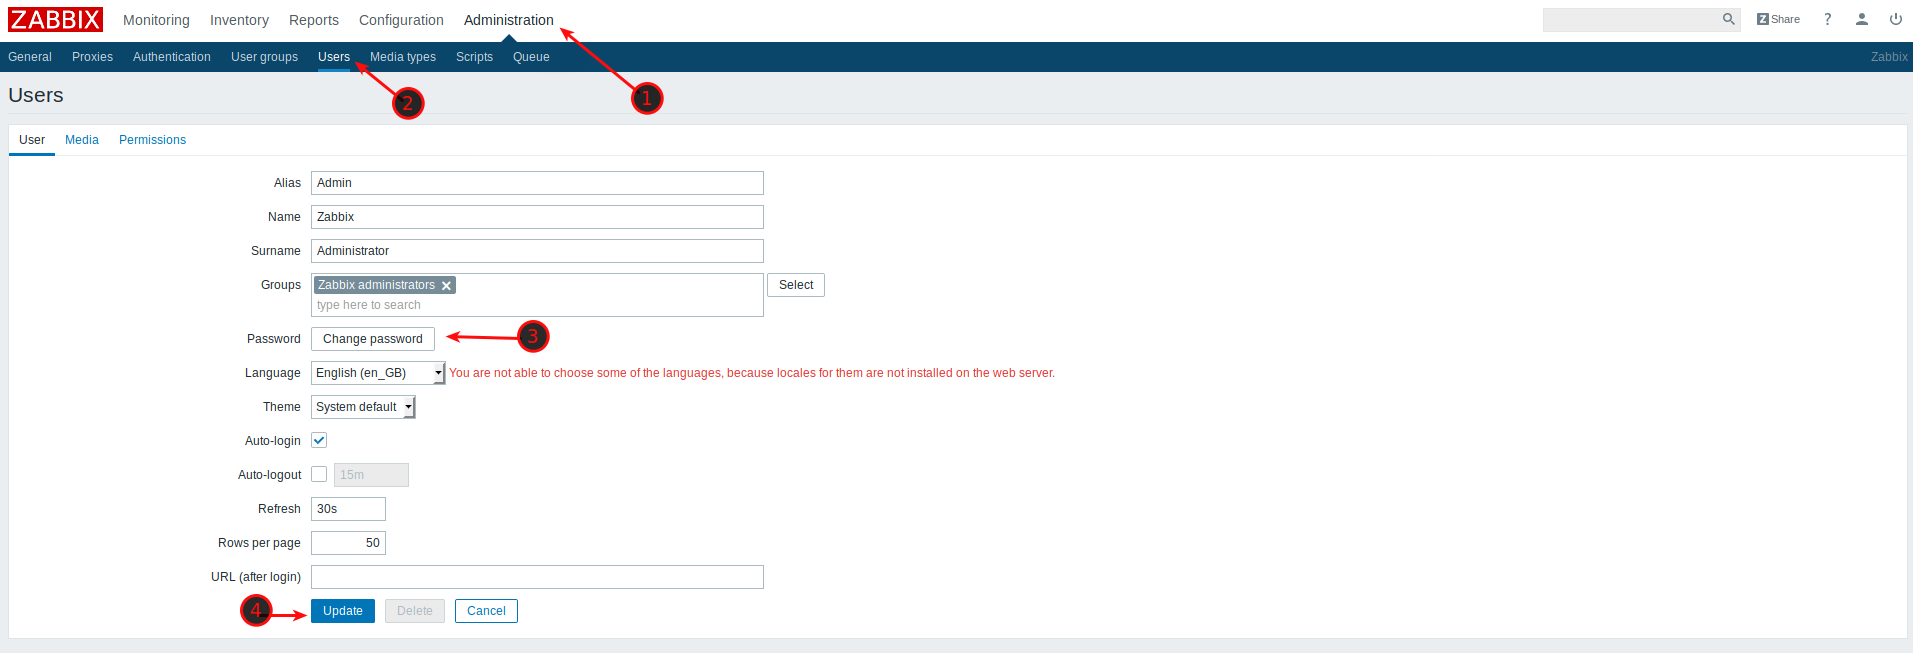
The first thing we need to do after logging in is change our Default Password. So head to Administration, Users, and click on your Admin User. Click on Change Password and choose a new one.
Conclusion
As you can see, it is really easy to install Zabbix on Ubuntu 18.04. It is certainly much easier than on Ubuntu 16.04, at least for me. You now have a freshly installed Zabbix in place and you can start rolling out Zabbix-Agents on your clients. There will be a separate tutorial on how to do this in the future.
Amazing tutorial, so easy to follow thank you.
Thanks!
Worked like a charm!
Thanks.
This was awesome and helped me so much thank you! If you can do a tutorial on how to set up agents on different machines and then run through some basic monitoring, that would be amazing.
Hey Jeffrey,
thanks for leaving a comment! I’m actually working on it, although can’t exactly say when it’s going to be done. Sign up for the newsletter or check out my Patreon once a month, I usually post updates there.