Astro, a modern web framework, provides an elegant solution for building fast, interactive websites. Paired with dummyapi.online, a fantastic resource for mock API data, you can create dynamic and visually appealing social cards. This Astro API guide will walk you through each step, offering alternatives where applicable, to help you harness the power of Astro and dummyapi.online.
Table of Contents
- Setting Up Your Astro Project
- Integrating dummyapi.online
- Final Result
- Wrapping Up and Additional Details
Setting Up Your Astro Project
Install PNPM: Begin by installing PNPM, a fast, disk space-efficient package manager. Open your terminal and run:
brew install pnpm
Create a New Astro Project: Execute the following command to create a new Astro project:
pnpm create astro@latest
Code language: CSS (css)
During the setup, choose the following options:
- Project name:
astro-social-cards - Template:
empty (no template) - Install dependencies:
Yes - Typescript:
Yes - Strict:
Yes
Navigate to Your Project Directory:
cd astro-social-cards
Add Tailwind CSS: Tailwind CSS, a utility-first CSS framework, can be added to your Astro project. Run:
npx astro add tailwind
When prompted, say Yes to all questions.
Start Your Development Server: To view your project locally, run:
pnpm dev
Then, open your browser and navigate to http://localhost:4321/.
Prepare Your Project Structure: Create a new folder src/components in your project directory. This is where your components will reside.
Create the SocialCard Component: Inside the src/components folder, create a file named SocialCard.astro.
Integrating dummyapi.online
dummyapi.online offers a convenient way to fetch mock social profile data for our project. This step involves making an API call to dummyapi.online and using the data to populate our social cards.
Here is an example of the DummyAPI Social Profiles Endpoint:
{
"userId": 1,
"username": "user123",
"email": "user1@example.com",
"profilePic": "<https://placehold.co/400x400?text=user123+profile+pic>",
"bio": "This is a short user bio...",
"homepage": "<https://userwebsite.com>",
"hobbies": [
"Photography",
"Traveling",
"Reading"
],
"fullName": "John Doe",
"location": "New York, USA",
"birthDate": "1990-01-01",
"followersCount": 1500,
"followingCount": 300,
"postsCount": 450,
"joinedDate": "2015-06-01",
"verifiedStatus": true,
"languages": [
"English",
"Spanish"
],
"education": "B.Sc in Computer Science",
"work": "Software Developer at TechCorp",
"relationshipStatus": "Single",
"gender": "Male",
"pronouns": "he/him",
"interests": [
"Artificial Intelligence",
"Machine Learning"
],
"coverPhoto": "<https://placehold.co/600x400?text=user123+cover+pic>",
"privacySettings": {
"showEmail": false,
"showBirthDate": false
},
"lastActive": "2023-11-23",
"statusMessage": "Exploring the world of AI!",
"contactInfo": {
"phone": "+1234567890",
"secondaryEmail": "secondary@example.com"
},
"customFields": [
{
"fieldName": "FavoriteBook",
"fieldValue": "1984 by George Orwell"
}
]
},
Code language: JavaScript (javascript)
Modify the Index Page: Open src/pages/index.astro and replace its content with the following code:
---
import SocialCard from "../components/SocialCard.astro"

const response = await fetch("<https://dummyapi.online/api/social-profiles>")
const data = await response.json()
const socialProfiles = data
---

<html lang='en'>
  <head>
    <meta charset='utf-8' />
    <link rel='icon' type='image/svg+xml' href='/favicon.svg' />
    <meta name='viewport' content='width=device-width' />
    <meta name='generator' content={Astro.generator} />
    <title>Astro Social Cards</title>
  </head>
  <body class='min-h-screen w-full'>
    <h1 class='text-4xl'>Astro Social Cards</h1>
    <div
      class='grid grid-flow-row-dense grid-cols-1 sm:grid-cols-2 lg:grid-cols-3 gap-6 m-12'
    >
      {
        socialProfiles.map((profile: any) => (
          <SocialCard
            verifiedStatus={profile.verifiedStatus}
            userName={profile.username}
            profilePicUrl={profile.profilePic}
            bio={profile.bio}
            homepageUrl={profile.homepage}
            followersCount={profile.followersCount}
            lastActive={profile.lastActive}
          />
        ))
      }
    </div>
  </body>
</html>
Code language: JavaScript (javascript)
Explanation:
- We import the
SocialCardcomponent. - Using
fetch, we make a request to dummyapi.online’s/social-profilesendpoint. - The response is converted to JSON, providing us with an array of social profiles.
Add Content to SocialCard.astro: Now, add the following JSX code to SocialCard.astro:
---
interface Props {
  userName: string
  profilePicUrl: string
  bio: string
  homepageUrl: string
  followersCount: number
  verifiedStatus: boolean
  lastActive: string
}

const {
  userName,
  profilePicUrl,
  bio,
  homepageUrl,
  followersCount,
  verifiedStatus,
  lastActive,
} = Astro.props
---

<div
  class='bg-gradient-to-r from-purple-400 via-pink-500 to-red-500 rounded-lg shadow-lg p-4'
>
  <img class='w-16 h-16 rounded-full mx-auto' src={profilePicUrl} alt='' />
  <p class='text-center font-bold text-2xl mt-2 text-white'>{userName}</p>
  {
    verifiedStatus && (
      <div class='flex items-center justify-center mt-2'>
        <svg
          class='w-4 h-4 text-green-500 mr-1'
          fill='currentColor'
          viewBox='0 0 20 20'
        >
          <path
            fill-rule='evenodd'
            d='M10 18a8 8 0 100-16 8 8 0 000 16zm1-11a1 1 0 00-2 0v5a1 1 0 002 0V7z'
            clip-rule='evenodd'
          />
        </svg>
        <p class='text-center text-green-500'>Verified</p>
      </div>
    )
  }

  <p class='text-center text-gray-200 mt-2'>{bio}</p>
  <p class='text-center text-blue-500 mt-2'>
    <a href={homepageUrl} class='underline'>{homepageUrl}</a>
  </p>
  <p class='text-center mt-2 text-white'>
    Followers: {followersCount.toString()}
  </p>
  {
    lastActive && (
      <p class='text-center text-gray-200 mt-2'>Last Active: {lastActive}</p>
    )
  }
</div>
Code language: JavaScript (javascript)
Explanation:
- The
Propsinterface defines the expected properties of each social profile. - The
Astro.propscontains the values passed from the index page. - The JSX code creates a visually appealing card layout using Tailwind CSS classes.
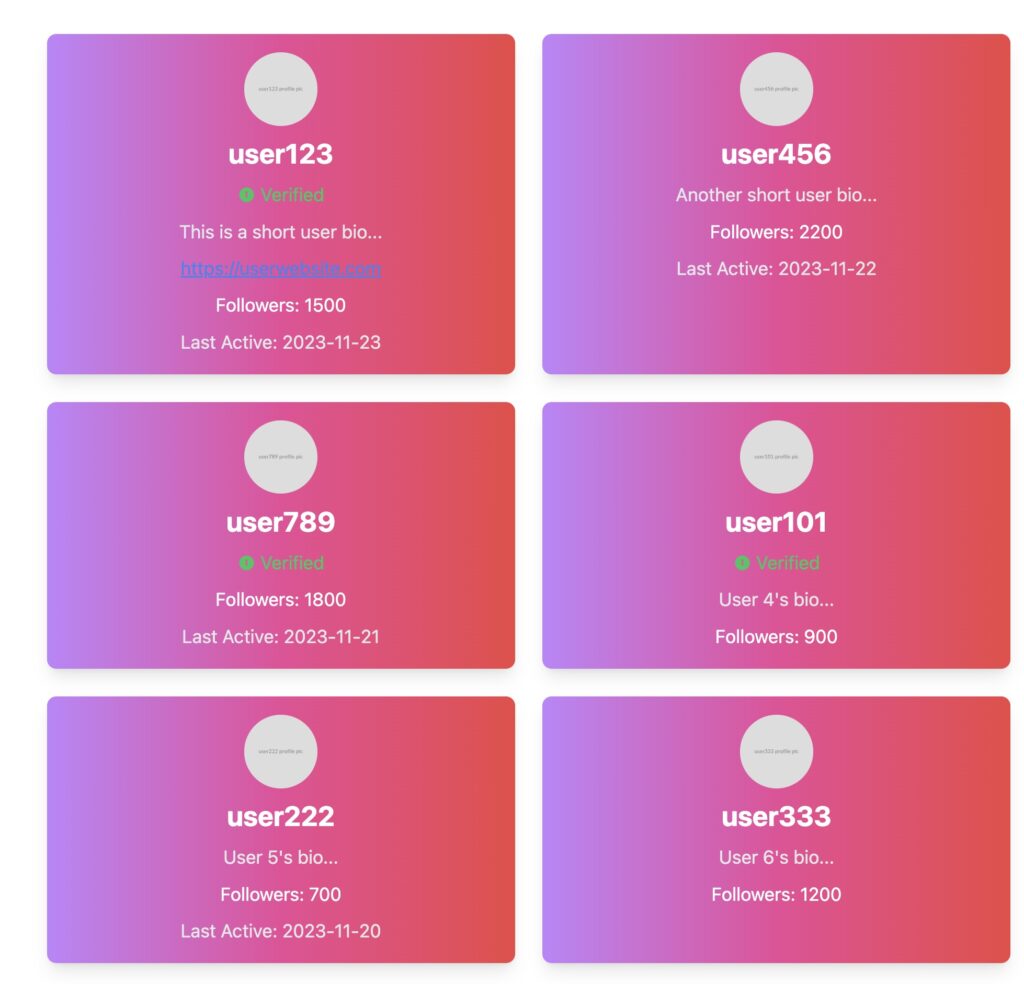
Final Result
If you have successfully followed through with the tutorial, you should end up with something like this:
Wrapping Up and Additional Details
This Astro API tutorial showcases how you can use Astro in combination with dummyapi.online to create dynamic social cards. The process involves setting up an Astro project, integrating Tailwind CSS for styling, fetching data from dummyapi.online, and using that data to populate custom components.
Key Takeaways:
- Astro is a flexible and powerful framework for modern web development.
- dummyapi.online is an excellent source for mock API data, ideal for testing and development purposes.
- Integrating third-party APIs in Astro is straightforward and enhances the dynamic nature of your web applications.
Remember, the world of web development is vast and ever-changing. Always keep exploring and learning new techniques and tools. Happy coding!