How to Configure NTP Server on Windows Server 2016
 By Updated 1 min read

In this article, I will show you how to configure NTP Server on Windows Server 2016 in just a few steps.
We will use PowerShell to change the NTP Server and we will validate if it worked afterward.
Configure the NTP Server on Windows Server 2016
On your Windows Server, 2016 hit the Windows Button and type: PowerShell and right-click it and select Run as Administrator
Type the following commands
w32tm /config /manualpeerlist:pool.ntp.org /syncfromflags:MANUAL
Stop-Service w32time
Start-Service w32time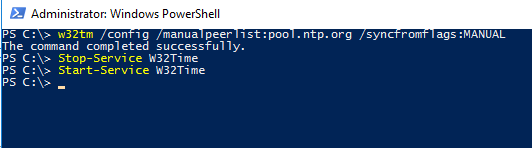
Of course, you can take any NTP Server that you want.
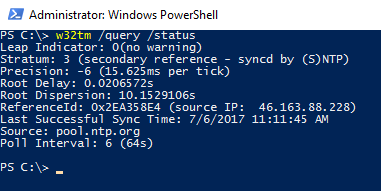
Now verify if the time-server was set correctly on your Server 2016 by typing:
w32tm /query /statusYou should get a reply like this:
Now we will go ahead and verify if our clients sync properly.
Verifying if the Time Server was correctly set on our Clients
On a client computer open a PowerShell with right-click and Run as Administrator….
Type:
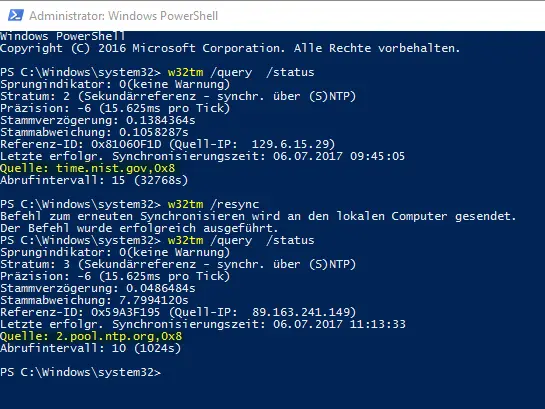
w32tm /query /statusCheck the time-server and type:
w32tm /resync
w32tm /query /status
Then you are able to see that the time-server actually changed like in the example below.
And that’s it! Easy, right?
Always make sure that you use the same time-server in your network and that all your clients are syncing with it. If you have time differences inside of your Active Directory Domain you will run into major issues.
10 thoughts on “How to Configure NTP Server on Windows Server 2016”
Comments are closed. I keep the discussion here because the answers still help.
More posts
All SysAdmin

How do i verify NTP version 4 is being used for time synchronization? thank you for your guidance.
What NTP version is this synchronizing to?
It is not working for them because they did not do a resync that's why
The commands provided only configure one machine to point to the (external) NTP source.. you have not provided the relevant commands to make the clients point to it, so I can only assume that the first machine you used is a DC, and you already set the command "w32tm /config /reliable:yes" on it, which makes any DC a reliable NTP source. All clients that are members of the domain would then automatically use it as an ntp time source (due to default domain policies).
Note - as per w32tm /? the command "w32tm /config /reliable:yes" is ONLY applicable to DC's. There are alternative settings that need to be enabled (including registry hacking) to enable a non-DC system as an NTP source.
Hey Wes, thanks for leaving a comment. Yes, indeed the Server is a DC. Thank you for pointing that out.
Microsoft Windows [Version 6.2.9200]
(c) 2012 Microsoft Corporation. All rights reserved.
C:\Users\Administrator>w32tm /query /status
Leap Indicator: 0(no warning)
Stratum: 1 (primary reference – syncd by radio clock)
Precision: -6 (15.625ms per tick)
Root Delay: 0.0000000s
Root Dispersion: 10.0000000s
ReferenceId: 0x4C4F434C (source name: „LOCL“)
Last Successful Sync Time: 10/19/2018 12:43:34 PM
Source: Local CMOS Clock
Poll Interval: 6 (64s)
Hey, thanks for your feedback! I also wish to remove them, but that only works if some donations are coming in to at least be able to pay the server cost. As soon as I get enough donations that I don't lose money, the ads are gone.
Nope.. After doing those steps it still says the source is local cmos clock. I am an Enterprise admin:
PS C:\Windows\system32> w32tm /query /status
Leap Indicator: 0(no warning)
Stratum: 1 (primary reference - syncd by radio clock)
Precision: -6 (15.625ms per tick)
Root Delay: 0.0000000s
Root Dispersion: 10.0000000s
ReferenceId: 0x4C4F434C (source name: "LOCL")
Last Successful Sync Time: 11/14/2017 2:53:29 PM
Source: Local CMOS Clock
Poll Interval: 6 (64s)
Please advise.
i found the same output as well. the commands mentioned in this „tutorial“ doesn’t work at all, or it’s missing something crucial.
I just tried it again and it worked. Are you running an elevated cmd shell?