In this tutorial, you will learn how to calibrate your screen using DisplayCAL and the Spyder 5 calibration device. We will go through everything step-by-step. You don’t specifically have to use a Spyder device, DisplayCAL works with other calibration devices too, but this article assumes you use a Spyder 5 and Windows 10/11 on the latest update.
Table of Contents
- Why it’s important to calibrate your screen
- Calibrate for Web and Print are two different pairs of shoes
- Standardized light
- Step 1: Installation of all components needed for DisplayCAL
- Step 2: Screen Calibration and Profiling
- Step 3: The Calibration Process
- Step 4: Wrapping Up
- Conclusion DisplayCAL and Spyder5 Installation
Why it’s important to calibrate your screen
You might wonder, why do I even need to calibrate my screen? Well, this depends entirely on what your approach to photography is and how much weight you put on how your viewers experience your work. If you want your viewers to have the best possible experience when viewing your photos, you got to calibrate your screen.
Just assume you are using an ultra crappy, old, and not calibrated monitor for your post-processing, which has colors, contrast, and brightness levels that are totally off. You edit your photos on this and send them out on your Instagram feed and wonder why you get shitty or no response, that’s because the picture probably looks completely off on a standard (non-calibrated) screen.
You, of course, can’t assume that all your users view your pictures on calibrated screens, that would be ludicrous, but you want that the pictures that leave your post-process have the best possible quality.
Calibrate for Web and Print are two different pairs of shoes
Depending on your goal this is important.
If you solely process pictures to release them to be viewed on digital media, you can simply go with a color temperature of 6500k, which is the standard for digital media processing.
If you want to print your pictures, the standard is around 5000k. Now be aware that 5000k, if you haven’t worked with it before, will probably set you off because it is way too yellow for your nonprint images. Your whole screen will have a yellow hue.
From my personal experience, you get great print results and the colors really are on point when using light around the 5000k range while editing, but for me it was unbearable. I actually went with 5500k for print processing which is an often discussed topic, but use whatever works best for you.
I now use 6500k most of the time, because 90% of my content is web-based. So the choice is yours and based on what you want to achieve.
Standardized light
As mentioned above, there are certain standards that were established internationally for picture processing, we just will cover 2 of them:
I personally have 2 different light bulbs and 2 different color profiles on my screen:
- 5000k with screen calibrated to 5500k for Prints
- 6500k with screen calibrated to 65000k for The Web
So if I need to edit prints, I would just unscrew the 6500k and work with the 5000k and vice versa. Works pretty well so far. Of course, you need to switch your screen profile too.
This is a little bit of hassle that most people are not willing to do, so I definitely recommend if most of your work is Web-based, simply go with 6500k. Even if you do occasional prints you will be more than fine and definitely better than without any norm light and calibration. Don’t overthink it like me in the beginning. You are not printing fine art HQ Photography books for a living, do you?
Unfortunately, I wasn’t able to find specific brands on the US Amazon, in Germany, we have two established kinds of lights for that on Amazon:
Both of which I use and recommend.
Alright, let’s get our hands dirty.
Step 1: Installation of all components needed for DisplayCAL
If you never had the Spyder software installed before, you can skip step 1.1 and continue right with step 1.2.
1.1 Removing the old software from your system
First, you will uninstall your Spyder software.
Unfortunately, the Spyder driver will not be automatically removed when uninstalling the software, so we have to put some manual labor into it.
- Plug in your Spyder device on a USB port
- Hit the Windows Button and type Device Manager into the search field or open your Control Panel and find the Device Manager
- Open the Device Manager
- Find your Spyder under “USB-Controller”
- Right-click on the entry and select uninstall
- If there is a checkbox asking you if you want to remove the driver too, check the box
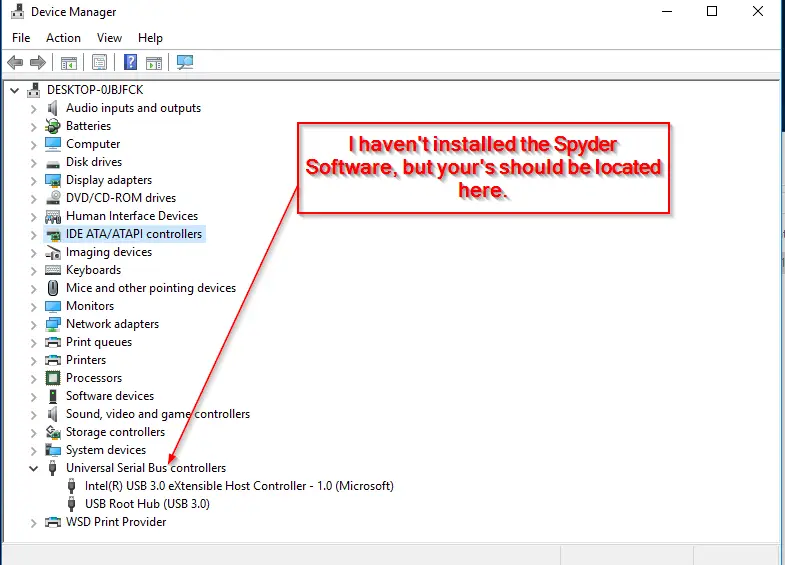
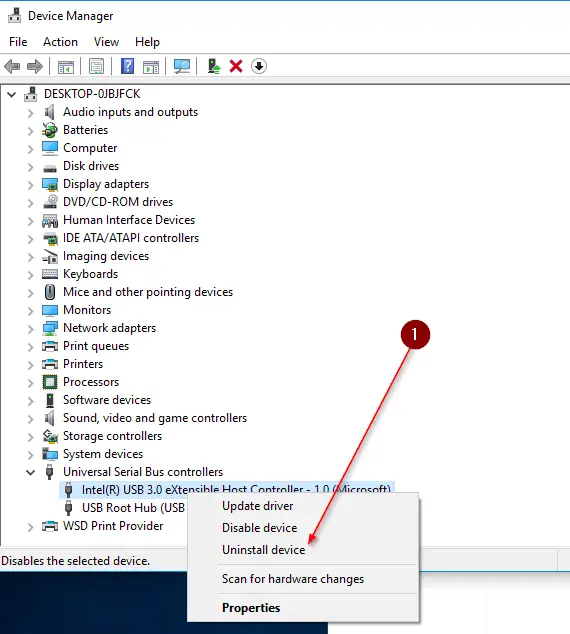
Now unplug your Spyder 5 device, you should now have removed every rest of the driver.
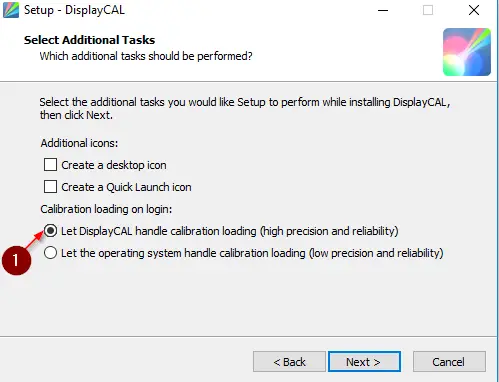
1.2 Installing DisplayCAL
Now go ahead and download DisplayCAL from their homepage. Choose from the DisplayCAL Standalone Windows Installer.
Run the installation process, it’s pretty straightforward. There is only one option you need to be sure is selected:
1.3 Starting DisplayCAL for the first time
Now start DisplayCAL. The first time you start the software, you get asked if you want to Download the Argyll CMS color engine. Click on Download.
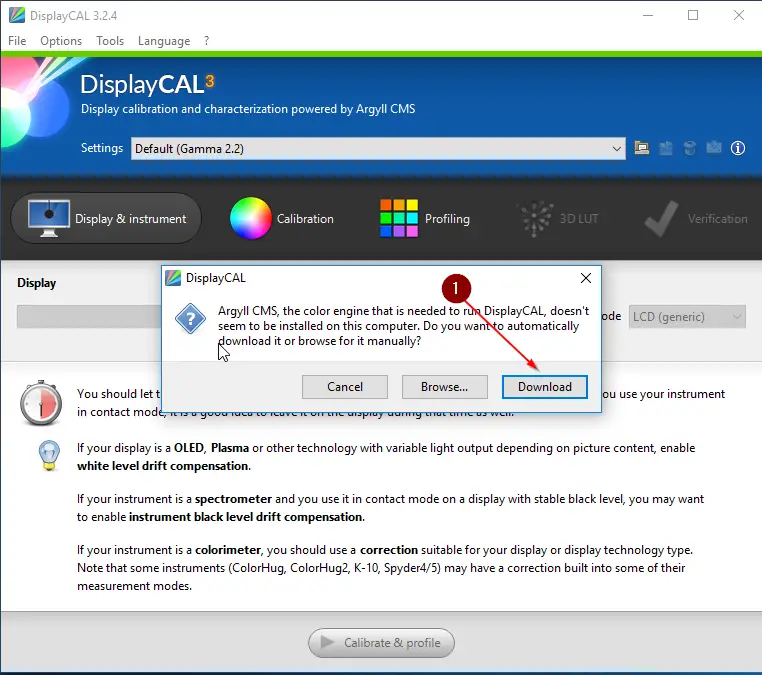
In case something goes wrong, you can download Argyll CMS here.
Grant DisplayCAL all access it wants (your windows firewall for example).
Contribute if you appreciate the product.
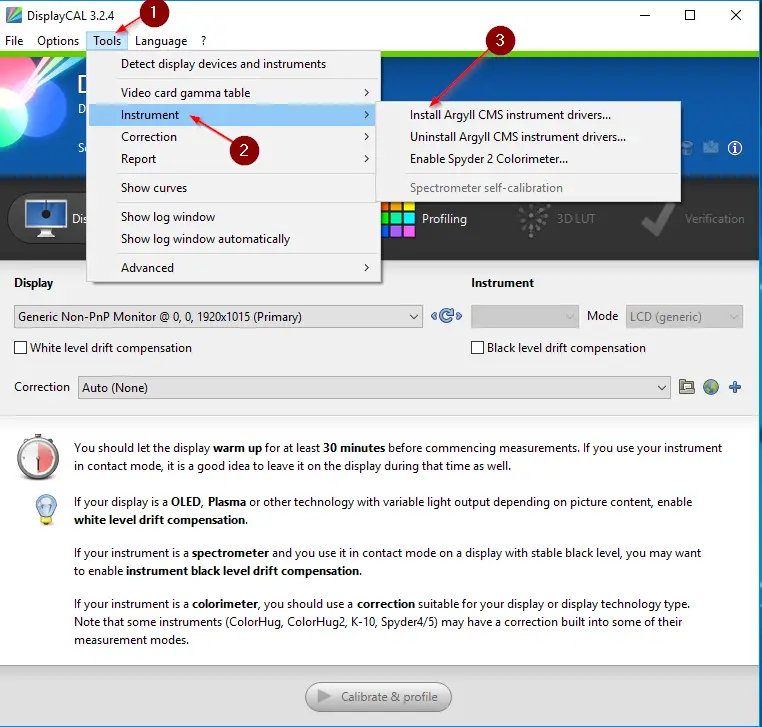
1.4 Installing the driver
It’s time to install the new driver for our Spyder 5 Colorimeter:
- Make sure your Spyder5 is plugged into your USB port.
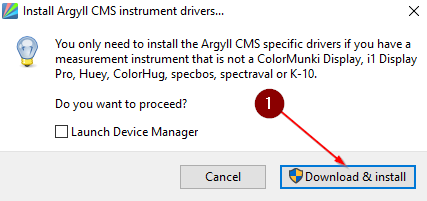
- In DisplayCAL click on Tools / Instrument / Install Argyll CMS instrument drivers…
- Follow through with the installation process
- Now plug your Spyder 5 device into your USB Port and restart the DisplayCAL Software
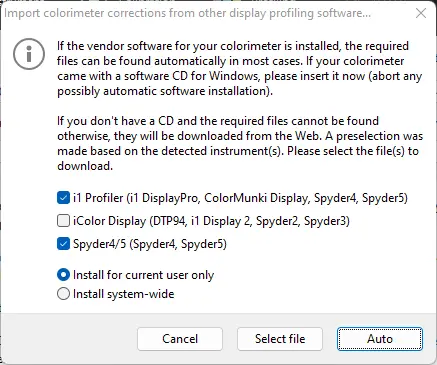
When this window appears, just leave everything per default and click on Auto.
Once that is finished, you will see your Spyder5 device appearing as an Instrument in the DisplayCAL software:

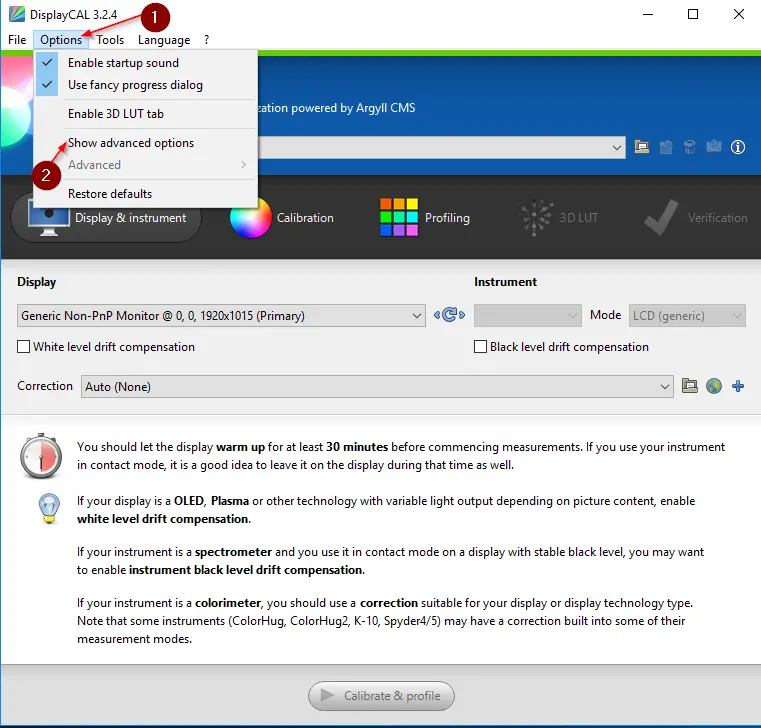
1.6 Activating Advanced Options
This might make the whole thing seem even more complicated for you, but we need those options so go ahead and activate them:
- In DisplayCAL click on Options / Show advanced options
Step 2: Screen Calibration and Profiling
Now we are getting to the actual calibration and profiling process.
Leave all settings that I don’t mention as default.
2.1 Choosing the right screen and settings
- Under Display select the Display you want to be calibrated
- On Correction select Auto (None)
- As Instrument make sure your Spyder device is selected (if not, restart DisplayCAL)
- For Mode we choose: LCD ( White LED )
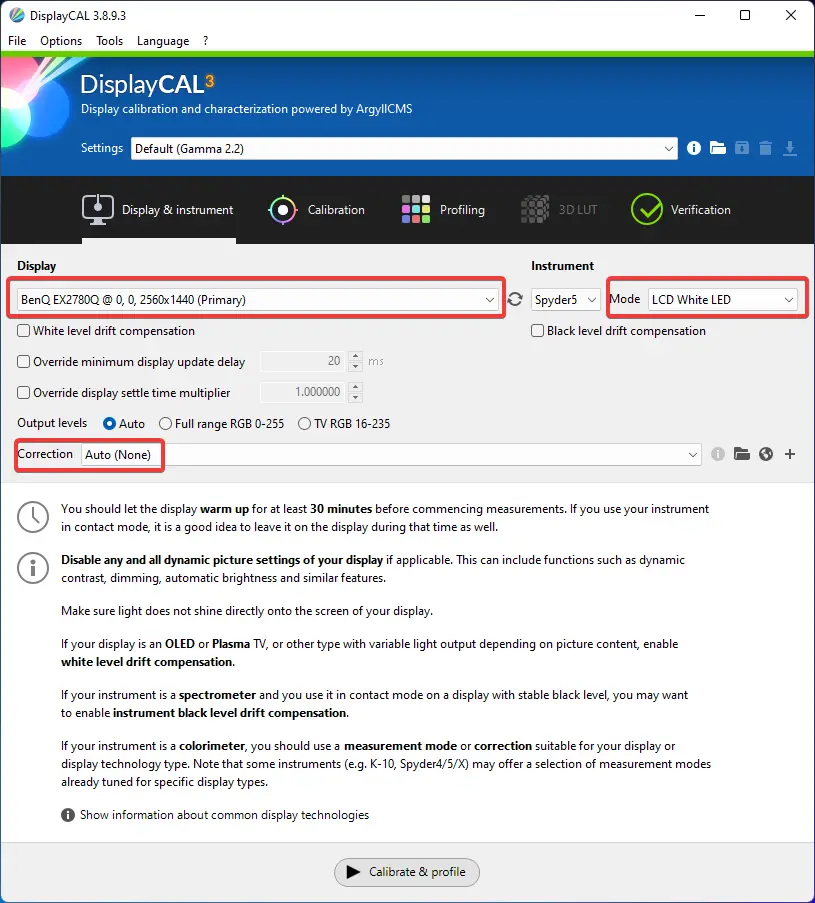
For the Mode option, you should check your Monitors manual or simply google {MyMonitorType} + LCD.
Most newer monitors, however, are working with white LEDs, so in most cases, this is the right option. If in doubt, choose LCD (Generic).
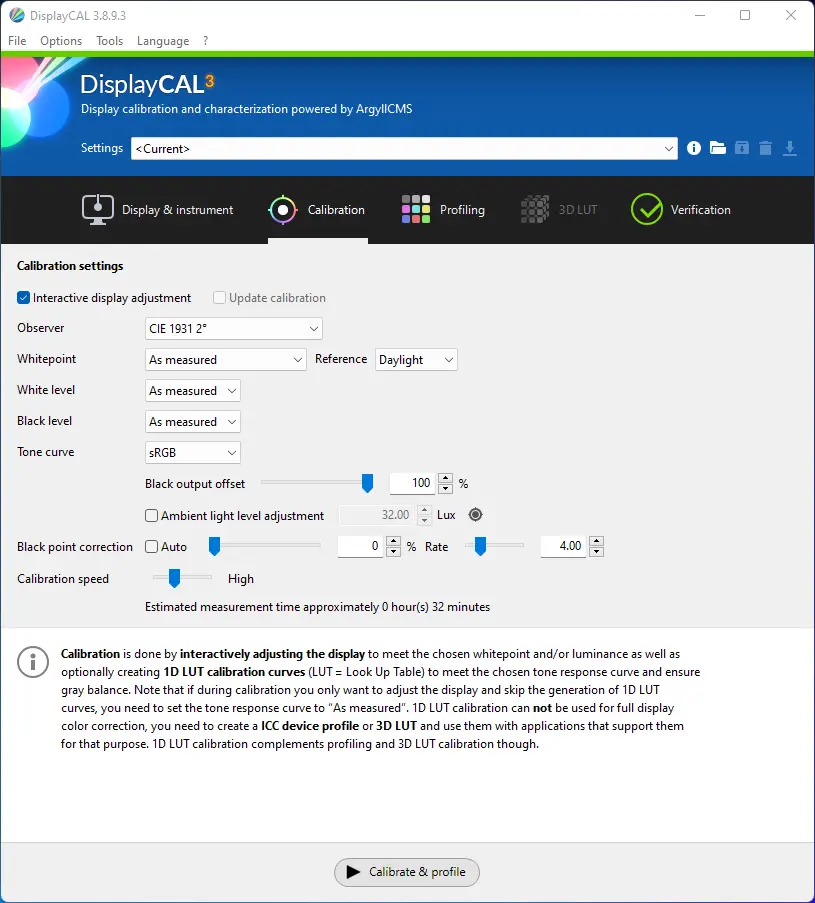
2.2 Calibration Settings
Now head over to the Calibration tab on DisplayCAL. This is a very complex part again but we will try to keep it as short as possible.
If the Interactive Display Adjustment box is checked (which it should be), you have to do manual adjustments to your screen in the calibration process (Brightness & Color). This is desired.
You can also let DisplayCAL do all the work automatically by un-checking the box, but you should definitely make use of the in-monitor calibration that your device offers.
Let me run you through the settings real quick.
Whitepoint: This depends if you have standardized light in your editing room or not.
If you have, let’s say, constant 6500k lighting with your windows dimmed to ensure a constant level of lighting, you will set your Whitepoint to Color Temperature 6500k. If you do not have standardized light, just leave it on default. Most people will have varying light levels throughout the day (as daylight changes outside) and more or less constant light levels at night-time.
White Level / Black level: This is a very complex topic, we will leave the standard values here. Just a short explanation on this one.
The White Level is the brightness of the whitest point that your monitor is able to display. It is also depending on the light levels in your room, that’s why we leave it on “As Measured”. If your room is very dark you probably don’t want to run your screen at maximum brightness, so this option adjusts your screen brightness according to your room brightness.
The Black Level is the exact opposite. However, it depends on the setting of the White Level. We leave it on “As Measured” as well.
Tone Curve: The tone curve regulates the brightness distribution within your screen. The most used setting for the tone curve is what you probably are familiar with already – sRGB. This is what we choose here. Most photo print shops and printers work in the sRGB color space, too. So this is really the standard that you want to choose. You can read a little bit on that here. In most cases, your monitor will not be able to display the AdobeRGB color space anyway, except if you have a professional screen.
Ambient Light Level Adjustment: This is more relevant for older CRC screens and can be left unchecked. It would measure the ambient light and make adjustments therefor. But we don’t need that for a basic calibration on an LCD screen, so leave it unchecked.
Calibration Speed: Leave it on the standard-setting High. Anything Higher than High will have a noticeable difference in the calibration quality, whereas anything slower than High has no noticeable difference, but is a little more accurate and can take many hours to finish.
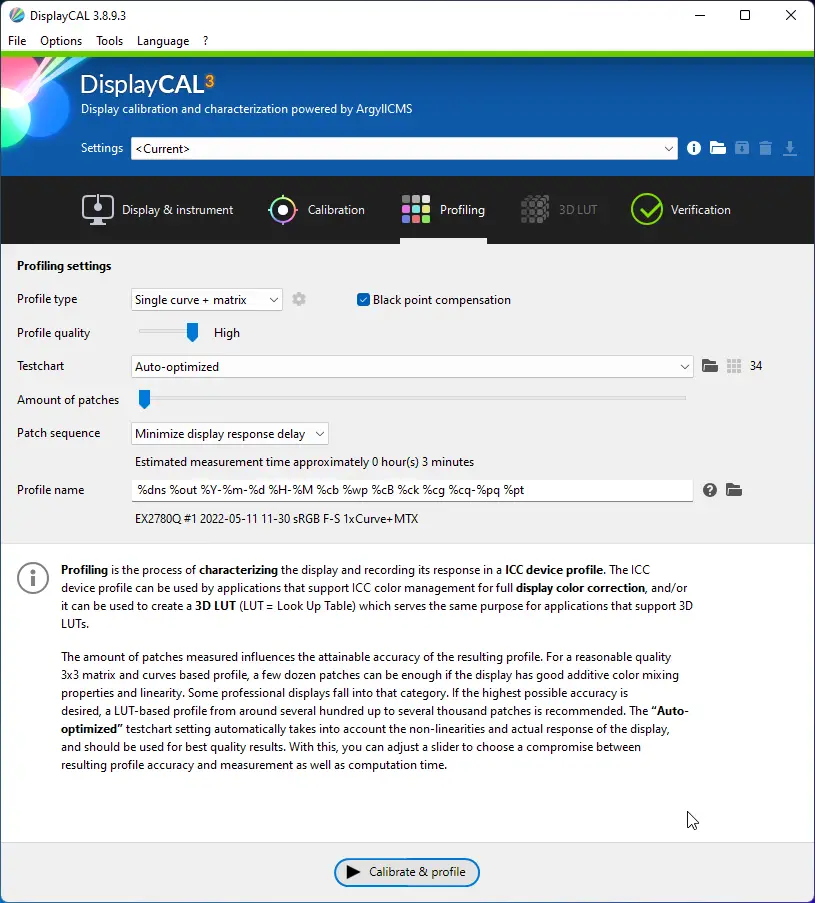
2.3 Profiling
The Profile Type dictates the internal structure of the profile. There are two types of profiles: Matrix and LUT.
LUT Profiles are more accurate than Matrix profiles but are not compatible with every application.
To achieve an equal color profile throughout all of the applications that you use, and the profile all applications are able to process, we will choose Single curve + matrix.
You can edit the Profile Name to your liking. I usually use the format like this: %dns(that’s the name of your screen) 6500k or %dns 5000k because I work with two different color profiles, as mentioned before.
Now we are getting towards the end already.
Step 3: The Calibration Process
Now if you have followed all previous steps, you can click on Calibrate & Profile.
DisplayCAL will now display a box on your screen which indicates the place where you should place your Spyder5.
Please note: Make sure you attach the Spyder5 device to the screen properly so that there is no space between the Spyder5 and the screen itself. Tilt your monitor backward for this or use some tape to fix the cable to the frame of the screen (protip).
Now click on Start Measurement, this will take a few seconds and DisplayCAL will present you with a chart:
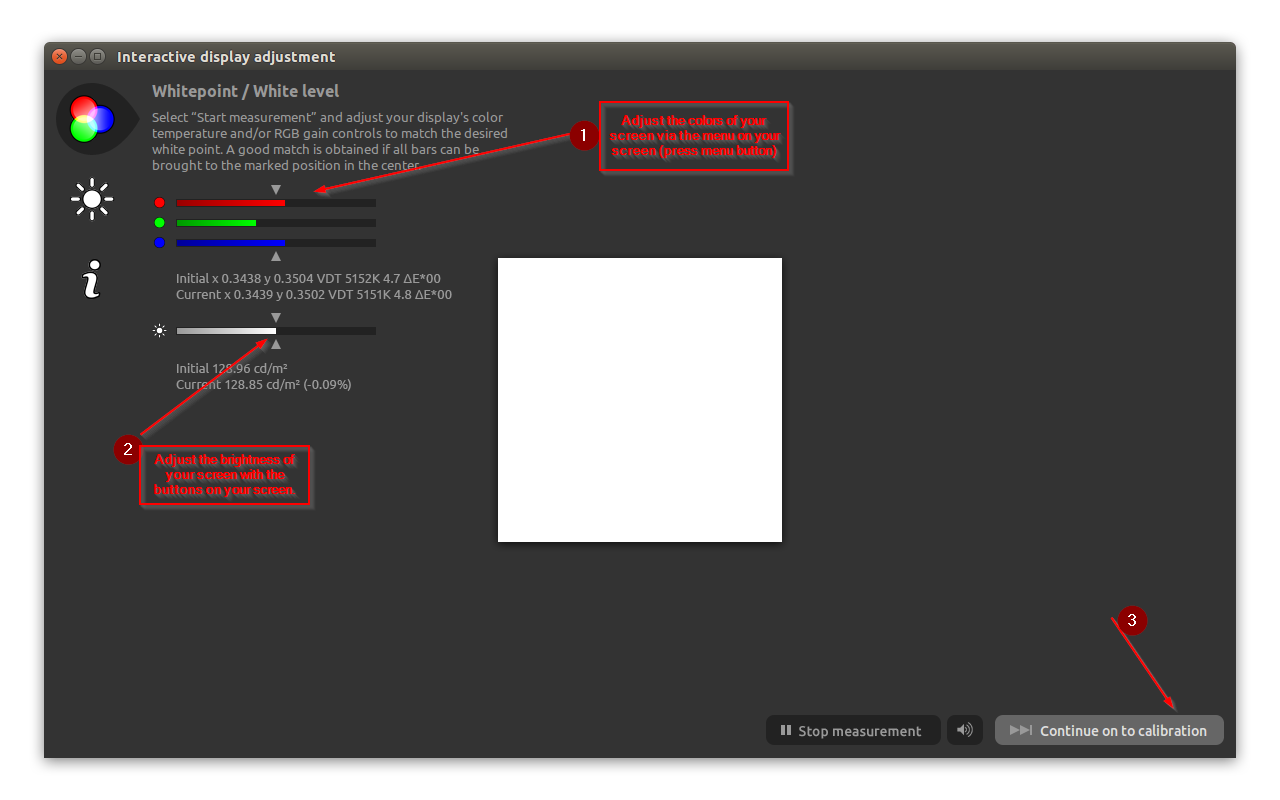
Now DisplayCAL will take a new measurement every few seconds to check the values you changed.
NOTE: Those values need to be changed on your screen itself. So you press the menu button on your monitor and find the color adjustment options. Now you start adjusting the colors so that all colors meet in the middle. After changing colors, you adjust the brightness to be in the middle too.
After adjusting brightness, it is possible you need to make minor adjustments to color again. Do this as accurately as possible so that all 4 sliders are exactly middle out.
If you reached the desired levels, hit Stop Measurement and click on Continue to calibration.
Now go for a walk because this will take at least 30 minutes up to possibly 2 hours.
You don’t need to do anything. Just leave the calibration run-through.
Step 4: Wrapping Up
After that was running through you are almost done.
You will get presented with the results of the calibration.
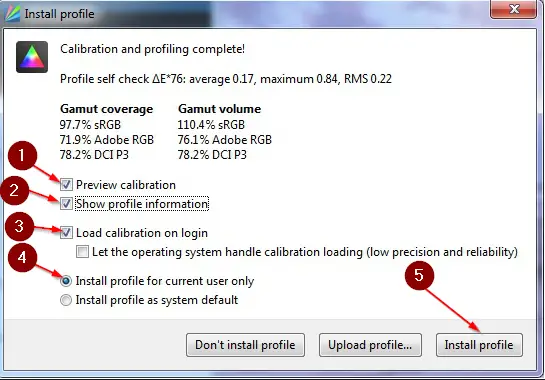
This is it! You successfully installed the calibrated profile. The profile will get loaded every time you start your computer automatically. You can manage the different profiles by right-clicking the DisplayCAL symbol in your taskbar.
As I said, it’s a lengthy article but worth every step. The results are so much better than with the Spyder software. You should re-calibrate your screen every few months, maybe 3 months would be a good timeframe.
Conclusion DisplayCAL and Spyder5 Installation
If this article has helped you, please consider buying your Spyder 5 via my affiliate link. I will get a small provision on it which enables me to continue to produce quality content for you.
After you calibrated your screen it’s time to step up your game and Build Your Own Monitor Hood. I got you covered on that as well. I will also attach a list of photography gear that I use below. I only list items I use myself and items that I believe in.
Thank you for writing this guide. I am sure it will be very useful to a lot of people.
(There’s a small typo in the title. It reads “calbirate” instead of “calibrate”. It was indeed the first article I ever read about screen calbiration :-))
Thanks Miguel! Appreciate it. Also, thanks for the grammar correction! 🙂
Hi and Thanks a lot for this article! I love how easily one feels guided through the rpocess.
Ihave high hopes this will fix my problem with my Dell screen (the calibration with the Spyder 5 Pro just got poor results). However, I am stuck in a very crucial step, the importing of the colorimeter corrections from the spyder software. I have downloasded the Spyder pro software from th url you provided and didn’t install it, just let the dowenload sit in the folder.
Then I followed the steps (Check Spyder 4/5, Check Install for current user only, Click on Select File and find the downloaded Spyder 5 Express Software Installer…) I get an error message “Didn’t locate any files to install – no CD present ?”
Do you have any idea what I might have doen wrong or how to fix this?
Thanks a lot again!
Hi there!
First of all: Thank you so much for this!
I’ve been trying to find out good concise info on how to make this work (spyder 4) and until today I failed.
Today with your instructions it worked out.
I have a couple of questions if you don’t mind helping me out a bit more:
1- Step 3: The Calibration Process. I’m trying to calibrate my laptop’s monitor and I have no control over it’s settings other than brightness. I tried changing the colors using windows’s “calibrate display color”, but it didn’t work out as whenever I’d change a setting, it would quickly revert back. I think DisplayCal was overriding windows’s settings.
So, since that didn’t work out, I turned off the interactive calibration. Ideas on this?
2- You mention you have two different profiles, one for 6500k and another one for 5500k. How to create different profiles is clear, what I don’t understand is what exactly needs to be changed (which setting in particular) to set it to 6500k / 5500k. Please clear it out for me?
3- What’s the best way to match two monitors using this process?
With best regards from Ingolstadt, Germany.
André
DisplayCAL doesn’t detect my instrument (spider 5) How to proceed? Thanks
Leave the USB driver. Use a cheap usb 2.0 hub to avoid problems with usb 3.0.
Can not find anywhere on my laptop to change the colour display settings to get the bars in the middle. Am I missing something or its only possible for standalone monitors? Should I let the software do this and how?
Let me say simply “THANKS” for your step by step help!!! My English is not so good but I realized everything I had to do and I’m really satisfied installation has been succesful. Thanks!
Hey Roberto,
glad it worked out well for you. Thanks for leaving a comment!
Would be great to update this walk-trough with new DisplayCal options available on each configuration screen
Works like a charm on Spyder 4 Express device. Far superior over Spyder software.
Great!
Well great, uninstalled the USB 3 driver like you asked in 2nd pic and lost control of my computer had to force reboot and lost all progress on stuff. Thanks alot.
Man i hate this Spyder5.
Well, of course, it is my fault that you make changes on your System and don’t save your stuff before doing so. You’re welcome.
Thanks for this, currently trying your settings to profile my system. One question though, I do have an AdobeRBG monitor (Benq SW2700), so rather than the sRGB setting, what tone curve should I use? I chose Gamma 2.2, is that right?
Thanks for taking the time to post this well-written guide. My Windows 10 Pro 1803 update (installed in July 2018) has caused my Spyder calibration data to suddenly drop from my 3 monitors about once every half-hour. It usually reloads within 20 seconds, but is very annoying. I’ll give DisplayCal a try thanks to your guide. Spyder was never able to get my non-identical monitors to appear very similar side-by-side; perhaps DisplayCal can do a better job.
Jimmy, it absolutely can. I haven’t had a single issue and the calibration is way better. Let me know how it goes for you.
Same here Mike! I just unchecked the interactive box 🙁 using the latest displaycal on an Acer 38″
Thanks so much for this guide. I am oddly running in to an issue on step 3 where even when I made manual adjustments on my monitor to get everything right in the middle, any changes I make to the color are not being registered by the software. I can turn the green all the way down, for example, and the color will change, but that green bar on the application does not move. Have you seen anything like that?
Hi Mike,
unfortunately not, but maybe someone else here!
I never comment on blogs, but this article was so helpful. Thank you!
Thanks, Nathan! I appreciate it!
Thank you so much! I’ve referred back to this article 3 times over the past year. Just letting you know it’s still helping people. Thank you!
Thanks very much Jay, happy to hear that!
Hey thanks for the step by step. I’m using a mac. I’m having trouble getting the Argyll to show up in „instruments“. I can’t seem to get it unpacked from the file I downloaded from the site. Do you know what I should be clicking on to unpack the file??
What socket are you using for the tubes? I want to buy me the Philips tubes but which socket whould I use for it? As all sockets I can find are mat it would reduce the light and colors of the bulb.
I honestly can’t tell you. I had them home. They are called “Rasterleuchte” in German. They use it in Offices to spread the Light better.
Thank you so much! As others here, I took a Spyder5EXPRESS planning to use DisplayCAL for going around the software limitations. But the DisplayCAL basic documentation is a bit too complete and confusing.
I just have a few questions:
– „Let DisplayCAL handle calibration“ means that DisplayCAL will compensate for the colors of every application, kind of like an overlay on Windows, and I do not have to load the profile in any software, right? Then why „Single curve + matrix“ instead of „LUT“? Wouldn’t DisplayCAL be able to take care of everything even with a LUT profile?
– For image software that are able to include calibration / profile correction, is it better to use this rather than the global calibration on all Windows?
– Dual screen (extended mode). Is it easily possible to calibrate both (different) screens?
Just did my two monitors, it looks like you can create a different profile for each monitor and they are respected.
Cool! Thanks for letting us know.
Thank you!
You are welcome!
Hi! First of all – THANK YOU SO MUCH for this tutorial!! I followed every single step as discribed, but when I finally click on calibrate & profile in the DisplayCAL Software, I get a message „Waiting for connection at 192.168.1.106:20002“ and from there nothing happens – the calibration never starts. I googled it, but couldn’t find a solution. Do you know how to proceed here? Really appreciate your help here!!!
This is awesome. Thanks man!
One quick question regarding brightness
Should I set the monitor to a preferred brightness before starting the calibration?
Should I recalibrate the screen every time I change the brightness?
Hi there, if I recall right, you have to adjust the brightness during the calibration process. Otherwise I would go for a brigthness level that feels comfortable for you.
Thanks for write up! I am using Mac, should I uninstall the Datacolor software before running DisplayCal? Thank you,
Hey Raj, yes, absolutely.
Thank you
why does my displaycal don’t work? everytime my pc boots up the calibration profile stop works. And a pop up saying my calibration profile couldn’t load with the graphics card.. Am so confuse iv’e tried everything nothing works.
Thanks a million for this article, super useful! It wasn’t easy figuring everything out, so you’re a star! My only concern is that on iMac I couldn’t find how to change the RVB as stated in step 3, so I’m not sure the calibration process will be correct..? Any idea or input please? Again, thanks a million #applause
Thanks Emilie, glad I was able to help. Unfortunately I have no experience with Mac on that matter 🙁
Thank you for your help. Just FYI, your Spyder 5 software link isn’t working. I’m currently downloading the installer from their site. Anyways, thanks. 🙂
Hey Josh, thanks for the info! Will Update the Link right away!
Thanks so much for this! I just bought a Spyder5 express (sorry, I would have used your affiliate link if I’d known about it then!). I knew the Spyder5 hardware is exactly the same for all three versions (express, pro and elite) and that I could use DisplayCAL free for a much more accurate result and sure enough, the express software gave a poor result which was way too warm but no one mentioned all the complexities in getting DisplayCAL set up properly to work with a Spyder5 so your article has saved my neck, thanks a million! I also thought the Spyder5 Express colorimeter itself had its ambient light meter physically disabled but guess what, that is just a software thing too and DisplayCAL uses it successfully!!
You are welcome. Thanks for leaving your experience!
I just wanted to say thank you!
Thanks for leaving the comment 🙂 Glad I could help!