
In this article, you will learn how to install Linux Mint 19 on VirtualBox. I will guide you through each step, so you don’t get lost.
If you just want to try out Linux for the first time, it is probably a good idea to do that in a Virtual Machine first before committing to completely wiping Windows from your Computer and running Linux on it. I really like Linux Mint; it’s a great newbie Distribution for people coming from Windows (and I think it was designed with that in mind).
If you were scared or didn’t know how to get started with Linux, this tutorial is for you. You can’t break anything on your computer, and I will take you through the process step by step. So let’s get started and let us install Linux Mint 19.
If you prefer to try Ubuntu instead of Linux Mint, I got you covered. Ubuntu also is a great beginner Distro.
Table of Contents
- What do you need to install Linux Mint 19 on VirtualBox?
- Step 1 – Installing VirtualBox
- Step 2 – Creating a Virtual Machine
- Step 3 – Install Linux Mint 19
- Step 4 – Logging in
What do you need to install Linux Mint 19 on VirtualBox?
Hardware
If you run Windows 10, you should have a computer with at least:
- 8GB of RAM
- A Dual Core Processor
- At least 20GB of free hard disk space
If you use Windows 10, Windows alone will already eat up your 4GB of RAM, so there is nothing left to run a Virtual Machine on.
Software
Before starting, make sure you download the two files:
- Oracle VirtualBox
- The Linux Mint 19 ISO file (I recommend you download the 64bit Cinnamon edition)
Step 1 – Installing VirtualBox
As the first step, we are going to install Oracle VirtualBox. This is pretty straightforward, just run the installer and leave everything on default. Start VirtualBox soon as you get it installed.
Step 2 – Creating a Virtual Machine
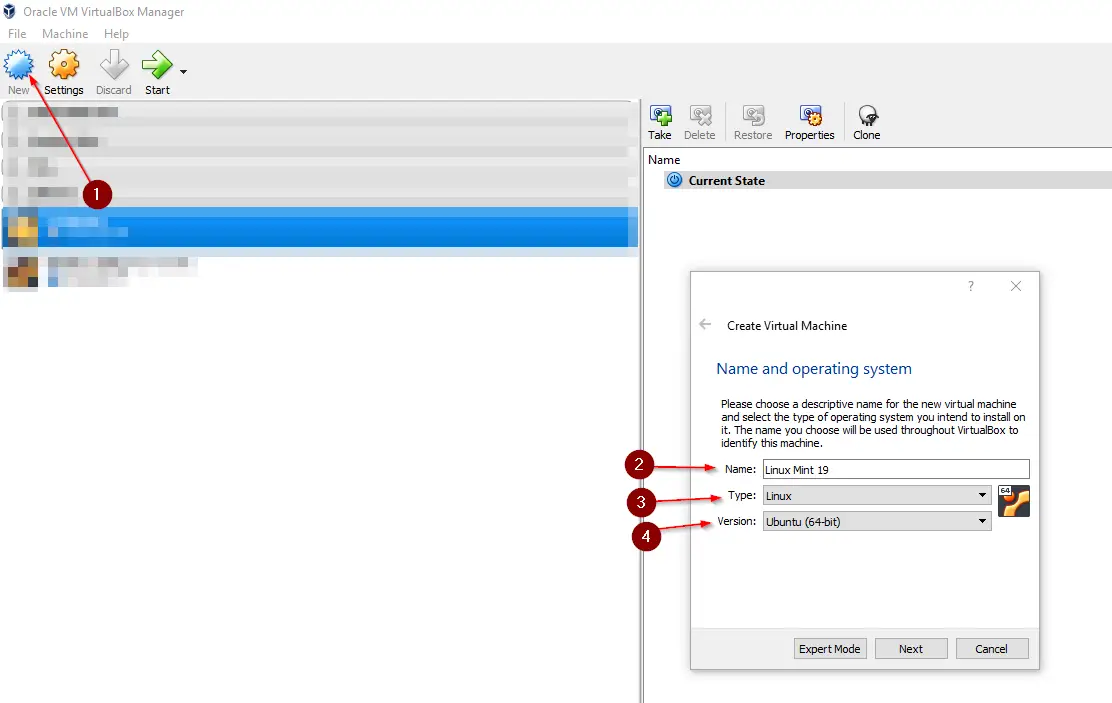
Good, now we are going to create our first Virtual Machine. This is much easier than you might think. Once you have VirtualBox started, click on New. Give it a Name, and choose a Type and a Version as follows:
- Name: Linux Mint 19 (Or whatever you want to call it)
- Type: Linux
- Version: Ubuntu (64bit)
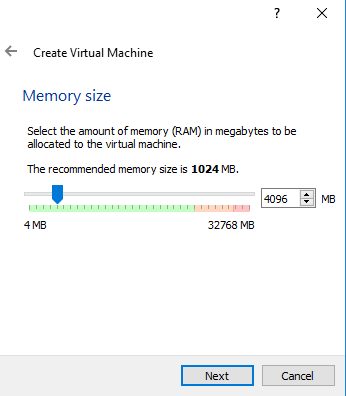
Click on Next and assign it a certain amount of Memory. For a good experience, a rule of thumb is: If you have 8GB of RAM, assign it 4GB. If you have 16, you can assign more, but you don’t have to. Mint runs pretty well, even on 4GB.
Click on Next when you are finished and select: Create a virtual hard disk now and click on Create. Leave it on the default VDI (VirtualBox Disk Image) and click Next. Leave it on Dynamically allocated and click Next. Dynamically allocated means that if you choose to give the VM 20 GB of space, but the size of your installation is only 6GB big, it will only eat up 6GB of your physical hard drive instead of the whole 20. But it will fill up to a maximum of 20GB.
On the final screen, click on the folder on the right to select a location where you want to save the VM file. The VM will be stored in a single file. Assign it 20GB for a good experience.

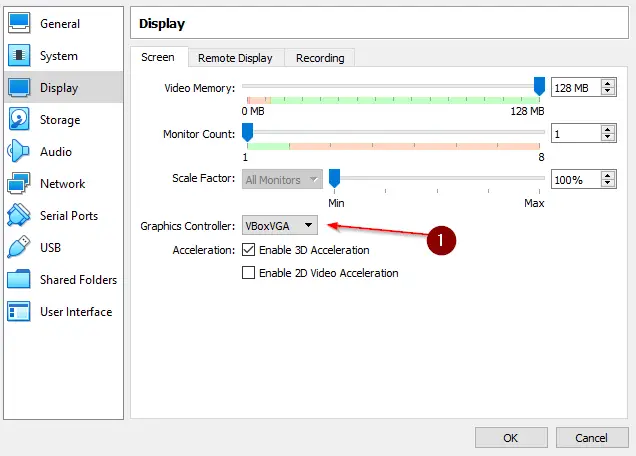
Next, right-click your VM, navigate to Display and make sure you choose VboxVGA for your Graphics Controller.
Perfect, you just created your first VM! Easy, wasn’t it? Next, we are going to install Linux Mint 19.
Step 3 – Install Linux Mint 19
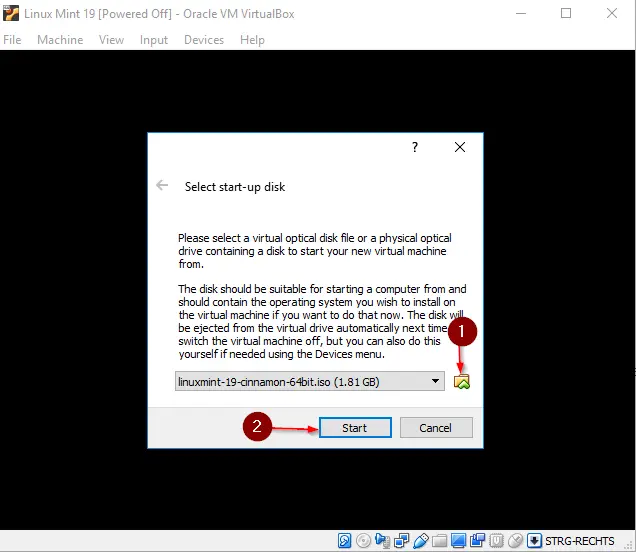
Alright, time for the fun part! Let’s start up your VM. Once you start it, it will ask you to provide an image file. That’s the Linux Mint 19 ISO file we downloaded earlier. Select your Linux Mint 19 VM and either click on Start from the navigation bar on the top or simply right-click the VM and hit Start -> Normal Start.
Now select the Linux Mint 19 ISO file from your Downloads folder.
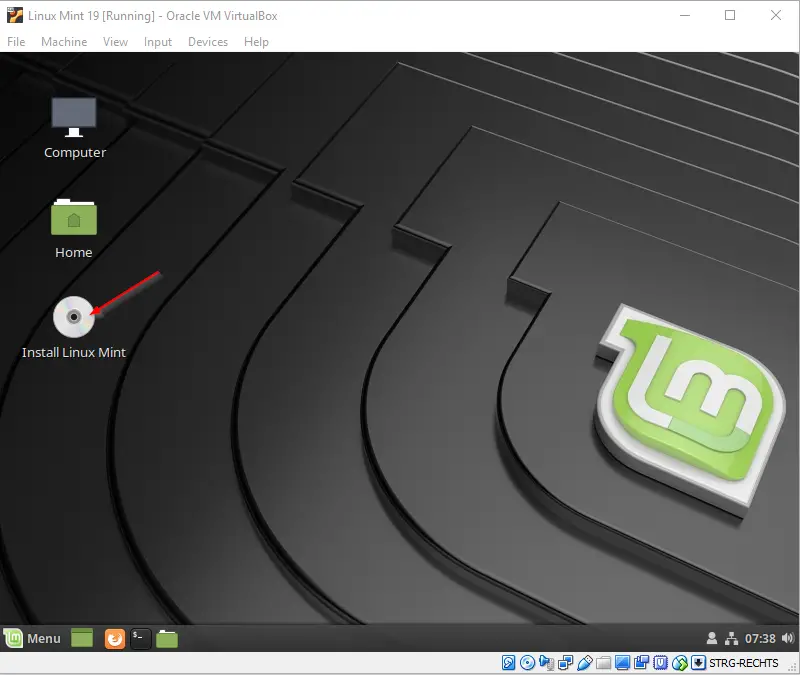
After you did this, Linux Mint 19 will boot into its live environment. Simply double-click Install Linux Mint on the Desktop.
This will bring up the installation menu. Now I won’t attach a screenshot for every step but I will guide you through in text form:
- Welcome Screen: Select your language and click Continue.
- Keyboard Layout: Select your preferred Keyboard layout and click Continue.
- Preparing to install Linux Mint: Leave the install third-party software box unticked. Click Continue.
- Installation type: Check Erase disk and install Linux Mint. Choose if you want to Encrypt your Hard Disk. Click Install Now.
- Write the changes to disks: Click Continue.
- Where are you: Select your Region to set the correct time zone.
- Who are you: Select a Username, a Computer Name, and a strong password. Click Continue.
Finally, the installer is running and installing Mint on your Virtual Hard Disk. Lean back and enjoy some cat pics, or check out some other Open Source Tutorials. When the installer is finished, click on Restart Now to reboot into your brand new Linux Mint 19 installation.
Press Enter in the remove the installation medium screen. VirtualBox automatically removes that for you.
Step 4 – Logging in
Now you can log in with your Username and Password that you set up earlier. You can play around with Mint now, even use the Internet, without having to install it on your physical computer. Great, isn’t it? You can go ahead and maximize the VirtualBox Window or even run Mint in Fullscreen mode to have a real Linux experience. Simply click on View -> Full-Screen Mode.
Wrapping up
I really like Linux Mint from a SysAdmin point of view. It’s the closest thing to Windows 10 that I know of, and really good for beginners who are interested in giving Linux a try.
If you are a Windows user and are trying Mint for the first time, let me know about your experience in the comments below!
Installation type: Check Erase disk and install Linux Mint. Choose if you want to Encrypt your Hard Disk. Click Install Now.
Is this going to erase everything or just for the 20GB I allowed by the Virtual mashine?
same doubt
Thank you for the very clear instructions.
Thank you for the very clear instructions above. Linux works great so far and doing a lot of the tutorials to get to know my way around
Yep! That happened. Thanks Rod. Appreciate you taking a few minutes out of your day to share such wisdom. PS Did I say I used to work for Oracle? Be well.
I saw your video on YouTube prior to finding this article. So, it’s nice to see you again. Unfortunately, I must confess that after a full two days (minimum) of genuinely and patiently trying to get a Mint 19.1 Tessa (xfce) version loading into a VirtualBox environment on my Mint 18.1 Serena (xfce) laptop, I’m seriously rethinking the whole thing. The VBox is still not fully done updating the Mint updates and I still don’t have a local WordPress Dev environment. Now, I also have to confess, this is my first time at attempting this. But, ouch!!! I’m going to boot up VBox once again to see if I can make any progress. I may even abort the whole thing and attempt one last time to complete it using cinammon (as you’re recommending) wish me luck and feel free to reach out 5uperchap (with an ‘s’) at gmail. Continued success.
Hey man. Thanks for leaving a comment!
Well, depending on the hardware, there are always quirks here and there with virtual environments (at least, so I found). On some of my machines all works flawless, on some of them I have nothing else than problems…
I wish you the best of luck!
Turn of HyperV
Ensure virtualization is turned on for your CPU in your BiOS
Thanks for the very helpful tutorial. I have one issue – when I install, I get a slightly different Display configuration window than you show – there is no “Graphics Controller” option on the window. I also discovered that video acceleration is apparently only supported by VirtualBox when you are running Windows in your VM, not Linux – and thus, when I run the Linux Mint VM, I get a message saying this: “Cinnamon is currently running without video hardware and, as a result, you may observe much higher than normal CPU usage”. Is there any way to get accelerated video?
Under Wrapping Up your first sentence is starts “I really like Windows Mint…”. It’s Linux Mint
God damn it, writing those late night articles really comes at a price 😀 Thank you for pointing that out! Changed!
Thanks. One thing. You might run into a wonky display when doing this. If you do. Hit Right Control and F2 and then f7 and back a forth maybe three times. That will resolve that issue.
From
https://forums.linuxmint.com/viewtopic.php?f=231&t=274389
Hey Rod, thanks for pointing that out!
its just not working, virtual box reports 1 cpu instead of 6and heaps of other bullshit like looking for 64bit despite the 64bit system is available, it goes on and on. classed as useless!
That sounds more of a Driver Problem on your System than a faulty tutorial.