
In this tutorial, I show you how to fix the Mount CIFS Permission Denied error on Linux.
Table of Contents
- Mount CIFS Permission Denied Error
- Step 1 – Installing CIFS Utils
- Step 2 – Creating a Mount Point
- Step 3 – Editing the fstab file
- Step 4 – Creating the .smbcredentials file
- Wrapping up
⚠️Related Articles
Part 1 – How to install WSL 2 with Windows Terminal – Complete Guide
Part 2 – Windows Terminal Customization for WSL 2
Part 3 – In-Depth Windows Terminal Customization for WSL2
Mount CIFS Permission Denied Error
The error occurs mostly because you don’t provide sufficient credential information, specifically which Domain you are in. Most Tutorials out there only mention username and password when editing the .smbcredentials file. But let me take you through the process from the beginning.
Step 1 – Installing CIFS Utils
To mount a CIFS share on Linux, we first need to install cifs-utils. Let’s get started with that.
sudo apt-get install cifs-utils -y
Code language: JavaScript (javascript)
It should probably be pre-installed in most distros anyway.
Step 2 – Creating a Mount Point
Next, we need to create the directory where we want to Mount our Share in. You can later find the Share in this Directory. For this example, we will mount the imaginary “Photos” share.
sudo mkdir /media/share/PhotosStep 3 – Editing the fstab file
That we don’t have to mount our Share again after each reboot, we have to edit the fstab file to make the Share mount automatically after each reboot. But first, we make a backup of this file in case something goes wrong.
sudo cp /etc/fstab /etc/fstab.oldThat done, we edit our fstab file.
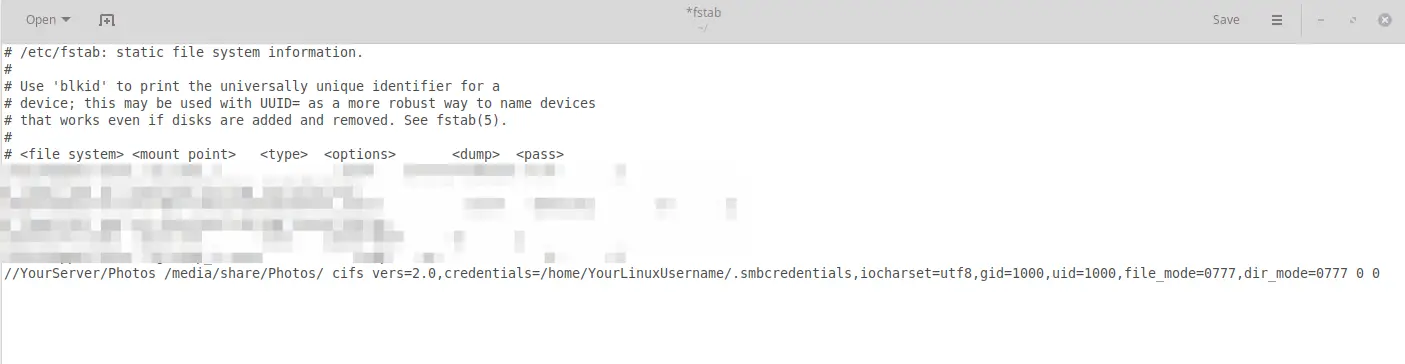
sudo gedit /etc/fstabAnd paste this line at the end of the file (all in one line)
//YourServer/Photos /media/share/Photos/ cifs vers=2.0,credentials=/home/YourLinuxUsername/.smbcredentials,iocharset=utf8,gid=1000,uid=1000,file_mode=0777,dir_mode=0777 0 0Code language: JSON / JSON with Comments (json)Of course, adjust accordingly to your own Server and YourLinuxUsername! We will create the .smbcredentials file next.
By default, you will have the gid=1000 and uid=1000. That’s your Group & User ID, but to make sure that those values are the same in your system, double-check it by typing:
id
If all is correct, hit CTRL+S to Save the fstab file and close it.
Step 4 – Creating the .smbcredentials file
We could enter our username directly into our fstab file, but that would not be safe as someone could clearly read our Username and Password in this unencrypted file. Therefore, we are going to create a separate file containing this information.
sudo gedit .smbcredentials
Code language: CSS (css)
And here is the key point to fixing the Mount CIFS Permission Denied error. Most guides simply state to enter Username and Password into this file, but you also have to enter your Domain!
So paste this into your .smbcredentials file:
username=yourusername
password=yourpassword
domain=yourdomain
Save & Close the file.
Now we just make the .smbcredentials file so that only the root user can read its contents.
sudo chmod 600 ~/.smbcredentialsStep 5 – Mounting the Share
Now when everything is done, try to mount the share by typing
sudo mount -aAnd your share should now be successfully mounted! If there are still some errors, try rebooting your system and see again if the Share was mounted. The share should be located in your media/share/Photos folder.
Wrapping up
It took me a while to figure out this error. I use a Synology NAS and had to set vers=2.0 in the fstab file. If you still encounter problems, try changing vers to 1.0 or 3.0. Let me know in the comments below if this solution worked for you!
mount.cifs: permission denied: no match for /home/pi/video found in /etc/fstab
//192.168.50.150/Downloads /home/pi/video/ cifs vers=2.0,credentials=/home/pi/.smbcredentials,iocharset=utf8,gid=1000,uid=1000,file_mode=0777,dir_mode=0777 0 0
why does this not work?
Thanks so much for this Stefan, it was the clearest article I could find!
Unfortunately I cannot get it to work on boot – strangely it mounts absolutely fine using
sudo mount -a otherwise I get a mount.cifs permission denied error. Have you ever seen this?
Thanks Luca for your great work, your guide is the best ever and it works on my Debian Bookworm+KDE connected to the directory hosted on our Windows 2019 server with AD DC!
I have just one issue, I have a share on the Windows server with a space something like IT Office, I’m in the IT crew so I could solve it to rename it without space (LOL!) but I remember in Windows years and years ago with W95 I used the “%” to manage space in MS environment but I don’t remember how could I solve from linux side!
Gabriele
Hello.
Thanks for this tuto !
I try to mount an old rnd2000 V1 on my raspberry.
I get mount error(13): Permission denied when I use sbmcredetials:
mount.cifs kernel mount options: ip=192.168.0.10,unc=\\192.168.0.10\Photos,iocharset=utf8,vers=1.0,sec=ntlmv2,uid=1000,gid=100,user=root,domain=WORKGROUP,pass=********
mount error(13): Permission denied
I’m not sure for the domain name…
But when I use -o user=yann, and enter my password at the prompt it works fine.
(Connecting the NAS with ssh as root is ok).
Has any body got an idea?
Finely smbcredentials works with admin user.
So it’s OK now.
Worked great, thanks for figuring this out, it was the domain name that I was missing too.
Great tutorial. I am new to Linux and while this works great when running the “sudo mount -a” command. Every time I reboot Ubuntu, it loses the mount and does not automatically mount. Any suggestions?
Stefan, great tutorial. I followed it closely as prescribed… and then modified fstab as follows to have “receiving” folders under user “Pi”. Either way, still get “mount.cifs permission denied”! Is access denial my Buffalo 4TB NAS (with SMB turned ON) or the Pi 3 on LAN?
My fstab: //192.168.0.100/LS210xxnn/pub_music /home/pi/myNAS/pub_music cifs vers=2.0,credentials=/home/pi/.smbcredentials,iocharset=utf8,gid=1000,uid=1000,file_mode=0777,dir_mode=0777 0 0
Plan to add to fstab for pub_photos, pub_video, once “pub_music” working!
Should fstab have Buffalo’s LS210xxnn name as well as its domain and the desired share?
Thanks for help!
P.S. For the NAS, using logonid=guest; password= (written this way representing “blank”; in Lenix should password=” ” instead?
Thank you Sir you are an absolute HERO!
Aww thanks!
thank you for your help. I got my share drive mounted. now, what if I have more than one share drive on the same domain?
When I try to mount with sudo mount I get the error:
mount error(13): Permission denied
It is evident that you lie!!!
According to the other comments, it would almost appear you do something wrong. But since it is almost evident that I lie, I am not going to help you :p
Great article, I’m able to successfully create the mount and see files in the share, however; I am unable to create or write to the directory. Is there something else not included in the article which I need to configure?
Thank you very much. this was solved my issue “mount error(13): permission denied” while running mount.cifs.
Good start/thinking about writing this. However 2 things: 1. when editing .smbcredidentials you should specify that it’s under ~ and 2. when mounting it asks for a root password. So even though your tutorial is nice it doesn’t work.
Hi I am new to Ubuntu how do I find what mydomain is? Thanks
try domain=WORKGROUP